
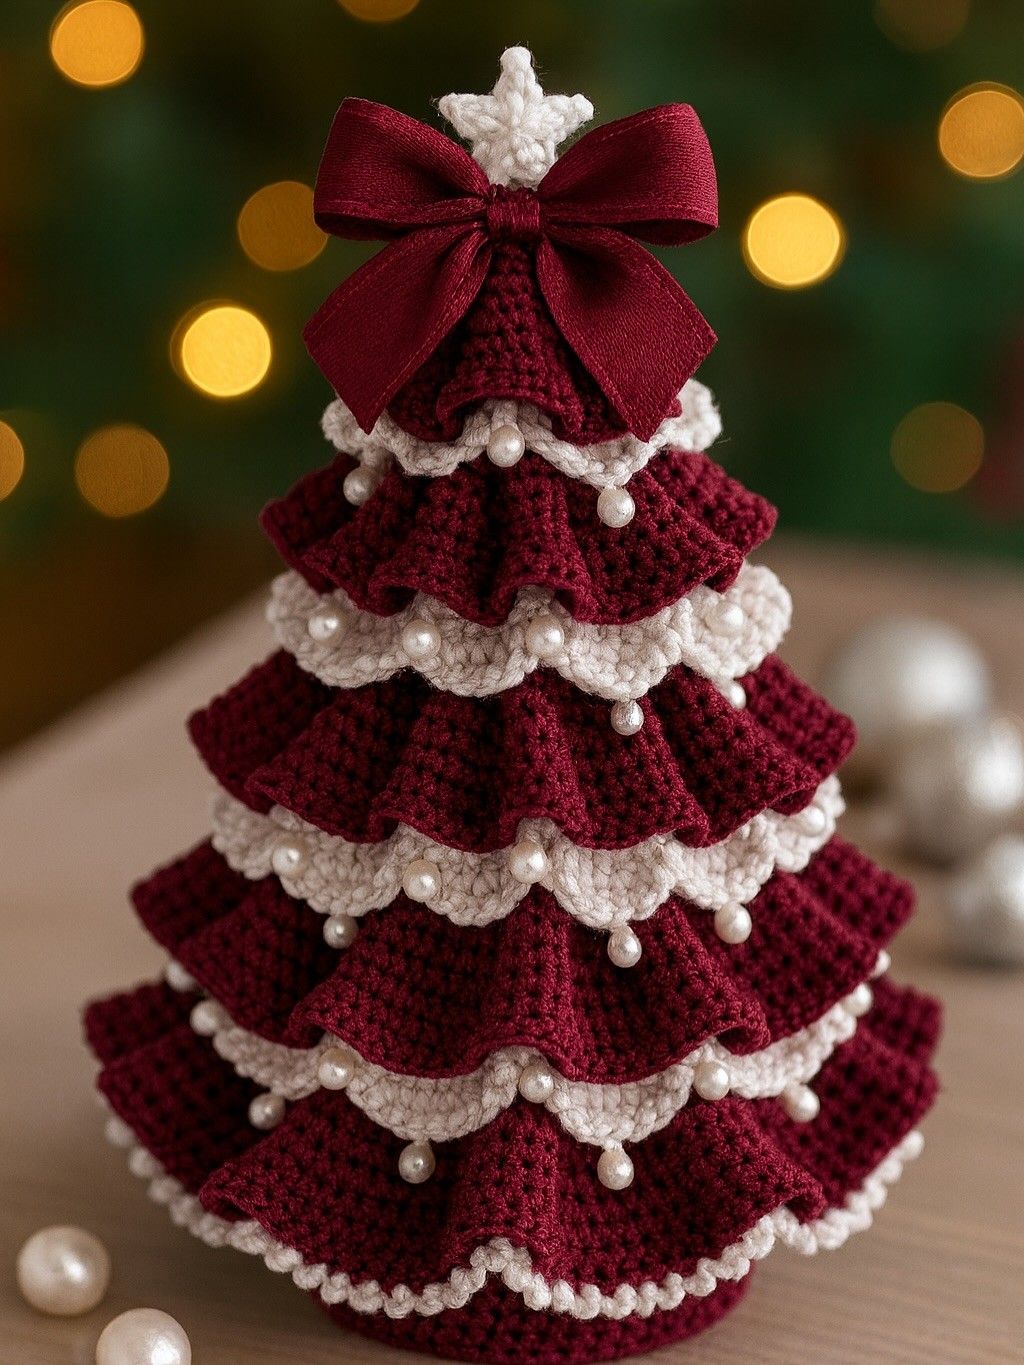
Crochet Christmas Tree Pattern is a charming holiday project that combines traditional Christmas colors, textured crochet stitches, elegant ruffles, and decorative details in one beautiful handmade piece. Inspired by the layered tree shown in the reference image, this design uses deep burgundy or Christmas red for the main branches, creamy white edging, pearl-style embellishments, a decorative bow, and a small star at the top. The finished tree works wonderfully as tabletop Christmas crochet decor, a handmade centerpiece, or a thoughtful seasonal gift. Although the finished piece looks detailed and sophisticated, the construction becomes much easier when you think of it as a series of individual crocheted tiers that gradually decrease in size toward the top.
One of the most appealing features of this crochet Christmas tree is the dramatic layered silhouette. Instead of creating flat triangular branches, each level is worked with increases that encourage the fabric to flare outward. This creates the soft, ruffled appearance associated with the tree in the photo. Contrasting white crochet edging between the burgundy layers helps define every tier and gives the project a snowy Christmas appearance. Small pearl-like decorations can then be attached along the scalloped edges to imitate ornaments. Because embellishments can become detached, use securely sewn decorations for display pieces and omit small beads or pearls if the finished item could be handled by young children or pets.
This Crochet Christmas Tree Pattern can also be customized without changing the basic construction method. Classic Christmas red and white create a festive result, while forest green and cream produce a more traditional evergreen look. Gold, champagne, silver, dusty rose, or even an all-white palette can give the same pattern an elegant contemporary style. The project is best suited to an adventurous beginner or intermediate crocheter who already understands basic U.S. crochet terms, including chain, single crochet, half double crochet, double crochet, slip stitch, increases, and working in joined rounds. Once these fundamental techniques are comfortable, the repeating tiers make the project relaxing and surprisingly approachable.
Materials, Crochet Abbreviations, and Preparing the Tree Base
For this Crochet Christmas Tree Pattern, choose a medium-weight yarn that holds its shape well. A worsted weight yarn (Category 4) is a practical option for a sturdy tabletop decoration. Approximately 250–400 yards (229–366 m) of burgundy or red yarn and 75–150 yards (69–137 m) of cream or white yarn should be enough for many medium-sized versions, although the exact amount depends on your gauge and desired tree size. A 4.0 mm to 5.0 mm crochet hook is a useful starting range.
You will also need scissors, a yarn needle, stitch markers, polyester fiberfill if you want a stuffed structure, and optional decorative materials. A satin ribbon can create the oversized bow shown near the top of the reference design. Pearl-style beads can recreate the ornaments, while the topper can be crocheted from white, cream, gold, or metallic-effect yarn. Select embellishments according to how the finished tree will be displayed.
The main abbreviations used throughout the pattern are ch = chain, sl st = slip stitch, sc = single crochet, hdc = half double crochet, dc = double crochet, inc = increase, st = stitch, and sts = stitches. An increase means working two stitches into the same stitch unless another instruction is provided. These instructions use standard U.S. crochet terminology.
Begin with the internal tree structure. Round 1: Make a magic ring, ch 1, and work 6 sc into the ring. Pull the ring closed and join with a sl st. Round 2: Ch 1, work 2 sc into every stitch around, and join. You now have 12 sts. Round 3: Ch 1, sc in the next st, 2 sc in the next st; repeat around and join. You should have 18 sts.
Continue increasing evenly. Round 4: Ch 1, sc in the next 2 sts, 2 sc in the next st; repeat around. Round 5: Work sc in the next 3 sts, 2 sc in the next st around. Additional rounds can follow the same mathematical progression, adding one more regular sc between increases each round. This produces a gradually expanding cone rather than an abrupt flat circle.
For a tree approximately 12–16 inches (30–41 cm) tall, continue building the cone until it has the desired height and lower circumference. Gauge is not critical because this is decorative rather than wearable, but consistency matters. Keep your stitches firm enough that stuffing will not show through. If the cone begins expanding too quickly, work one round without increases before continuing.
How to Crochet the Layered Christmas Tree Branches
The distinctive feature of this crochet tree pattern is its collection of flared branches. One effective method is to crochet the underlying cone first and then attach individual ruffled rounds to selected rows. This provides stability while allowing the branches to project outward. Mark approximately five or six evenly spaced levels from the bottom to the top before beginning the decorative tiers.
For the lowest branch, join the burgundy yarn around the lower portion of the cone. Branch Round 1: Ch 2 and work 1 hdc into each available stitch around. Join with a sl st. Branch Round 2: Ch 2, then work 1 hdc in the next st, 2 hdc in the next st around. This substantial increase begins creating the flare.
Branch Round 3: Ch 2 and work 1 hdc in each of the next 2 sts, 2 hdc in the next st around. Join. Branch Round 4: Ch 3, then work 1 dc in every stitch around. For an even more pronounced ruffle, occasionally work 2 dc into one stitch. The additional stitches make the circumference larger than the supporting cone, naturally causing the fabric to ripple.
Create the final branch edge with slightly taller stitches. Branch Round 5: Ch 3, dc in the next 3 sts, 2 dc in the next st; repeat around. Join and fasten off. The edge should curve outward rather than hanging completely flat. If your yarn is particularly soft, you can make the branch slightly firmer by using a hook 0.5 mm smaller than the hook used for the main cone.
Move upward and repeat this basic process for the remaining tiers. Each crochet Christmas tree branch should become progressively smaller. For example, the lowest tier might contain five decorative rounds, the next four or five, and the upper branches three or four. The goal is not to make every tier identical but to preserve the recognizable Christmas tree silhouette.
The top tiers need less dramatic increases because they naturally have a smaller circumference. Too many increases near the top can make them look more like circular skirts than branches. Work approximately one increase every 3–5 stitches and evaluate the shape after each round. Crochet patterns are easily adjustable, so allow the fabric itself to guide minor modifications.
Adding the White Scalloped Edging, Pearls, Bow, and Star
The contrasting trim is what transforms the basic structure into an elegant Christmas crochet decoration. Join cream or white yarn to the lower edge of one burgundy branch. Edging Round: Ch 1, sc in the first stitch, skip 1 stitch, work 5 dc into the next stitch, skip 1 stitch, sc into the next stitch. Repeat this sequence around the branch.
This combination of five double crochets creates a simple crochet shell stitch. Each shell forms a rounded white scallop resembling snow resting along the branches. If the stitch count does not divide perfectly, adjust the final repeat by skipping zero or two stitches rather than forcing the fabric. The most important objective is an evenly distributed decorative edge.
Repeat the white scalloped trim beneath each burgundy tier. Maintain similar spacing so the finished tree looks balanced from every angle. You can use four dc instead of five for smaller upper branches. Near the top, three or four dc per shell may produce a cleaner proportion. This gradual reduction mirrors the decreasing scale of the tree itself.
Pearl-style embellishments can be sewn near the lowest point of selected scallops. Thread a strong sewing or yarn needle with matching thread and pass through each decoration several times before knotting securely. Space the pearls rather than covering every scallop. This gives the crochet Christmas tree ornament pattern a sophisticated appearance without overwhelming the stitch texture.
For the large bow, cut a generous length of satin ribbon and form two symmetrical loops with two tails. Secure the center tightly using matching thread or a narrow piece of ribbon. Sew the bow firmly near the upper portion of the tree rather than relying only on glue. Burgundy creates the coordinated appearance shown in the inspiration image, while gold, cream, red, or velvet ribbon can completely change the personality of the finished project.
Finish the topper with a small crochet star. Make a magic ring and work 10 sc into it. Join. For each point, ch 4, sl st in the second ch from the hook, sc in the next ch, hdc in the final ch, skip one stitch on the center circle, sl st into the next stitch. Repeat until five points have been formed. Fasten off, weave in the ends, shape the star, and sew it securely to the top.
Assembly, Shaping, Finishing, and Customizing the Crochet Christmas Tree Pattern
Before completing the project, inspect the entire Crochet Christmas Tree Pattern from several angles. Arrange the tiers so the ruffles fall naturally and the white scallops remain visible. If the cone is stuffed, add small amounts of fiberfill at a time rather than pushing in a large handful. Overstuffing can stretch the stitches and distort the triangular shape.
The bottom can be closed with a crocheted circle. Start with 6 sc in a magic ring, increase to 12 stitches on the next round, then continue adding six evenly spaced increases per round until the circle matches the opening at the base of the tree. Leave a long yarn tail and sew the circle to the bottom using a whip stitch or mattress-style seam.
If you prefer a firmer tabletop crochet Christmas decoration, insert a lightweight craft cone or other suitable internal support before closing the bottom. The support should fit comfortably without forcing the crochet fabric outward. A flat base is especially helpful when the tree includes heavier embellishments such as beads, large ribbons, or a substantial topper.
Once assembled, gently shape every branch by hand. Pull the points and ruffles outward, then arrange the scalloped white sections so they remain visible beneath the burgundy layers. Light blocking can help define stubborn sections. Always follow the care recommendations for your yarn fiber, particularly when using acrylic or synthetic yarn that may react differently to heat.
Color customization is one of the easiest ways to make this Crochet Christmas Tree Pattern unique. Forest green with white edging creates a classic snowy tree. Burgundy and cream feel elegant and vintage. White with gold accents can suit neutral Christmas interiors, while red and white offer a cheerful candy-inspired appearance. Scraps can even be used to create multicolored ornaments between the branches.
The finished size can also be changed easily. For a miniature ornament, use lightweight yarn, a smaller hook, fewer cone rounds, and only three branch tiers. For a large centerpiece, use thicker yarn and create six or seven tiers. Instead of focusing on an exact stitch count for every possible size, maintain the central principle: a stable cone combined with increasingly wider ruffled sections toward the bottom.
FAQ About the Crochet Christmas Tree Pattern
Is this Crochet Christmas Tree Pattern suitable for beginners?
An adventurous beginner can complete it if they already understand single crochet, half double crochet, double crochet, slip stitch, increases, and working in rounds. The individual techniques are relatively simple; most of the visual complexity comes from layering them.
What yarn is best for a crochet Christmas tree?
Medium-weight worsted yarn is an excellent option because it provides enough structure for the branches while remaining easy to crochet. Cotton blends can give crisp stitch definition, while acrylic is widely available and offers many holiday colors.
How much yarn will I need?
A medium tabletop tree may require approximately 250–400 yards (229–366 m) of the main color and 75–150 yards (69–137 m) of the contrasting color. These amounts are estimates because yarn weight, gauge, hook size, number of tiers, and finished dimensions can significantly affect yardage.
How do I make the branches more ruffled?
Add more increases during the outer branch rounds. When the outer circumference contains significantly more stitches than the attachment area, the crochet naturally forms waves. Avoid excessive increases all at once, however, because they can cause the branches to twist unpredictably.
Can I make the tree without beads or pearls?
Absolutely. The pearl ornaments are decorative and completely optional. You can leave the scallops undecorated, embroider small French knots, attach crocheted bobbles, or use contrasting yarn details instead.
How can I make the tree stand upright?
Use firm tension when crocheting the cone and avoid overstuffing it. A flat crocheted bottom helps stabilize the project. For display-only versions, an appropriate lightweight internal support can also help preserve the cone shape.
Can I use green instead of burgundy?
Yes. Green is an excellent choice for a traditional crochet Christmas tree. Deep forest green with cream edging looks classic, while emerald green with gold details creates a brighter festive appearance.
What does “sc” mean in this pattern?
Sc means single crochet in U.S. crochet terminology. Insert the hook into the stitch, yarn over and pull up a loop, yarn over again, and pull through both loops on the hook.
What does “dc” mean?
Dc means double crochet in U.S. terminology. Yarn over, insert the hook into the stitch, yarn over and pull up a loop, yarn over and pull through two loops, then yarn over and pull through the remaining two loops.
What is an increase in crochet?
A crochet increase means adding stitches to make the fabric wider. In this project, a basic increase usually means working two stitches into the same stitch. The increases are especially important because they create both the cone shape and the dramatic ruffled branches.
How many tiers should a crochet Christmas tree have?
Five or six tiers create a full tabletop tree similar to the reference design. A miniature tree can have three or four, while a larger decorative tree can have six or seven. Keep the upper tiers smaller and gradually increase their size toward the base.
Can the Crochet Christmas Tree Pattern be made without stuffing?
Yes. You can create a hollow decorative tree if the stitches and yarn provide enough structure. For a softer freestanding version, polyester fiberfill helps maintain the shape. Another option is placing the crochet shell over an appropriately sized craft form.
How do I keep the white scallops even?
Count the stitches before beginning the shell stitch edging and place stitch markers at regular intervals. Small adjustments between shells are often less noticeable than trying to force a repeat into an incompatible stitch count.
Can this pattern be used as a Christmas gift?
Yes. Handmade crochet trees can make attractive seasonal gifts, especially when the recipient’s favorite colors are incorporated. A personalized ribbon or carefully selected color combination can make each finished tree distinctive.
How should I store the finished tree after Christmas?
Remove any detachable accessories and store the tree in a clean, dry container. Avoid placing heavy decorations directly on top of the crocheted branches. If the ruffles become compressed during storage, reshape them gently before displaying the tree again.
Conclusion
This Crochet Christmas Tree Pattern combines a simple crocheted cone with layered ruffled branches, contrasting shell stitch edging, decorative pearls, a large festive bow, and a small crochet star to create an impressive handmade Christmas decoration. The project begins with basic increases to establish the structure, followed by progressively sized branch tiers that produce the characteristic Christmas tree silhouette.
Throughout the pattern, you learned how to work the foundation in joined rounds, create controlled increases, form dramatic ruffled branches, crochet snowy white scallops, assemble the base, shape the finished piece, and add optional decorative elements. These techniques can also be adapted to smaller ornaments, larger tabletop trees, and many different holiday color combinations.The most enjoyable part of this crochet Christmas tree project is making it your own. Burgundy and cream create an elegant look similar to the inspiration, but traditional green, bright red, snowy white, gold, silver, or personalized colors can produce an entirely different result. You can also simplify the decorations or add more handmade crochet details according to your experience level.