
Padded Chicken Pot Holder Pattern is a charming sewing project that combines practical kitchen protection with the warmth and personality of handmade fabric décor. Shaped like a cheerful chicken, this padded holder can bring color to a kitchen while also providing a useful place to protect your hands when handling warm cookware. The design shown in the reference image uses a rounded chicken body, a contrasting padded wing, a dimensional tail, a small beak, and a decorative comb. These individual elements make the project look detailed, yet each component can be constructed from relatively simple fabric shapes.
One of the advantages of making a Padded Chicken Pot Holder Pattern is the opportunity to use several coordinating cotton prints in the same project. A soft floral print can form the chicken body, while stronger contrasting colors can highlight the wing, tail, comb, and beak. Because many of the pieces are fairly small, the project can also be suitable for using leftover quilting cotton from previous sewing projects. The finished result can be decorative enough to display near the kitchen while still being constructed with functional padding intended for kitchen sewing projects.
This tutorial explains how to recreate the general appearance of the chicken shown in the reference photo, from preparing the pattern pieces to assembling the padded body and finishing the decorative details. Exact dimensions can be adjusted according to the size you prefer, but a finished chicken approximately 15–16 inches (38–41 cm) tall and about 18–20 inches (46–51 cm) across the widest portions creates a substantial project similar in proportion to the pictured design. When the holder is intended for contact with hot cookware, material selection is especially important: choose padding specifically rated for heat-resistant kitchen projects and follow the batting manufacturer’s instructions regarding layering, temperature limits, and safe use.
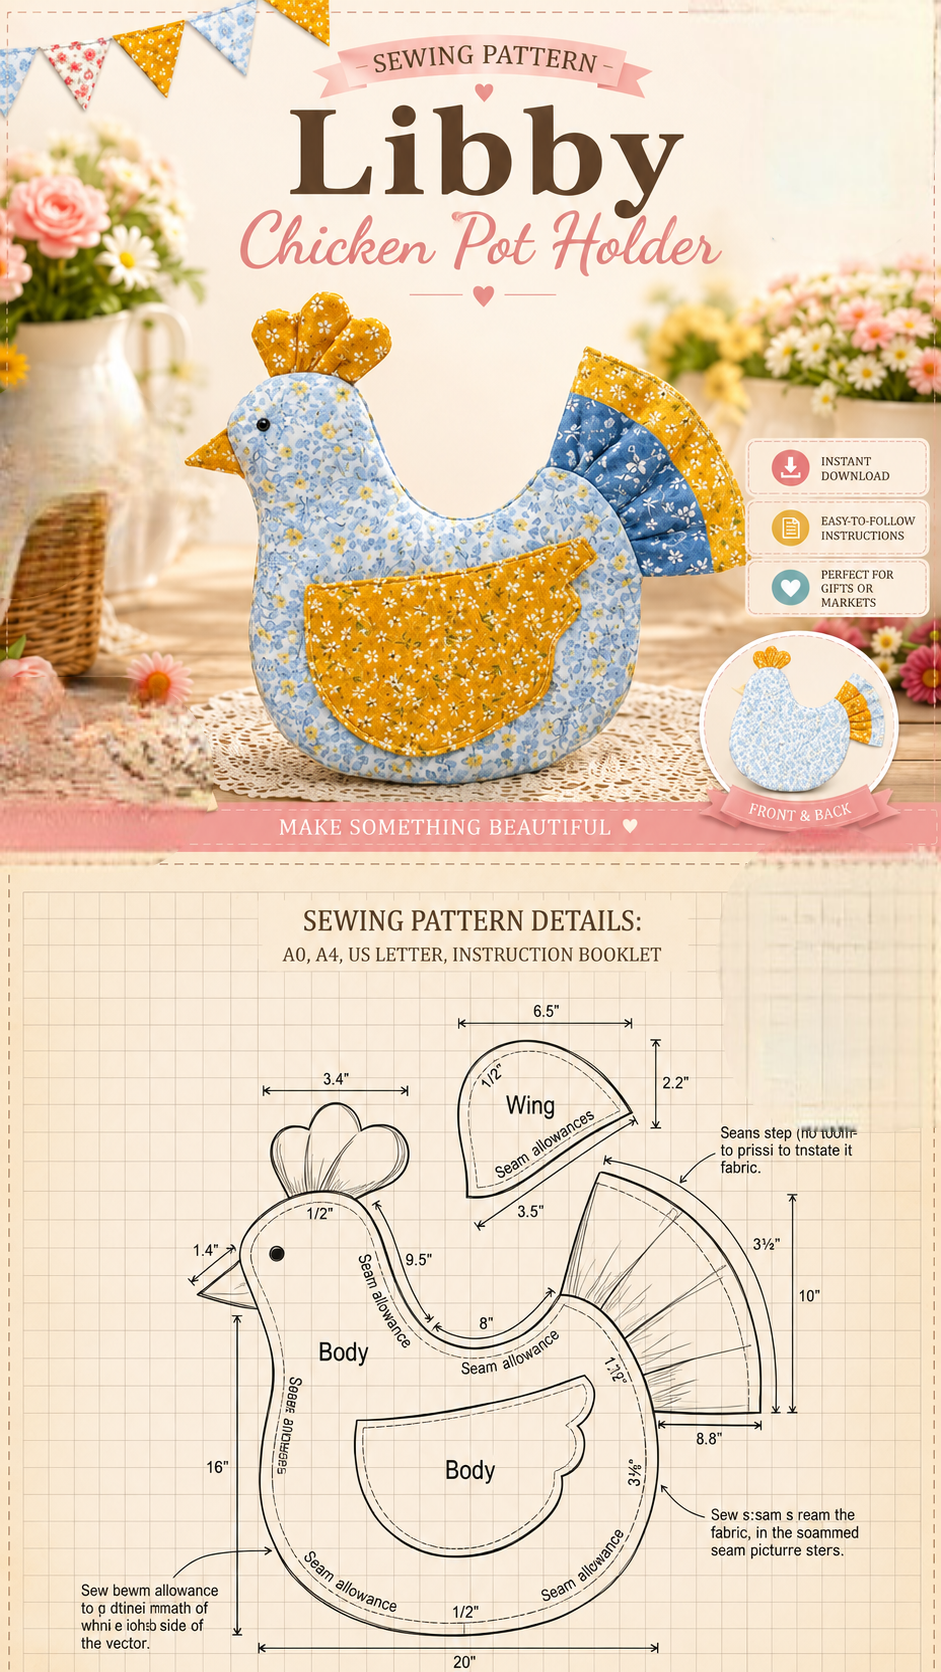
Materials and Pattern Pieces for the Padded Chicken Pot Holder Pattern
Start your Padded Chicken Pot Holder Pattern with good-quality woven cotton fabric. Quilting cotton works especially well because it is easy to cut, press, quilt, and sew. For a design inspired by the photograph, select one light floral print for the main body, one warm contrasting print for the wing and accents, and another complementary print for the tail. Approximately 1/2 yard (46 cm) of main fabric and several fat-quarter-sized pieces for contrasting areas should be more than enough for most versions.
For the padding, use a product designed specifically for potholders, oven mitts, or similar heat-resistant sewing applications. Depending on the manufacturer’s directions, the project may require one or more layers. Ordinary polyester craft batting should not automatically be treated as heat protection. Read the product instructions carefully, particularly if the finished chicken will be used around hot pans rather than purely as decoration.
The main body is the largest pattern piece. Draw a rounded chicken silhouette approximately 16 inches (40.6 cm) tall and up to about 20 inches (50.8 cm) from the chest area toward the tail when all decorative portions are considered. Shape a rounded belly at the bottom, curve upward into the back, create a U-shaped transition between the head and back, and then round the head toward the chest. Add approximately 1/2 inch (1.3 cm) seam allowance if it is not already incorporated into your template.
Create a separate wing template measuring roughly 6 1/2 inches (16.5 cm) across and around 3 1/2 inches (8.9 cm) at its deepest point. A rounded half-moon or softly curved fan shape works beautifully. Cut two fabric pieces for the wing if you want it completely finished on both sides, along with an appropriately sized piece of thin batting. The wing should be large enough to become an obvious decorative feature without covering most of the chicken body.
Next, prepare the smaller pieces. The beak can be a simple triangular shape around 1 1/2 inches (3.8 cm) long. The comb can be approximately 3–3 1/2 inches (7.6–8.9 cm) wide and divided into three rounded lobes. The tail can be drafted as a fan approximately 8–10 inches (20–25 cm) tall, depending on the size of the body. These measurements are flexible because the visual proportions matter more than an exact number.
You will also need coordinating thread, fabric scissors or a rotary cutter, pins or sewing clips, a fabric marking tool, ruler, sewing machine, iron, and a suitable eye detail. If the item will be decorative, a securely attached button can create the eye seen in the reference design. For a frequently handled kitchen item, a small embroidered eye is often a simpler option because it avoids a raised hard component.
Cutting, Quilting, and Preparing the Individual Chicken Pieces
Before cutting your Padded Chicken Pot Holder Pattern, wash and press cotton fabrics if you normally prewash quilting material. Prewashing can help reduce unexpected shrinkage later. Press each piece flat without stretching it, then place the templates according to the grain of the fabric. Mark all alignment points, particularly the locations where the comb, beak, and tail will be inserted into the main body seam.
Cut two mirrored main body pieces from the primary fabric. Cut the required heat-resistant padding according to the manufacturer’s recommendations. If you want additional quilting layers, make certain they are appropriate for the intended use and do not create excessive bulk around the seams. Keep the padding smooth and evenly distributed so that the finished chicken pot holder does not develop thick lumps.
Prepare the wing separately. Layer the wing fabrics right sides together with the batting positioned as appropriate for your chosen construction method. Stitch around the curved edges while leaving an opening for turning. Clip the curved seam allowance carefully, turn the wing right side out, and press it into shape. Close the opening with topstitching or a neat hand stitch.
To reproduce the quilted appearance visible in the photograph, add several curved quilting lines across the wing. Begin near the lower center and fan the stitching outward toward the curved upper edge. The lines do not need to be perfectly identical. Gentle variations actually reinforce the handmade appearance. Maintain consistent stitch length and smooth curves for a polished result.
The tail can be made as a dimensional fan. Cut two matching fan-shaped pieces and add light padding if desired. Sew them together, turn them right side out, and quilt several lines radiating outward from the narrow base. For additional visual interest, use a contrasting fabric strip or binding around the outer curve. In the pictured style, combining blue and golden floral fabrics creates clear separation between the body and tail.
Finally, construct the comb and beak. Sew matching comb pieces right sides together around the lobes, clip the curves, turn, and lightly press. Repeat the process for the triangular beak. Avoid overstuffing these elements because excessive thickness makes them difficult to sew into the body seam. A little batting can provide dimension while allowing the pieces to remain flexible.
Step-by-Step Assembly of the Chicken Pot Holder
Begin assembling the Padded Chicken Pot Holder Pattern by positioning the completed wing on the right side of one body panel. The wing should sit across the lower-middle section of the chicken, similar to a natural folded wing. Pin or clip it carefully, then topstitch around the outer curved edge. Leave the upper portion positioned according to your chosen design so the wing retains its dimensional appearance.
Next, baste the comb to the top of the chicken’s head. The raw edge of the comb should align with the raw edge of the body while the decorative lobes point inward toward the center of the chicken. This may initially look backward, but once the body is turned right side out, the comb will extend correctly from the top of the head. Use the same method for the beak.
Position the tail at the back of the body. The finished fan should point inward while its raw base aligns with the body edge. Because this section can become thick, secure it with clips rather than forcing numerous pins through several padded layers. Baste across the tail base before joining the main body pieces. Basting prevents the tail from shifting while you sew the final seam.
Place the second main body piece over the first with right sides facing. Confirm that the comb, beak, and tail are safely tucked inside and away from unintended stitching lines. Add the heat-resistant padding layers according to the construction method recommended for the specific material you are using. Clip around the perimeter, keeping every layer aligned.
Sew around the body with approximately a 1/2-inch (1.3 cm) seam allowance, leaving a generous opening along a relatively straight section near the lower body. Stitch slowly around the neck and tighter curves. Clip inward curves and notch or trim outward curves carefully without cutting through the stitching. Reducing excess bulk at these locations will help the chicken maintain a smooth outline after turning.
Turn the entire chicken right side out through the opening. Gently work out the curves using a blunt turning tool rather than something sharp that could pierce the fabric. Arrange the comb, beak, and tail, then smooth the padding. Fold the opening edges inward and close them securely. Finish by adding the eye and any desired topstitching or quilting lines.
Finishing, Safety, Care, and Creative Variations
Once the basic Padded Chicken Pot Holder Pattern has been assembled, inspect the complete perimeter. Look for loose stitching, openings, or places where the seam allowance may not have been caught properly. Reinforce vulnerable areas, especially around the tail and comb, because these projecting components are more likely to be pulled during handling.
If you want additional quilting, stitch gentle lines through the main body while avoiding unnecessary compression of specialized insulating layers. Quilting can stabilize the fabric and produce the softly padded look visible in the reference photograph. Follow the spacing recommendations provided by the batting manufacturer, because some batting products specify maximum distances between quilting lines.
Color selection can completely transform this project. Traditional farmhouse versions work well in red, cream, navy, mustard, or small floral prints. A modern chicken can combine black and white fabric with a bright accent color. Spring versions can feature pastel florals, while autumn versions can use rust, gold, olive, and brown. The Padded Chicken Pot Holder Pattern is especially attractive when the wing and tail contrast clearly with the main body.
Scrap fabrics can also be incorporated into the tail. Instead of making the fan from one print, piece together several narrow fabric wedges before cutting the final tail shape. This technique creates a patchwork appearance and makes the project a useful way to repurpose attractive cotton scraps. Keep the fabric weights reasonably similar so that the tail remains balanced.
For cleaning, follow the care directions for every material used in the project, especially insulating batting. Cotton exterior fabric may be washable, but specialized insulating products can have their own care requirements. Allow the holder to dry completely before storing it. Stop using it for handling hot cookware if the fabric becomes scorched, badly worn, torn, or if the insulating layer becomes exposed.
Most importantly, remember that a handmade potholder is only as heat resistant as the materials inside it. Decorative batting alone does not guarantee protection from hot cookware, and no fabric potholder should be used when damp because moisture can transfer heat rapidly. For practical kitchen use, choose materials explicitly intended for this purpose and observe their temperature and layering instructions.
Frequently Asked Questions About the Padded Chicken Pot Holder Pattern
What fabric is best for a Padded Chicken Pot Holder Pattern?
Quilting-quality cotton is an excellent choice for the exterior because it is easy to sew, widely available, and offered in countless prints. Cotton also works beautifully for the small decorative pieces. Avoid choosing exterior fabrics simply because they look attractive; the complete material combination should be appropriate for the project’s intended kitchen use.
What type of batting should I use?
Use insulating or heat-resistant batting specifically manufactured for potholders, oven mitts, and comparable kitchen projects. Follow the manufacturer’s instructions regarding the number of layers and whether additional cotton batting is recommended. Do not assume that standard craft batting offers equivalent thermal protection.
How large should the finished chicken be?
A practical decorative version can measure approximately 15–16 inches (38–41 cm) tall, with the complete silhouette reaching roughly 18–20 inches (46–51 cm) across depending on the tail. You can resize the Padded Chicken Pot Holder Pattern, but remember to scale the wing, comb, beak, and tail proportionally.
Can beginners sew this project?
Yes. A confident beginner who understands basic straight and curved seams can attempt this project. The most challenging areas are the neck curve, attaching the dimensional tail, and managing multiple padded layers. Sewing slowly and basting small components before final assembly makes these sections considerably easier.
How much seam allowance should I use?
A 1/2-inch (1.3 cm) seam allowance works well for a project of this size. If you prefer 3/8 inch (1 cm), that can also work as long as you remain consistent. The important point is knowing whether your paper template already includes the seam allowance before cutting the fabric.
How do I make the wing look padded?
Place a thin batting layer between the two wing fabrics and add curved quilting lines after turning the wing. Radiating stitches create the fan-like texture visible in the reference project. Avoid making the wing excessively thick, since it still needs to attach neatly to the body.
Can I make the tail with several fabrics?
Absolutely. The tail is one of the best areas for experimenting with color. Piece several cotton prints together before cutting the final fan shape, or divide the tail into individual wedge-shaped sections. Contrasting binding along the outside curve can make the colors stand out even more.
Should I use a button for the chicken’s eye?
A button creates an appealing decorative eye, particularly if the chicken will mainly be displayed. An embroidered eye is another good option and eliminates a raised component. Whichever method you choose, make sure the eye is securely finished.
Why does my chicken look uneven after turning?
Uneven curves usually result from bulky seam allowances or insufficient clipping around curved sections. Carefully trim excess material, clip concave curves, and notch convex areas before turning. Do not cut into the seam itself. After turning, gently shape the perimeter with a blunt tool.
Can this pattern be made only as kitchen decoration?
Yes. You can create a purely decorative chicken for a farmhouse kitchen, sewing room, craft display, or handmade gift. If the project will not handle hot cookware, it does not need to function as thermal protection. However, it should be clearly treated as decoration rather than a functional potholder.
Can I make matching chickens in different sizes?
Yes. Once you have created the main template, enlarge or reduce all pattern components by the same percentage. A collection of coordinated chickens can make an attractive kitchen display. For actual potholder use, however, avoid making the piece so small that it cannot adequately cover the hand.
How can I make the finished project look more professional?
Accurate cutting, consistent seam allowances, careful clipping of curves, smooth topstitching, and well-matched fabrics make the biggest difference. Press components during construction when appropriate for the materials being used, and baste dimensional pieces before completing the final body seam. Taking extra time during these stages usually produces a cleaner result than trying to correct problems after assembly.
Conclusion
The Padded Chicken Pot Holder Pattern combines several enjoyable sewing techniques in one cheerful project. Throughout this tutorial, we covered how to draft and cut the rounded chicken body, prepare a padded decorative wing, construct the comb and beak, create the dimensional fan-shaped tail, assemble the layers, sew the curved body, turn the project, and complete the final details.
The project also provides plenty of room for personalization. Floral cotton, farmhouse prints, patchwork scraps, seasonal fabrics, or modern color combinations can all produce completely different versions from the same basic chicken pot holder pattern. The contrasting wing and tail are particularly useful areas for showcasing favorite fabrics.For a functional potholder, the most important lesson is to combine attractive sewing with appropriate material selection. Heat-resistant batting, secure seams, durable cotton fabric, and correct construction all contribute to a more useful finished piece. Always follow the insulating material manufacturer’s directions and replace a potholder that shows significant heat damage or wear.