Starting your crochet journey can be both exciting and a little overwhelming, especially when you’re trying to master the foundational shapes.
One of the most important forms you’ll learn is the crochet circle. This guide, focusing on the Crochet Circle For Beginners – Pattern, is designed to help you understand the steps clearly, avoid common mistakes, and gain confidence with circular crochet.
The Crochet Circle For Beginners – Pattern is one of the best ways to practice increasing, counting stitches, and managing tension.
It’s a beginner-friendly project that teaches core techniques that will prepare you for creating hats, doilies, mandalas, coasters, and more. And best of all—it’s easy, fun, and forgiving.
In this article, you’ll learn how to crochet a perfect circle, the materials you’ll need, tips for avoiding a wavy or ruffled edge, and how to troubleshoot as you go. Whether you’re brand new to crochet or simply want to refine your basic skills, this step-by-step guide will give you the tools to succeed with the Crochet Circle For Beginners – Pattern.
1. Understanding the Basics of a Crochet Circle
Before jumping into your first circle, it helps to understand how circular crochet works. The structure of a crochet circle is built through rounds, with stitches increasing at regular intervals to keep the shape flat and symmetrical.
Most Crochet Circle For Beginners – Pattern designs begin with a magic ring or a few chains joined to form a loop. The magic ring technique is a popular choice because it allows you to close the center tightly, leaving no gap.
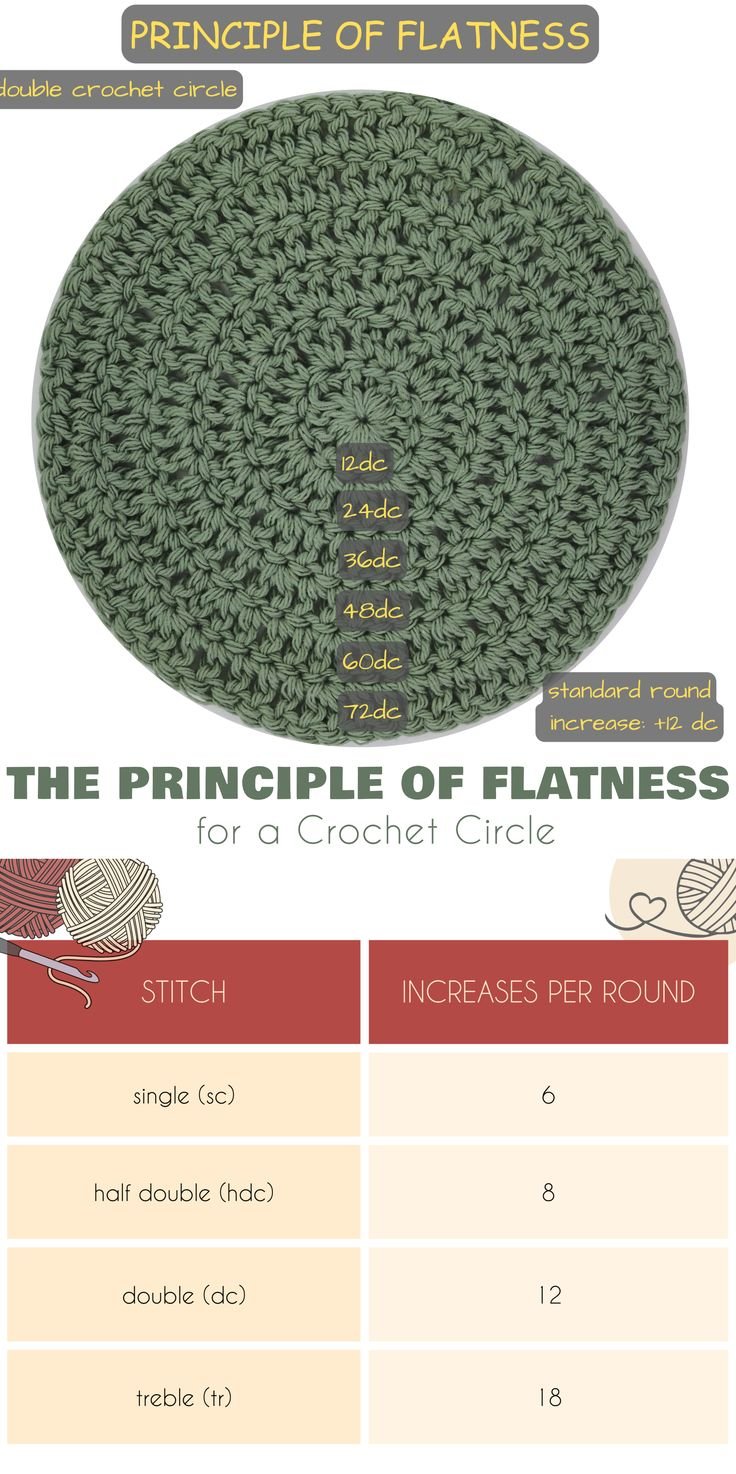
The most common stitches used in circles are single crochet (sc), half double crochet (hdc), and double crochet (dc). The type of stitch affects the height of each round and determines how fast the circle grows in diameter.
In each round, you’ll increase the number of stitches evenly. For example, if you start with six single crochets in the first round, you’ll typically double that to 12 in the next round, then increase by 6 in each following round. This consistent pattern helps maintain a flat circle.
Counting stitches is key to success. Mark the start of each round with a stitch marker or scrap yarn so you don’t lose your place. Accurate counting prevents uneven shapes or accidental increases that make your circle look distorted.
Beginners often face challenges like wavy edges or curling. These are usually caused by too many or too few increases. But don’t worry—these issues are fixable, and with practice, your circles will improve every time.
2. Materials and Tools for a Successful Circle
To start your Crochet Circle For Beginners – Pattern, you don’t need many materials. A few basic supplies will be enough to get you going and keep your process smooth and frustration-free.
First, choose the right yarn. For beginners, a medium-weight yarn (like worsted weight) is ideal. It’s thick enough to see your stitches clearly and soft enough to work comfortably. Avoid fuzzy or dark-colored yarns as they can make it harder to identify stitches.
Next, select an appropriate crochet hook. Check your yarn label for the recommended size, which is often between 5.0 mm (H-8) and 6.0 mm (J-10) for worsted yarn. A metal or ergonomic hook helps you maintain a steady grip and makes it easier to glide through the stitches.
A stitch marker is very helpful for marking the first stitch of each round. This ensures you know where the round starts and prevents unintentional increases or missed stitches.
Have a pair of sharp scissors on hand for cutting yarn cleanly and a yarn needle for weaving in the ends. Weaving in properly will secure your circle and prevent unraveling.
You may also want a measuring tape to track the size of your project. If your circle is part of a larger pattern (like a rug or coaster), knowing the exact dimensions can help with consistency.
Finally, consider using a blocking mat and pins if you want your circle to lay perfectly flat. While not essential for beginners, blocking helps improve the appearance of finished pieces and gives your work a polished finish.
3. Step-by-Step: Crochet Circle For Beginners – Pattern
Now that you have your tools ready, let’s walk through the actual steps of completing your first Crochet Circle For Beginners – Pattern. This method uses double crochet stitches for a fast-growing, easy-to-see result.
Step 1: Create a Magic Ring or Chain Loop
Start by forming a magic ring or chain 4 and slip stitch into the first chain to form a loop. If you’re using the chain method, the resulting center may have a small hole. The magic ring eliminates this.
Step 2: Round One – First Stitches
Into your loop, work 12 double crochet stitches (dc). Chain 2 counts as your first dc. After the 12 dc are complete, join with a slip stitch to the top of the chain 2. You now have your first round.
Step 3: Round Two – Increase in Every Stitch
Chain 2 (counts as dc). Make 1 double crochet in the same stitch. Work 2 dc in each stitch around. You should have 24 stitches. Join with a slip stitch.
Step 4: Round Three – Consistent Increases
Chain 2. 1 dc in the next stitch, 2 dc in the next stitch—repeat around. You’ll end with 36 stitches. Slip stitch to join. Your circle should be growing evenly.
Step 5: Continue Rounds with Regular Increases
In each round, increase the distance between your increases. For example, in Round 4: 1 dc in the next 2 stitches, 2 dc in the next. Round 5: 1 dc in the next 3 stitches, 2 dc in the next, and so on. This helps the circle stay flat.
Step 6: Check Your Shape and Adjust if Needed
Lay your circle flat every few rounds. If it’s curling up like a bowl, you may need more increases. If it’s ruffling or wavy, you may need fewer. Adjusting stitch count slightly can make a big difference.
4. Using and Customizing Your Crochet Circles
Once you’ve mastered the Crochet Circle For Beginners – Pattern, you’ll find endless ways to use and customize your circles in fun, creative projects. These small shapes can grow into something much bigger.
One of the most common uses is turning your circles into coasters, pot holders, or placemats. Using cotton yarn makes them heat-resistant and machine washable—great for household use.
Another fun idea is joining multiple circles together to create blankets, table runners, or wall art. You can vary the colors for a rainbow effect or stick to a monochrome palette for modern flair.
Circles also make excellent bases for hats, bags, and baskets. Starting with a flat circle and then shaping the sides with simple increases or decreases allows you to build 3D crochet objects.
You can add embellishments like surface crochet, embroidery, or beads to personalize your circles. Adding faces or patterns turns a plain circle into a character or themed decoration.
Consider turning circles into seasonal décor—like hanging ornaments, sunflowers, or crocheted fruit. The circle is one of the most versatile bases for amigurumi and other creative projects.
Lastly, you can use your circles as practice swatches to test tension, try out new stitches, or experiment with yarn types. Keep them in a binder or box as part of your crochet journey collection.
FAQ – Crochet Circle For Beginners – Pattern
1. Why is my crochet circle curling up or forming a bowl?
This usually happens when there are too few increases in a round. Make sure you’re following the increase pattern and not skipping any stitches.
2. How do I make my circle lie flat?
Consistent increases and even tension help keep your circle flat. If needed, blocking can fix mild waviness or curling.
3. What’s the difference between a magic ring and a chain loop?
A magic ring allows you to pull the center closed tightly, leaving no hole. A chain loop is easier for beginners but often leaves a small gap in the middle.
4. Can I use different stitches in my circle?
Yes! While this guide uses double crochet, you can use single or half-double crochet for tighter, denser circles. The key is adjusting your increases accordingly.
5. How big can I make my crochet circle?
There’s no limit—just keep following the increase pattern. The more rounds you add, the larger your circle will grow.
6. Can I join my crochet circles together?
Absolutely! You can sew or crochet them together to create larger projects like blankets, bags, or rugs.
Conclusion
Learning the Crochet Circle For Beginners – Pattern is a foundational skill that opens the door to countless creative possibilities. From home décor to wearables, circles form the base of many crochet masterpieces. With just a hook, yarn, and a bit of patience, you’ll be amazed at what you can create.
We’ve covered how to start your circle, maintain shape through increases, fix common issues, and customize your final piece. By following this guide and practicing regularly, you’ll gain confidence and enjoy every stitch of the process.
If this article helped you understand the Crochet Circle For Beginners – Pattern, we’d love to hear from you! Please leave a sincere opinion below and share any suggestions or experiences. Your feedback helps us continue to provide useful and inspiring crochet content!