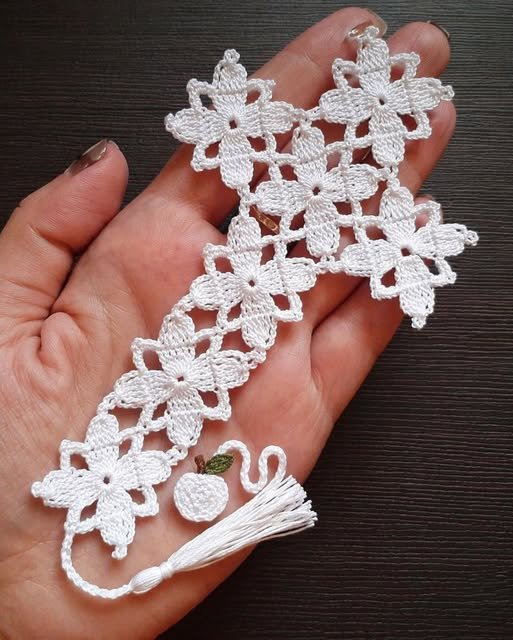
Crochet Cross Bookmark – Tutorial projects are a wonderful way to combine spiritual significance with the practical art of fiber crafts. Whether you are looking to create a thoughtful gift for a religious ceremony, a commemorative item for a church group, or simply a beautiful placeholder for your own favorite book, mastering the Crochet Cross Bookmark – Tutorial will provide you with a versatile skill set. This specific project is highly regarded in the crafting community because it is quick to complete, requires very little material, and results in a sophisticated item that looks far more complex than it actually is to construct.
Engaging with a Crochet Cross Bookmark – Tutorial allows you to practice precision and delicate stitch work, which is essential for working with thinner threads and smaller hooks. Because a bookmark needs to be thin enough to fit between pages without damaging the spine of a book, choosing the right mercerized cotton thread is a key component of the process. In this guide, we will walk through the entire journey, from selecting your supplies to the final blocking phase, ensuring that your finished crochet cross is symmetrical, crisp, and durable enough to last for years of reading sessions.
As you follow along with this Crochet Cross Bookmark – Tutorial, you will find that the rhythm of the stitches becomes quite meditative. The structure of the cross is created through a series of tactical increases and decreases, or by joining separate arms depending on the specific style you choose. Our focus today is on a seamless, one-piece construction that minimizes the need for weaving in ends, making this Crochet Cross Bookmark – Tutorial perfect for those who want a clean, professional finish. Let’s gather our materials and prepare to create a beautiful, handmade treasure that balances tradition with modern craft.
1. Choosing the Best Materials for Your Crochet Cross Bookmark – Tutorial
When starting your Crochet Cross Bookmark – Tutorial, the most important decision you will make is the weight of your yarn. For a traditional, elegant look, size 10 crochet thread is the gold standard because it offers incredible stitch definition while remaining very thin. Using a thicker yarn might result in a cross that is too bulky to function as a bookmark, so staying within the realm of lace-weight threads or very fine cotton is highly recommended for this specific project.
The choice of a steel crochet hook is equally important when following a Crochet Cross Bookmark – Tutorial. Typically, a 1.5mm or 1.75mm hook works best with size 10 thread, as it creates a tight, firm fabric that won’t lose its shape easily. If you tend to have a loose tension, you might even consider dropping down to a 1.25mm hook to ensure that the delicate “lace” holes in the design remain defined and small, preventing the bookmark from becoming flimsy.
Color selection plays a massive role in the final aesthetic of your Crochet Cross Bookmark – Tutorial. While classic white, ecru, and cream are the most popular choices for religious items, don’t be afraid to experiment with soft pastels or even variegated threads that transition between shades of blue or lavender. Using a high-quality mercerized cotton will give your bookmark a subtle sheen that reflects light beautifully, making the intricate stitch work stand out regardless of the color you choose.
In addition to your thread and hook, you will need a few basic notions to successfully complete this Crochet Cross Bookmark – Tutorial. A pair of sharp embroidery scissors is essential for cutting fine thread without fraying the ends, and a very thin tapestry needle will be needed to weave in your starting and ending tails. Because the thread is so fine, a needle with a large eye but a slender body is the best tool for hiding those final stitches invisibly within the work.
One often overlooked aspect of a Crochet Cross Bookmark – Tutorial is the preparation for blocking. You will want to have a foam blocking mat and rust-proof stainless steel pins ready for the finish. Since lace work often looks a bit “scrunchy” right off the hook, blocking is the secret step that transforms a piece of crochet into a professional-grade bookmark. We will discuss the specific technique for this later in the guide to ensure your cross is perfectly flat.
Lastly, consider if you want to add any embellishments to your Crochet Cross Bookmark – Tutorial. Some crafters like to incorporate small glass beads into the stitches or attach a silk tassel to the bottom of the cross for added flair. If you plan on adding a tassel, having a small piece of cardboard or a tassel maker on hand will help you create a uniform look. Planning these details before you start your first chain will ensure a smooth and enjoyable crafting experience.
2. Step-by-Step Stitching and Construction Techniques
The foundation of our Crochet Cross Bookmark – Tutorial begins with a vertical strip that forms the main body of the cross. You will start by chaining a specific length that determines the height of your bookmark. Most bookmarks are between 5 and 7 inches long, so your initial chain should reflect that desired scale. It is crucial to count your chains carefully here, as the symmetry of the side arms depends on having an accurate center point to work from.
Once the foundation is set, the Crochet Cross Bookmark – Tutorial moves into the first row of stitches, usually employing double crochet or treble crochet stitches to create a “filet” or mesh appearance. This openwork style is traditional for religious lace and allows the cross to be lightweight. During this stage, focus on keeping your stitches uniform; uneven tension can cause the vertical bar of the cross to lean to one side, which is difficult to correct later.
Creating the horizontal arms is the most technical part of the Crochet Cross Bookmark – Tutorial. Depending on the pattern variation, you will either work across a mid-section of the vertical bar or join new thread to create the extensions. If we are working a seamless version, you will use foundation double crochets to grow the arms outward from the center. This technique is excellent because it provides a stretchy, consistent base that looks identical to the rest of the work.
As you turn the corners in your Crochet Cross Bookmark – Tutorial, you may encounter chain spaces and picot stitches. The picots are small loops that add a decorative, “pointed” edge to the tips of the cross, giving it a gothic or vintage flair. When making a picot, ensure you slip stitch back into the correct base stitch to keep the loop tight and upright. These small details are what make the Crochet Cross Bookmark truly special and gift-worthy.
The upper portion of the cross is usually shorter than the bottom portion to maintain the correct proportions of a traditional crucifix. In this Crochet Cross Bookmark – Tutorial, we emphasize the “Rule of Thirds”—where the crossbar sits about one-third of the way down from the top. This creates a visually balanced design that is instantly recognizable. Always double-check your row counts on both the left and right arms to ensure they are perfectly identical in length.
After the main shape is finished, many Crochet Cross Bookmark – Tutorial patterns suggest a final border row. This usually consists of single crochet stitches or a simple “shell” stitch around the entire perimeter. A border not only adds beauty but also provides extra structural support to the thin lace. Once you reach the final stitch, pull the thread through and leave a tail of about 4 inches. This ensures you have enough length to securely weave in the end without it popping out later.
3. Refining Your Work with Blocking and Finishing Touches
After completing the crochet portion of the Crochet Cross Bookmark – Tutorial, your work might look slightly curled or distorted. This is completely normal for thread crochet! The next vital step is blocking. Start by soaking your bookmark in lukewarm water with a tiny drop of gentle soap. Let it sit for about 10 minutes until the fibers are fully saturated. This relaxes the cotton and makes it much easier to manipulate into the perfect shape.
Once soaked, gently press the bookmark between two clean towels to remove excess water—never wring or twist the delicate lace. Lay it out on your blocking mat. Using your rust-proof pins, pin the center of the cross first, then pull the arms out and pin the tips. Follow the lines of the Crochet Cross Bookmark – Tutorial to ensure the vertical and horizontal bars are perfectly straight. Use as many pins as necessary to define the picots and shell edges.
For a bookmark that stays stiff and functional, some crafters prefer to use a stiffening agent during the blocking process. You can use a commercial fabric stiffener or a traditional sugar-water solution. Applying this ensures that the Crochet Cross Bookmark – Tutorial result doesn’t become floppy after repeated use inside a book. Simply sponge the stiffener onto the pinned-down bookmark and let it air dry completely, usually overnight, before removing the pins.
Once the cross is dry and stiff, it is time to add the final decorative elements. A popular choice in many a Crochet Cross Bookmark – Tutorial is the addition of a tassel. To make a matching tassel, wrap your thread around a 3-inch piece of cardboard about 20 to 30 times. Tie the top, cut the bottom loops, and secure it to the base of the cross. This adds a bit of weight to the bottom, helping the bookmark hang straight when the book is closed.
If you are making this as a gift, the Crochet Cross Bookmark – Tutorial isn’t truly finished until you consider the presentation. Placing the bookmark on a piece of cardstock and slipping it into a clear plastic sleeve protects the delicate lace from oils and dirt. You can even print a favorite verse or a “handmade with love” note on the cardstock to complement the spiritual theme of the crochet cross.
Finally, take a moment to inspect your work for any loose thread ends. Even if you wove them in earlier, the blocking process can sometimes cause a tiny “tail” to peek out. Use your embroidery scissors to trim these flush with the fabric. Your Crochet Cross Bookmark – Tutorial project is now a completed work of art, ready to be used or gifted. The crisp edges and defined stitches are a testament to the care you put into every loop.
4. Advanced Variations and Customizing Your Bookmark
Once you have mastered the standard Crochet Cross Bookmark – Tutorial, you might want to explore more complex variations to keep your hobby exciting. One popular advanced technique is Beaded Crochet. By pre-stringing small seed beads onto your thread before you begin, you can drop a bead into each picot or along the center of the cross. This adds a shimmering, jewel-like quality to the bookmark that is especially beautiful for wedding or baptismal gifts.
Another way to iterate on the Crochet Cross Bookmark – Tutorial is by playing with different lace styles, such as Irish Crochet. This involves creating separate small roses or leaves and joining them together in the shape of a cross using a background mesh. While more time-consuming, this results in a stunning, three-dimensional texture that looks like an heirloom antique. It’s a great way to use the floral skills you might have learned in other tutorials.
You can also experiment with “Multi-Color Layering” within your Crochet Cross Bookmark – Tutorial. Instead of a solid color, try using a metallic gold thread for the final border row. This “halo” effect gives the cross a regal, illuminated manuscript appearance. Because metallic threads can be slippery and difficult to work with, this variation is a great way to challenge your skills and improve your fine motor control with the hook.
Size customization is another area where you can have fun. While this Crochet Cross Bookmark – Tutorial focuses on a standard size, you can use the same pattern with a much larger hook and bulky yarn to create a wall hanging. Conversely, using “sewing thread” and a microscopic hook can result in a tiny cross that can be used as a charm for a necklace or a pair of earrings, showcasing the incredible range of a single pattern design.
For those who enjoy a more modern look, consider the Filet Crochet approach to the Crochet Cross Bookmark – Tutorial. Instead of a shaped outline, you can crochet a solid rectangular bookmark with the image of a cross “revealed” through open mesh spaces. This style is very durable and provides a smooth surface that is very gentle on old or fragile book pages. It’s a clean, minimalist take on a traditional symbol.
Lastly, think about the theme of your project. If you are following the Crochet Cross Bookmark – Tutorial for an Easter gift, you might incorporate small green “vine” stitches or tiny colorful flowers. For a more somber or classic look, stick to geometric patterns and sharp angles. Every bookmark you create is a reflection of your artistic voice, and the techniques you’ve learned here serve as the foundation for endless creative exploration in the world of fiber arts.
FAQ – Frequently Asked Questions
1. Is this Crochet Cross Bookmark – Tutorial suitable for absolute beginners?
Yes, but with a caveat. While the stitches themselves (chain, single, and double crochet) are basic, working with thin thread and a small hook requires a bit more coordination than working with standard yarn. I recommend practicing the pattern once with scrap medium-weight yarn and a 4mm hook to understand the construction before moving to the thread version.
2. How do I stop my crochet cross from curling?
Curling is very common due to the way crochet stitches lean. The best solution is wet blocking, as described in the tutorial. Pinning the bookmark into the correct shape while damp and letting it dry completely will neutralize the tension and result in a perfectly flat finished product.
3. What can I use if I don’t have fabric stiffener for my bookmark?
A simple home remedy is a sugar-water solution. Mix equal parts white sugar and boiling water until dissolved, let it cool, and dip your bookmark in. Alternatively, you can use a mixture of white craft glue and water (50/50 ratio). Both will dry clear and provide excellent stiffness for your Crochet Cross Bookmark – Tutorial project.
4. How much thread do I need for one bookmark?
Very little! A standard 100g ball of size 10 cotton thread can produce dozens of bookmarks. This makes the Crochet Cross Bookmark – Tutorial an incredibly cost-effective project for making bulk gifts for large groups, such as Sunday school classes or wedding guests.
5. Can I use this pattern to make a cross for a necklace?
Absolutely! To scale it down for jewelry, use size 20 or 30 thread and a hook smaller than 1.0mm. The construction remains the same, but the final result will be small and delicate enough to hang on a chain. Just be sure to block it well so it stays flat against the skin.
Conclusion
In this Crochet Cross Bookmark – Tutorial, we have explored the delicate art of thread crochet to create a meaningful and functional accessory. We covered the essential materials, including the importance of mercerized cotton thread and specialized hooks, and moved through a detailed construction process that ensures symmetry and beauty. From the initial foundation chain to the final picot edges and the vital blocking stage, you now have the knowledge to create a professional-grade bookmark that serves as both a spiritual symbol and a practical tool for readers.
Mastering this Crochet Cross Bookmark – Tutorial opens up a world of possibilities for personalized gift-giving and creative expression. Whether you stick to the classic lace look or venture into beaded and multi-colored variations, the skills of precision and patience you’ve practiced here will benefit all your future fiber arts projects. We hope you enjoyed this journey into fine crochet work.