If you’re looking to add a unique and playful touch to your kitchen, the Crochet Dish Soap Dress pattern is the perfect project for you.
This creative idea not only helps you organize your dish soap in a fun way but also enhances the overall aesthetic of your kitchen.
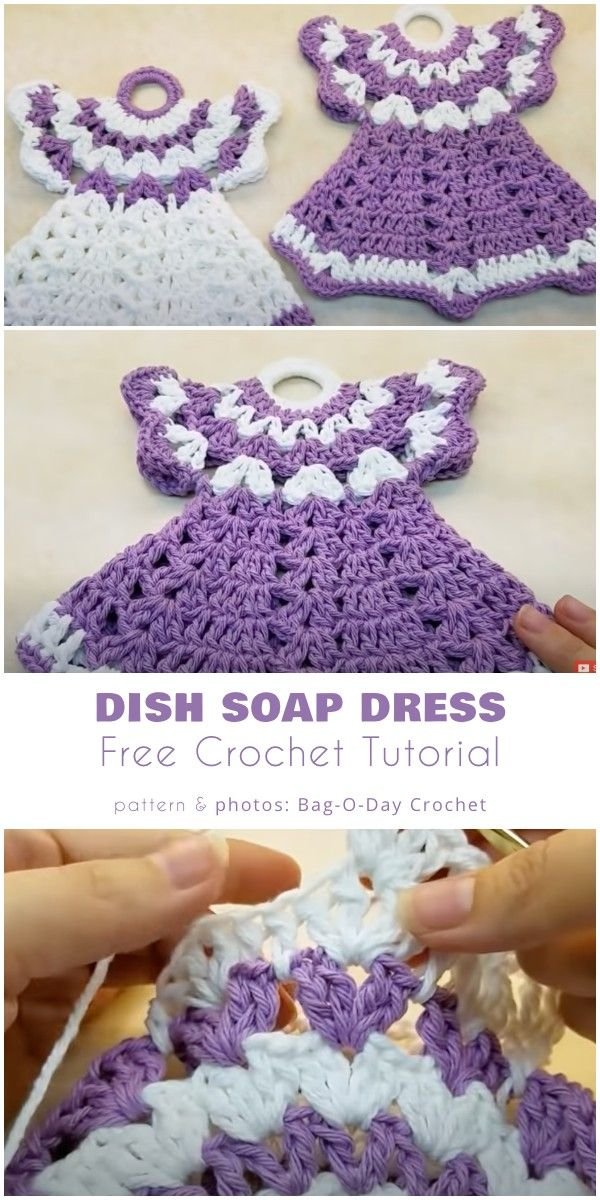
The Crochet Dish Soap Dress is a charming little garment that fits snugly around a bottle of dish soap, transforming it into a delightful decoration while still being functional.
This pattern is ideal for crocheters of all skill levels, from beginners to more experienced crafters.
Creating a Crochet Dish Soap Dress requires only basic crochet skills, such as chaining, single crochet, and slip stitch. The project is relatively quick to complete, which makes it a great weekend or evening project. Additionally, it’s a wonderful way to use up leftover yarn from previous projects, as only a small amount is needed. The fun part of this project is that you can personalize your dish soap dress by using different colors, yarn textures, and even adding embellishments like buttons or ribbons.
In this article, we will walk you through the steps to make your very own Crochet Dish Soap Dress, starting from selecting the right yarn to finishing touches. By the end of this guide, you’ll have a functional yet adorable cover for your dish soap bottle, and you’ll have learned how to make a simple but beautiful crochet piece that adds personality to your kitchen.
1. Materials You Need to Make a Crochet Dish Soap Dress
Before diving into the crochet process, it’s important to gather the right materials. The Crochet Dish Soap Dress pattern is simple and doesn’t require many supplies, making it an accessible project for beginners. Here’s what you’ll need:
- Yarn: Choose a cotton or cotton-blend yarn. Cotton yarn is absorbent and sturdy, making it ideal for kitchen-related projects like this. You’ll need a small amount, typically around 50-100 yards depending on the size of your dish soap bottle.
- Crochet Hook: A 4mm (G-6) crochet hook is commonly used for this project, but if you prefer a looser or tighter stitch, you can adjust the hook size accordingly.
- Button (Optional): You can add a button to the back of the dress for a more tailored look. Buttons also add a charming detail to the overall design.
- Scissors: For trimming your yarn at the end of the project.
- Yarn Needle: This will help you weave in loose ends and finish your project neatly.
Once you have all your materials ready, you can begin crafting your Crochet Dish Soap Dress!
2. Crocheting the Base of the Dish Soap Dress
The first step in creating your Crochet Dish Soap Dress is to crochet the base, which will form the skirt-like portion that fits around the dish soap bottle. This part is straightforward and will require basic crochet stitches.
Start by measuring the circumference of your dish soap bottle. The base of the dress should be slightly larger than the bottle’s circumference to allow it to fit comfortably. Begin by making a chain that is long enough to fit around the bottle. Use the chain to create a circle, and then join the ends to form a ring.
Once the base is set, work in rounds, making single crochet stitches to build up the skirt of the dress. You can adjust the length of the skirt to suit your preferences. If you’d like a shorter dress, work fewer rounds. If you prefer a longer, more dramatic skirt, simply add more rounds of single crochet. Make sure to keep the stitches tight and even for a neat appearance.
At the end of the base, fasten off your yarn and leave a tail long enough to sew the back seam together once the dress is complete. This will be the foundation of the Crochet Dish Soap Dress that will cover the bottle, and it’s where you can add any custom designs later, such as decorative borders or lacework.
3. Creating the Bodice and Fitting the Dress
Now that you have the base of the dress, it’s time to work on the bodice. This is where the dress takes shape and begins to resemble a tiny, crocheted garment. The bodice is designed to fit snugly around the top of the dish soap bottle, giving it a fitted, dress-like appearance.
Start by crocheting a few rows of single crochet around the top edge of the base. The number of stitches you’ll need will depend on the size of the bottle’s top, but it’s generally only a few rounds. The goal is to create a snug fit, but not so tight that it’s difficult to slide the dress on and off the bottle.
Once the bodice is complete, you can add additional design elements like ruffles or a frilly collar to enhance the dress’s appearance. This is a great opportunity to get creative with colors, adding stripes, contrasting yarns, or other decorative techniques.
After the bodice is finished, check the fit on your bottle to ensure it is snug enough to stay in place but loose enough to be removed for washing. You can adjust the fit by adding or removing rows, depending on the bottle’s shape.
4. Adding the Finishing Touches
To complete your Crochet Dish Soap Dress, you can add finishing touches that will elevate the look and give it a personal flair. Here are a few options for completing the dress:
- Button: If you want a more tailored fit, add a button to the back of the dress. You can either crochet a button loop or sew a button directly onto the back seam. A button adds a cute, realistic touch to the dress.
- Ribbon or Lace: Consider adding a bow or a lace trim around the waist or neckline for an extra decorative detail. Ribbons can be tied into a bow and attached to the front or back of the dress for added charm.
- Embellishments: For those who enjoy adding intricate details, you can crochet little flowers, hearts, or even tiny pockets to decorate the dress. Embellishments give the dress a unique touch and allow you to make it truly yours.
- Washing Instructions: Since this is a kitchen item, make sure to note that the dress should be machine washable or easy to clean. Cotton yarn is great for this because it’s durable and can withstand frequent washing.
Once you’ve added your chosen finishing touches, weave in any loose ends and trim any excess yarn. Your Crochet Dish Soap Dress is now complete and ready to bring a bit of fun and functionality to your kitchen.
FAQ: Common Questions About the Crochet Dish Soap Dress Pattern
- What type of yarn should I use for the Crochet Dish Soap Dress?
- Cotton or cotton-blend yarn is ideal for this project. It’s durable, absorbent, and holds up well in kitchen environments.
- How do I know the right size for the dress?
- Measure the circumference of your dish soap bottle and adjust the base of the dress to fit. The bodice should be tight enough to stay on but not so tight that it’s hard to remove.
- Can I add decorations to the dress?
- Yes! You can add buttons, ribbons, lace, or even crocheted flowers to give your dress a unique and personal touch.
- Is this pattern beginner-friendly?
- Absolutely! The Crochet Dish Soap Dress is simple and uses basic crochet stitches, making it perfect for beginners who are looking for a fun and creative project.
- Can I make this project in different sizes for different bottles?
- Yes, simply adjust the starting chain and the number of stitches for the base and bodice to fit various bottle sizes.
- How do I clean the Crochet Dish Soap Dress?
- Since cotton yarn is durable, you can easily wash the dress in the machine or by hand as needed.
Conclusion
In this article, we’ve walked you through the steps to create a charming Crochet Dish Soap Dress that adds a fun, decorative touch to your kitchen. Whether you’re a beginner or a seasoned crocheter, this pattern is a simple and enjoyable project that you can customize to your liking. From selecting the right yarn to adding decorative finishing touches, you now have all the tools to make a delightful crochet dress for your dish soap bottle.
We’d love to hear your thoughts! Please leave your opinion and any suggestions for future articles or crochet patterns in the comments. Happy crocheting!