Crochet Doily Bunting – Crochet Pattern is an incredibly charming and versatile project that adds a touch of elegance and vintage flair to any space.
Whether you’re planning a cozy gathering, decorating for a celebration, or simply looking to create something beautiful for your home, this crochet doily bunting will certainly impress.
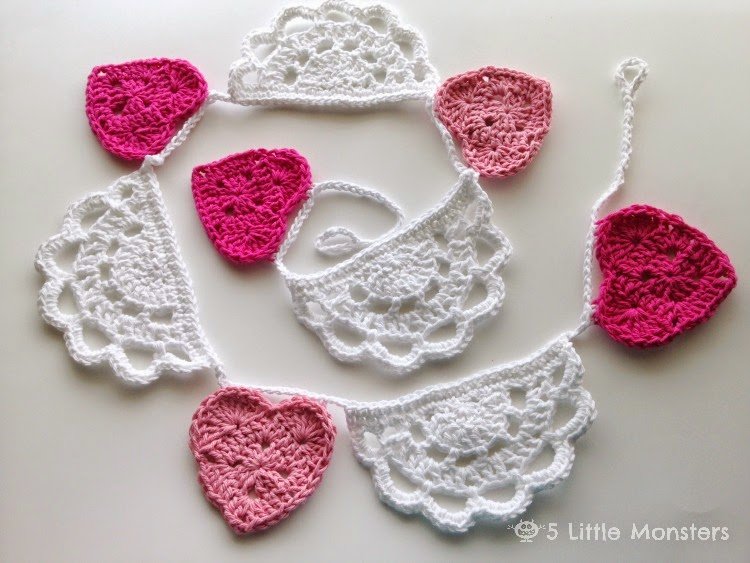
By combining delicate lace-like doilies with a string of crochet, you can create a whimsical, yet timeless decorative piece that suits all occasions.
In this article, we will explore how to create this delightful bunting, offer step-by-step instructions, and share some creative tips to customize it for your personal style.
Crocheting a doily bunting is a rewarding and relaxing project that doesn’t require advanced skills, making it perfect for beginners or seasoned crocheters alike. The Crochet Doily Bunting combines two beloved elements of crochet: the intricate doily pattern and the playful, festive nature of bunting. By following the pattern, you can create individual doily motifs that are then strung together to form a garland.
This project is not just about creating beautiful decor but also a wonderful opportunity to experiment with different colors, yarn types, and doily designs. Whether you choose a traditional white doily pattern for a classic, vintage look or bold, bright colors for a more modern twist, the possibilities are endless. So, if you’re ready to add a special touch to your home or next event, let’s dive into the steps of making the Crochet Doily Bunting!
1. Materials Needed for Crochet Doily Bunting
Before you begin working on your Crochet Doily Bunting – Crochet Pattern, it’s essential to gather the right materials. Having the proper supplies will make the process smoother and ensure that your bunting turns out beautifully.
Yarn
For this project, choose a lightweight cotton yarn or any yarn that is soft and easy to work with. Cotton yarn holds its shape well and creates a crisp, clean look for the doilies. You can select a variety of colors to give your bunting a lively, personalized touch. Pastels work well for a soft and elegant look, while bright, bold hues create a more vibrant and playful effect.
Crochet Hook
The size of the crochet hook you use depends on the yarn you select. A 2.5mm to 3.5mm crochet hook is ideal for lightweight yarns. If you’re unsure, always refer to the yarn label for recommendations. Using the right hook size will ensure that your doilies have the right texture and that the stitches are neat and consistent.
Scissors
A good pair of scissors is necessary to cut your yarn when you’re finished with each section of the bunting. Make sure to have a sharp, reliable pair that will give you clean cuts.
Tapestry Needle
You’ll need a tapestry needle for weaving in loose ends when finishing your bunting. This needle has a large eye and is perfect for threading through the yarn to secure the ends without causing any damage to the fabric.
String or Ribbon
For assembling the Crochet Doily Bunting, you’ll need a long piece of string or ribbon to string the doilies together. The string should be sturdy enough to hold the weight of the doilies but not too thick to overpower the delicate design of the crochet.
Having all these materials on hand will allow you to start crocheting your beautiful doily bunting without interruptions.
2. Step-by-Step Guide to Creating Crochet Doily Bunting
Now that you have your materials ready, let’s get started with the step-by-step guide to making your own Crochet Doily Bunting – Crochet Pattern. By following these instructions, you’ll be able to create an elegant garland that can decorate any space with ease.
Step 1: Choose Your Doily Pattern
Start by selecting the doily pattern you want to use. There are many doily patterns available, ranging from simple circular motifs to more intricate lace designs. Some popular options include the classic circular doily, the flower doily, or even a star-shaped doily. For beginners, simple circular motifs are a good choice, as they are easy to crochet and look beautiful when strung together.
Step 2: Crochet the Doilies
Begin crocheting the individual doilies according to your chosen pattern. Make sure to follow the stitch instructions carefully, and don’t forget to count your stitches to keep everything even. You will need several doilies to make a complete bunting, depending on the size of the garland you want to create. Aim for a consistent tension in your stitches to ensure all the doilies are uniform in size and appearance.
Step 3: Attach the Doilies to the String
Once you have crocheted the desired number of doilies, it’s time to string them together. Take your string or ribbon and thread it through the top of each doily, leaving some space between each one. You can either sew the doilies onto the string using a tapestry needle or simply crochet the doilies directly onto the string as you go, depending on the look you prefer.
Step 4: Secure the Ends
After all your doilies are attached to the string, use the tapestry needle to secure the loose ends of the yarn, both on the doilies and at the ends of the bunting. This will give your garland a polished, professional look and prevent the yarn from unraveling over time.
Step 5: Add Extra Embellishments
If you’d like to give your Crochet Doily Bunting some extra flair, consider adding embellishments like beads, buttons, or small flowers to the doilies. These decorative touches can help personalize your garland and make it more eye-catching. You can sew beads onto the center of each doily, or attach little fabric flowers to the string between the doilies.
Step 6: Display Your Bunting
Once your bunting is finished, it’s time to display it! Hang it across a wall, drape it over a mantel, or even use it to decorate the edge of a table for a special occasion. The beauty of Crochet Doily Bunting is that it’s versatile and can be used in a variety of settings, whether for a party, wedding, or just as an everyday decoration in your home.
3. Tips for Customizing Your Crochet Doily Bunting
While the Crochet Doily Bunting is beautiful as is, there are several ways you can customize it to fit your personal style. Here are some tips to help you make your bunting unique.
Tip 1: Experiment with Different Colors
You can use different yarn colors for each doily to create a rainbow effect or keep everything in one color for a more classic, minimalist look. Pastel shades are ideal for a soft, vintage style, while vibrant hues can add a cheerful and bold touch to your bunting.
Tip 2: Mix and Match Patterns
If you’re feeling adventurous, try mixing different doily patterns together. For example, you could combine a simple circular doily with a more intricate floral design to create a variety of textures and shapes. This approach will make your Crochet Doily Bunting even more interesting.
Tip 3: Make It Adjustable
For a more flexible garland, you can add extra string between the doilies so that you can adjust the spacing as needed. This way, if you want to hang your bunting in different areas, you can easily change how close or far apart the doilies are.
Tip 4: Add Fringe or Tassels
If you like the look of a more bohemian or whimsical design, consider adding fringe or tassels at the ends of your bunting. This can give it a fun, textured look that works perfectly for festive occasions.
Tip 5: Use Different Yarn Textures
Try using yarns with different textures, like fluffy or sparkly yarn, to add depth to your bunting. This will give each doily a unique visual texture and make the overall design more eye-catching.
Tip 6: Personalize with Messages
For a special occasion, you can crochet letters into the design of the doilies. Spell out a message like “Happy Birthday” or “Welcome Home” for a personalized touch. You can easily do this by using a simple crochet chart or following a letter pattern.
4. Common Mistakes to Avoid When Making Crochet Doily Bunting
While making Crochet Doily Bunting is an enjoyable process, it’s important to avoid some common mistakes to ensure your project turns out just the way you envision.
Mistake 1: Inconsistent Tension
One of the most common issues in crochet is inconsistent tension. If your stitches are too tight or too loose, your doilies might not be uniform in size. Try to maintain a steady tension throughout your project.
Mistake 2: Choosing the Wrong Yarn
Choosing yarn that is too thick can make your doilies stiff and bulky, while yarn that is too thin might not create the desired effect. Select a yarn that is lightweight and works well with the chosen pattern.
Mistake 3: Not Checking Size Consistency
Ensure that your doilies are the same size, especially if you are using different patterns. If they vary in size too much, your bunting may not hang evenly.
Mistake 4: Forgetting to Weave in Loose Ends
Loose yarn ends can quickly unravel, so it’s crucial to weave them in properly. This step ensures your Crochet Doily Bunting is secure and durable.
Mistake 5: Overloading with Embellishments
While it’s fun to add beads and other decorations, be careful not to overdo it. Too many embellishments can detract from the delicate beauty of the crochet work itself.
Mistake 6: Skipping the Blocking Process
Blocking your doilies before stringing them together will help them retain their shape and give them a polished finish. Skip this step at your own risk, as unblocked doilies may curl or distort.
FAQ – Frequently Asked Questions
1. Can I use any type of yarn for the crochet doily bunting?
While you can experiment with different yarns, cotton yarn is the most recommended for this project due to its durability and ability to hold its shape. Choose a lightweight cotton yarn for a crisp finish.
2. How many doilies do I need for the bunting?
The number of doilies you need depends on the size of your bunting and the spacing between the doilies. Typically, 5-10 doilies will create a lovely garland for a small space.
3. Can I customize the size of the doilies?
Yes! If you prefer larger or smaller doilies, you can adjust the pattern by adding or removing rows of stitches. Be sure to maintain consistent sizing across all your doilies.
4. How do I make my doily bunting stand out?
You can make your Crochet Doily Bunting stand out by experimenting with color combinations, mixing patterns, adding decorative elements like beads or flowers, or incorporating fringe at the ends.
5. How can I clean my crochet doily bunting?
To clean your bunting, hand wash it gently in cold water with mild detergent. Lay it flat to dry to avoid stretching or distorting the shapes.
6. Is this project suitable for beginners?
Yes! The Crochet Doily Bunting is a beginner-friendly project. Simple doily patterns are easy to follow, and the process of stringing them together is straightforward.
Conclusion
In this article, we’ve explored how to create a Crochet Doily Bunting – Crochet Pattern, from gathering materials to customizing the design. Whether you choose to create a soft, elegant garland or a vibrant, playful decoration, this project offers endless possibilities for creative expression. By following the step-by-step instructions and using the tips provided, you can create a
beautiful and personal decoration for any occasion. If you enjoyed this tutorial, please leave a comment below with your thoughts and any suggestions you have for future projects. Happy crocheting!