The Crochet Flower Tote Bag – Pattern is more than just a simple DIY project; it is a vibrant expression of personality and a sustainable fashion statement that has taken the crafting world by storm. In an era where fast fashion is being replaced by mindful creation, learning how to assemble your own Crochet Flower Tote Bag – Pattern allows you to merge utility with high-end bohemian aesthetics. Whether you are strolling through a farmer’s market or heading to a brunch date, this specific crochet accessory offers a tactile charm that store-bought items simply cannot replicate.
Crafting a Crochet Flower Tote Bag – Pattern requires a blend of patience and a love for floral motifs, typically involving the assembly of several crochet flower squares or 3D floral appliqués. The beauty of this handmade tote lies in its versatility, as you can customize the color palette to match any season, from pastel spring tones to earthy autumnal hues. By mastering this Crochet Flower Tote Bag – Pattern, you aren’t just making a container for your belongings; you are engineering a durable, breathable, and eye-catching piece of art that serves as a testament to your technical skills.
The journey of creating a Crochet Flower Tote Bag – Pattern starts with selecting the right materials and understanding the fundamental stitches that bring the “bloom” to life. Throughout this guide, we will dive deep into the nuances of yarn selection, hook sizes, and the structural integrity needed to ensure your bag handles the weight of daily essentials. This comprehensive look at the Crochet Flower Tote Bag – Pattern is designed to take you from a handful of yarn skeins to a finished, professional-looking floral handbag that will undoubtedly turn heads and spark conversations wherever you go.
1 Understanding the Crochet Flower Tote Bag – Pattern Basics
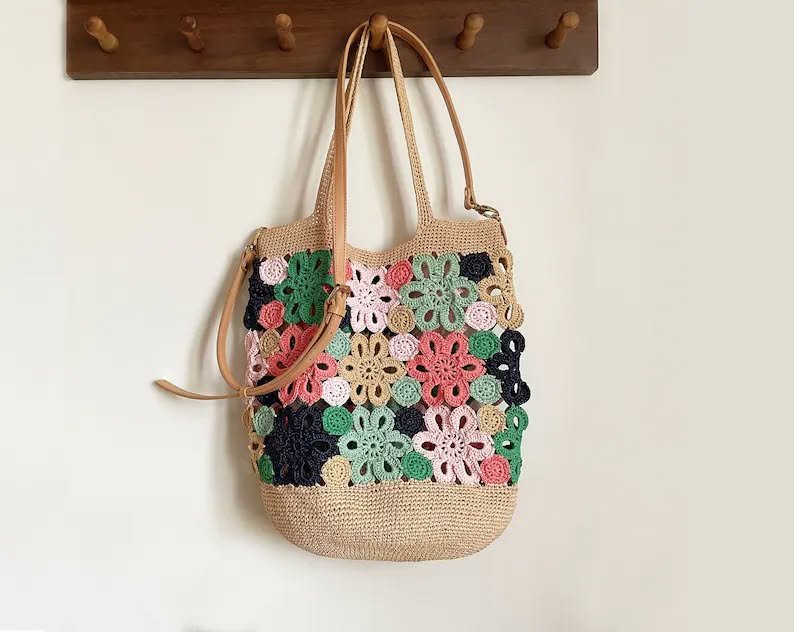
To successfully execute a Crochet Flower Tote Bag – Pattern, you must first understand that the foundation of the design usually relies on Granny Squares. These squares are the building blocks of most floral crochet patterns, allowing you to create individual flower centers that are then framed by structural borders. The Crochet Flower Tote Bag – Pattern often utilizes the “Popcorn Stitch” or “Puff Stitch” to give the petals a three-dimensional effect, making the flowers pop against the flat surface of the bag.
The term Crochet Flower Tote Bag – Pattern refers to the strategic blueprint used to calculate how many motifs are needed for the front, back, and sides of the bag. Most standard designs require approximately 13 to 24 squares, depending on the desired size of your handmade carrier. When following a Crochet Flower Tote Bag – Pattern, accuracy in your stitch count is vital, as even one extra loop can cause the bag to appear lopsided once the final assembly begins.
Material choice is the next pillar of the Crochet Flower Tote Bag – Pattern. For a bag that maintains its shape, mercerized cotton yarn is highly recommended because it has less “stretch” than acrylic or wool. This ensures that when you place your phone, wallet, or books inside the Crochet Flower Tote Bag – Pattern creation, the bottom doesn’t sag excessively. Using a natural fiber yarn also enhances the definition of the floral stitches, making the intricate details of the pattern more visible to the naked eye.
The crochet hook size you choose for your Crochet Flower Tote Bag – Pattern will determine the tension and overall drape of the piece. Usually, a 4.0mm (G) or 5.0mm (H) hook is the “sweet spot” for medium-weight yarn, providing a tight enough weave to keep items secure while remaining flexible. Always perform a gauge swatch before starting the full Crochet Flower Tote Bag – Pattern to ensure your squares match the dimensions specified in the instructions, preventing a size mismatch later.
Color theory plays a massive role in how the Crochet Flower Tote Bag – Pattern is perceived visually. You can opt for a “monochrome chic” look by using different shades of the same color, or a “wildflower meadow” look by using a different bright color for every flower center. The Crochet Flower Tote Bag – Pattern is incredibly forgiving for scrap-busting, meaning you can use leftover yarn from previous projects to create a unique, multicolored boho tote that is uniquely yours.
Finally, the Crochet Flower Tote Bag – Pattern involves a “joining” phase, which is where the magic happens. You can use a slip stitch join for a seamless look or a whip stitch with a tapestry needle for a more traditional, quilted feel. Understanding these assembly techniques is just as important as the stitching itself, as the joinery provides the structural skeleton that allows the Crochet Flower Tote Bag – Pattern to transition from flat fabric to a functional 3D object.
2 Step-by-Step Execution of the Floral Motifs
The heart of the Crochet Flower Tote Bag – Pattern is the central floral motif, which usually begins with a Magic Ring or a small chain loop. Starting with a Magic Circle allows you to pull the center tight, eliminating any holes in the middle of your flowers. In this Crochet Flower Tote Bag – Pattern, the first round typically consists of Double Crochet (dc) clusters that form the “stamen” of the flower, providing a sturdy anchor for the petals that follow in the subsequent rounds.
As you progress through the Crochet Flower Tote Bag – Pattern, you will transition to creating the petals, which often involve Treble Crochets (tr) or Double Treble Crochets (dtr) to give the flower height. These taller stitches create the soft, rounded edges of a daisy or sunflower, which are the most popular styles for a Crochet Flower Tote Bag – Pattern. It is essential to maintain consistent tension during this phase so that every flower on your bag looks identical in size and volume.
Once the flower is complete, the Crochet Flower Tote Bag – Pattern instructs you to “square off” the circle. This is achieved by using stitches of varying heights—Single Crochets in the middle of the sides and Double Crochets or Treble Crochets in the corners. This geometric trick transforms a round flower into a workable square, making it easy to connect multiple pieces together. This step is the most satisfying part of the Crochet Flower Tote Bag – Pattern because you finally see the “tote” structure taking shape.
Blocking your squares is a professional secret that elevates any Crochet Flower Tote Bag – Pattern from amateur to boutique quality. By pinning your finished squares to a blocking board and lightly steaming them, you ensure that every edge is perfectly straight and every corner is a crisp 90 degrees. This extra effort makes the final assembly of the Crochet Flower Tote Bag – Pattern significantly easier, as the edges will line up perfectly like puzzle pieces without any bunching or pulling.
In some variations of the Crochet Flower Tote Bag – Pattern, you might choose to add leaf motifs in the corners of the squares. Using a forest green or sage yarn for the final round of the square can simulate the look of foliage surrounding the blossom. This adds a layer of realism and depth to the Crochet Flower Tote Bag – Pattern, leaning into the popular “cottagecore” aesthetic that continues to dominate fashion trends and social media platforms like Pinterest.
Safety and durability are also addressed during the motif stage of the Crochet Flower Tote Bag – Pattern. Make sure to weave in your ends securely using a tapestry needle, moving the yarn in multiple directions to lock it in place. Since a tote bag undergoes a lot of friction and movement, loose ends can easily unravel. A well-finished Crochet Flower Tote Bag – Pattern should look as clean on the inside as it does on the outside, ensuring a long lifespan for your creation.
3 Assembling and Shaping Your Tote Bag
After you have crocheted all the necessary squares following your Crochet Flower Tote Bag – Pattern, it is time to arrange them. Lay them out on a flat surface to decide on the color placement; many find that a checkerboard pattern or a gradient effect works best. The most common layout for a Crochet Flower Tote Bag – Pattern involves two large panels for the faces of the bag, though some “market bag” styles use a continuous mesh bottom with floral borders.
To join the pieces, the Crochet Flower Tote Bag – Pattern usually recommends the “Flat Slip Stitch Join.” This method creates a decorative ridge that adds to the bag’s texture or a completely flat seam that stays hidden. If you want a more sturdy construction, the Single Crochet Join is excellent because it adds a bit of “ribbing” to the seams, providing extra reinforcement at the stress points of the Crochet Flower Tote Bag – Pattern where the bag will naturally fold.
The handles are a critical component of the Crochet Flower Tote Bag – Pattern. You can choose to crochet simple straps using the half-double crochet stitch, or you can buy pre-made leather or wooden handles for a mixed-media look. If you are crocheting them, the Crochet Flower Tote Bag – Pattern suggests making them slightly shorter than you think you need, as yarn handles will naturally stretch over time when the bag is loaded with heavy items.
Adding a lining is an optional but highly recommended step in the Crochet Flower Tote Bag – Pattern. A simple cotton fabric lining prevents smaller items like lip balms or pens from falling through the gaps in the crochet stitches. To do this, simply cut a piece of fabric slightly larger than your bag panels, sew it into a pouch, and hand-stitch it to the inside rim of your Crochet Flower Tote Bag – Pattern project. This also helps the bag maintain its rectangular or square shape over years of use.
For the top border of the Crochet Flower Tote Bag – Pattern, a few rounds of Reverse Single Crochet (also known as the Crab Stitch) provide a beautiful, cord-like finish. This final touch stabilizes the opening of the bag, preventing it from stretching out of shape. It is these small details in the Crochet Flower Tote Bag – Pattern that differentiate a quick project from a high-quality accessory that can withstand the rigors of daily use.
Don’t forget to add a closure if your Crochet Flower Tote Bag – Pattern requires one. A simple loop and a decorative button—perhaps even a wooden one—can keep your belongings secure. Some crafters prefer to install a zipper, though this requires a bit more sewing skill. Regardless of the choice, the Crochet Flower Tote Bag – Pattern is flexible enough to accommodate various fastening methods based on your personal preference and skill level.
4 Customization and Advanced Styling Tips
The beauty of the Crochet Flower Tote Bag – Pattern is that it serves as a canvas for your creativity. Once you’ve mastered the basic floral square, you can experiment with different types of flowers, such as roses, lavender, or tulips. By altering the Crochet Flower Tote Bag – Pattern to include different botanical elements, you can create a “bouquet bag” that is entirely unique. This customization is what makes the crochet community so vibrant and innovative.
You can also play with yarn textures within the same Crochet Flower Tote Bag – Pattern. Using a velvet yarn for the flower petals and a matte cotton for the background creates a stunning contrast in light reflection and feel. This tactile variety makes the Crochet Flower Tote Bag – Pattern look much more expensive and professionally made. Just ensure that the yarn weights are compatible so the squares don’t turn out different sizes.
For those who want a larger Crochet Flower Tote Bag – Pattern, you can simply add a “border” of solid color around each square before joining them. This increases the surface area of the bag without requiring more intricate floral work. It’s a great way to scale the Crochet Flower Tote Bag – Pattern up into a beach bag or a large grocery carrier while keeping the floral details centered and highlighted.
Embellishments can take your Crochet Flower Tote Bag – Pattern to the next level. Consider sewing small pearls or beads into the center of each flower for a touch of elegance. If you are making a summer-themed Crochet Flower Tote Bag – Pattern, adding small tassels or pom-poms to the bottom corners can give it a playful, festival-ready vibe. These additions are easy to do and significantly increase the “wow factor” of the finished product.
Sustainability is a key theme when working on a Crochet Flower Tote Bag – Pattern. You can even use recycled T-shirt yarn for a chunkier, sturdier version of the bag. This makes the Crochet Flower Tote Bag – Pattern an eco-friendly project that helps reduce textile waste while providing you with a durable shopping companion. Chunky yarn also means the project works up much faster, which is perfect for last-minute gifts.
Finally, consider the Crochet Flower Tote Bag – Pattern as a potential source of income. Handcrafted bags with floral designs are highly sought after on platforms like Etsy or at local craft fairs. By perfecting this Crochet Flower Tote Bag – Pattern, you are developing a marketable skill. High-quality photography of your finished crochet tote in natural lighting will help showcase the texture and detail, making your version of the Crochet Flower Tote Bag – Pattern stand out in a crowded marketplace.
Frequently Asked Questions (FAQ)
What is the best yarn for a Crochet Flower Tote Bag – Pattern?
The best yarn is 100% cotton or a cotton-linen blend. These fibers are strong, have minimal stretch, and offer excellent stitch definition, which is crucial for showing off the floral details in the Crochet Flower Tote Bag – Pattern.
How long does it take to finish a Crochet Flower Tote Bag – Pattern?
For an intermediate crocheter, it typically takes between 10 to 15 hours. This includes the time to crochet about 13-15 squares, join them together, and add the handles and finishing touches.
Can a beginner attempt a Crochet Flower Tote Bag – Pattern?
Yes! While the floral motifs might look complex, they usually rely on basic stitches like the chain, single crochet, and double crochet. If you can make a standard granny square, you can definitely handle a Crochet Flower Tote Bag – Pattern.
Is it necessary to line a crochet bag?
While not strictly necessary, lining your Crochet Flower Tote Bag – Pattern with fabric will prevent the bag from stretching out of shape when carrying heavy items and will keep small objects from slipping through the stitches.
How do I wash my Crochet Flower Tote Bag?
If you used cotton yarn, you can usually hand wash it in cool water with a mild detergent. Lay it flat on a towel to dry to ensure the Crochet Flower Tote Bag – Pattern maintains its original shape and doesn’t shrink or warp.
Can I make the handles adjustable?
Absolutely. You can modify the Crochet Flower Tote Bag – Pattern by crocheting a much longer strap and using a metal slider or simply tying a knot at the shoulder to adjust the length to your liking.
Conclusion
In this guide, we have explored the intricate and rewarding process of creating a Crochet Flower Tote Bag – Pattern. From selecting the perfect non-stretch cotton yarn to mastering the 3D floral motifs and finally assembling the bag with professional joining techniques, you now have the knowledge to create a stunning accessory. We discussed the importance of gauge, the benefits of blocking, and how to add personal touches like fabric linings and bead embellishments to make your work truly stand out.
The Crochet Flower Tote Bag – Pattern is a perfect project for those looking to combine their love for nature with practical, everyday fashion. By following these steps, you’ve learned how to transform simple yarn into a durable, stylish, and eco-friendly tote that reflects your creative spirit. Remember, the most important part of any crochet journey is the joy of the process and the satisfaction of seeing a project through to completion.