
Crochet Flowers – Tutorial: how to create everlasting blooms with yarn and a hook. If you have ever wanted to bring a touch of eternal spring into your home, mastering the art of crochet flowers is the perfect way to start. This comprehensive step-by-step crochet guide is designed to take you from a curious beginner to a confident crafter, ensuring you can create beautiful handmade floral decor with ease.
Crocheting has evolved from a traditional hobby into a vibrant, modern form of self-expression. By learning how to make a DIY crochet flower, you open up a world of endless creative possibilities, allowing you to embellish clothing, create stunning bouquets, or design unique gifts for your loved ones. In this easy crochet project, we will break down the essential stitches, materials, and techniques required to master this beautiful craft.
As you embark on this creative journey, you will find that working on a crochet flowers tutorial is not only rewarding but also incredibly therapeutic. The repetitive motion of the stitches combined with the vibrant colors of your yarn offers a wonderful way to unwind and express your personal style. Let us dive deep into the world of yarn crafting and discover how simple loops can transform into spectacular, blooming works of art.
1. Choosing the Best Yarn and Hooks for Crochet Flowers
Selecting the right materials is the first and most crucial step in your crochet flowers tutorial journey. The type of yarn you choose will heavily influence the final look, texture, and size of your handmade floral decor. For beginners, a smooth, tightly spun yarn is highly recommended because it allows you to see your stitches clearly and avoids splitting.
When considering yarn weights, a medium weight yarn (also known as worsted weight or aran) or a sport weight yarn is ideal for creating structured, well-defined petals. Cotton yarn is a favorite choice among crafters for yarn crafting flowers because it holds its shape exceptionally well and offers a crisp, clean finish. Acrylic yarn is another excellent, budget-friendly alternative that comes in an infinite array of vibrant colors.
The crochet hook you pair with your yarn is equally important for achieving the perfect tension. For a standard easy crochet project, a hook size ranging from 3.5mm (E-4) to 4.5mm (G-6) works beautifully with most medium yarns. If your stitches tend to be too loose, dropping down a hook size can help your DIY crochet flower look much tighter and more professional.
Pro Tip: Always check the yarn label for the manufacturer’s recommended hook size, but feel free to go down one size if you want stiffer petals that stand up on their own.
Proper tool selection ensures that your crafting experience remains frustration-free and enjoyable from start to finish. Gathering the right tools, including a sharp pair of scissors and a tapestry needle for weaving in ends, sets you up for ultimate success. Now that your supplies are ready, you can confidently move forward with your step-by-step crochet guide.
Investing a little time in understanding your materials will dramatically improve your final results. Beautiful crochet flowers start with a solid foundation of quality materials that complement each other perfectly. With your hook and yarn in hand, you are fully prepared to master the fundamental stitches that bring these gorgeous blossoms to life.
2. Essential Stitches for Your Step-by-Step Crochet Guide
To successfully complete this crochet flowers tutorial, you only need to master a few fundamental crochet stitches. The magic begins with either a slip knot and a short chain or the famous magic ring technique. The magic ring is highly preferred for handmade floral decor because it allows you to pull the center of your flower completely closed, leaving no visible hole.
The first foundational stitch you will use frequently is the single crochet (sc), which provides a tight, dense structure perfect for the flower centers. Next, the half double crochet (hdc) adds a bit more height, making it excellent for transitioning from the center to the petals. Mastering these basic building blocks is essential for anyone diving into an easy crochet project.
The star of the show for creating elongated, flowing petals is the double crochet (dc) stitch. This stitch adds the necessary height and drape to make your DIY crochet flower look realistic and dynamic. By combining single, half double, and double crochets in a single loop, you can easily create beautifully curved petals.
Another vital element in yarn crafting is the slip stitch (sl st), which is used to join rounds and move your yarn seamlessly across the project. Slip stitches keep your edges neat and help define the separations between individual petals. Learning how to manipulate these stitches together is the secret to a successful step-by-step crochet guide.
As you practice, remember that consistency in your stitch tension is far more important than speed. Taking your time to ensure each loop is uniform will give your crochet flowers a polished, boutique-quality appearance. With these five basic stitches in your repertoire, you possess all the skills needed to tackle almost any floral pattern.
3. Creating Your First DIY Crochet Flower
Now it is time to put your skills into practice and build your very first DIY crochet flower. Start by creating a magic ring and securing it with a single chain stitch. Inside the ring, work 10 single crochet stitches, then pull the yarn tail firmly to close the center circle tightly. Join the round with a slip stitch into the very first single crochet you made.
For the second round, we will begin constructing the vibrant petals that make this easy crochet project so delightful. Chain 2 (this counts as your first height guide), and in the exact same stitch, work two double crochet stitches. This cluster forms the swelling, rounded beginning of your very first flower petal.
In the next stitch, work two more double crochet stitches followed by a chain of 2, and secure it with a slip stitch into that same loop. You have now successfully created one complete, beautiful petal for your handmade floral decor. Repeat this exact sequence across the remaining stitches of your central ring.
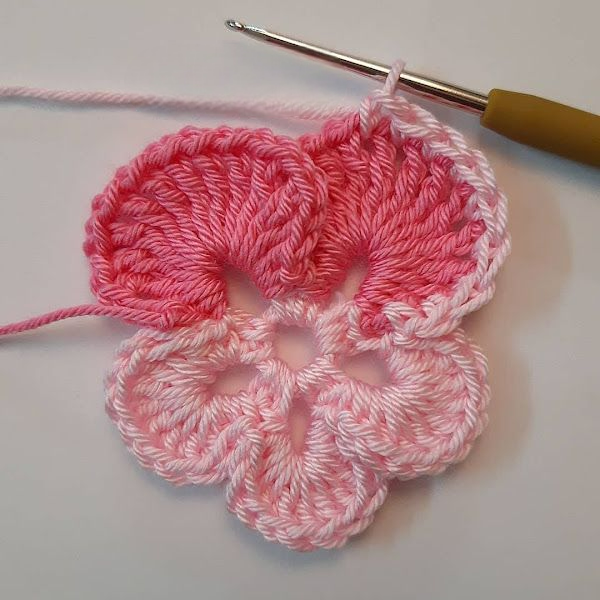
As you progress around the circle, you will watch five distinct, symmetrical petals bloom right before your eyes. This simple repetition is the core mechanic of our crochet flowers tutorial, making it accessible yet incredibly satisfying. Ensure you keep your yarn tension even so that all five petals turn out identical in size.
Once you reach the final stitch, cut your yarn, leaving a generous six-inch tail for finishing. Pull the yarn completely through the last loop, and use your tapestry needle to weave the ends neatly into the back of the flower. This clean finish is what elevates your yarn crafting from a simple hobby to professional-grade art.
Gently reshape the petals with your fingers, flattening the center and puffing up the edges to give it a natural look. Congratulations, you have just completed your first piece of everlasting, gorgeous handmade floral decor! This basic pattern serves as the perfect springboard for more advanced variations and styles.
4. Creative Ways to Use Handmade Floral Decor
Once you have mastered this crochet flowers tutorial, you will quickly find yourself with a beautiful collection of colorful blossoms. One of the most popular ways to utilize these creations is by turning them into handmade floral decor for your living space. You can attach floral wire to the backs and arrange them in a vase for a permanent, dust-resistant bouquet.
These blossoms also make fantastic embellishments for your wardrobe and personal accessories. Stitching a DIY crochet flower onto a plain canvas tote bag, a denim jacket, or a winter beanie instantly adds a cozy, bohemian charm. It is an incredibly cost-effective way to upcycle old clothing into trendy, customized fashion pieces.
If you enjoy scrapbooking or card making, smaller variations of these flowers can be glued onto paper crafts for a gorgeous 3D effect. Utilizing an easy crochet project to decorate gift wrapping makes your presents stand out and shows the recipient extra thoughtfulness. The versatility of yarn crafting means your imagination is the only real limit.
For holiday decorating, you can string dozens of these flowers together along a thick piece of twine to create a stunning seasonal garland. This type of step-by-step crochet guide application is perfect for baby showers, birthday parties, or spring celebrations. They bring warmth, color, and a handmade touch to any event atmosphere.
You can also transform your crochet flowers into functional items like hair clips, headbands, or elegant brooches. By gluing a simple metal hair slide or safety pin to the back of the flower, you create instant, wearable art. They make wonderful stocking stuffers, party favors, or craft fair items.
Ultimately, the joy of creating handmade floral decor lies in sharing your passion with the world around you. Whether you keep them to brighten your own home or gift them to friends, these pieces carry a timeless appeal. Keep experimenting with colors, textures, and layouts to discover your own unique crafting signature.
FAQ – Frequently Asked Questions
What is the best yarn for making crochet flowers?
The best yarn for creating crisp, well-defined crochet flowers is 100% cotton yarn in a medium or sport weight. Cotton provides excellent stitch definition and structural integrity, ensuring your petals hold their shape over time without drooping.
Can a complete beginner follow this crochet flowers tutorial?
Absolutely! This easy crochet project uses only the most basic stitches, such as the single crochet, double crochet, and slip stitch. With a little patience and practice, a beginner can easily complete their first flower in less than an hour.
How do I make my crochet flowers stiffer so they stand up?
To achieve stiffer petals for your handmade floral decor, you can use a crochet hook that is one size smaller than what the yarn label recommends. Alternatively, you can apply a commercial fabric stiffener or a water-and-glue mixture to the finished project.
How long does it take to complete one DIY crochet flower?
Once you are comfortable with the basic stitch sequence outlined in this step-by-step crochet guide, a single five-petal flower typically takes between 10 to 15 minutes to complete from start to finish.
Are crochet flowers machine washable?
This depends entirely on the fiber content of the yarn you used. If you used cotton or acrylic yarn, your flowers can generally be washed on a gentle cycle, though hand washing and air drying are highly recommended to preserve their delicate shape.
Conclusion
In this crochet flowers tutorial, we have explored everything you need to know to create gorgeous, everlasting blooms from scratch. From selecting the perfect cotton or acrylic yarn to mastering foundational stitches like the single and double crochet, you now have the tools to build a beautiful collection of handmade floral decor.
We walked through a simple, beginner-friendly step-by-step crochet guide to help you craft your very first DIY crochet flower, and discussed how to use these versatile pieces to brighten up your home, wardrobe, and gifts. This easy crochet project highlights just how rewarding and versatile the art of yarn crafting can truly be.