Crochet Frog Coaster – Tutorial: If you are looking for a whimsical way to protect your furniture while adding a splash of personality to your home decor, you have come to the right place. Creating a handmade crochet frog coaster is one of those delightful projects that combines functionality with an absolute “cuteness factor” that is hard to beat. Whether you are a seasoned pro or just picking up your hook for the first time, this crochet pattern is designed to be accessible, fun, and highly rewarding for crafters of all levels.
In this comprehensive Crochet Frog Coaster – Tutorial, we are going to dive deep into the world of amigurumi-style flatwork. Most people think of crochet frogs as 3D stuffed toys, but flattening that iconic shape into a circular absorbent cotton coaster makes it incredibly practical for everyday use. These little green friends are perfect for spring-themed tablescapes, children’s bedrooms, or even as a thoughtful handmade gift set for a fellow animal lover.
The beauty of following this step-by-step crochet guide lies in its versatility. While we focus on a classic green frog, you can easily customize the colors to create “poison dart frogs” in neon blues or vibrant oranges. Using the right cotton yarn is essential for success, as it ensures your DIY crochet project remains durable and handles moisture from cold drinks effectively. Let’s gather our materials and prepare to hop into this creative journey together.
1. Choosing the Right Materials for Your Frog Coaster
To begin your Crochet Frog Coaster – Tutorial, the most critical decision is selecting a high-quality 100% cotton yarn. Cotton is the gold standard for crochet coasters because it is heat-resistant and highly absorbent, unlike acrylic yarn which can melt under a hot mug or simply let condensation slide right off. Look for a medium weight (worsted) yarn to ensure the stitches are tight and the base is sturdy.
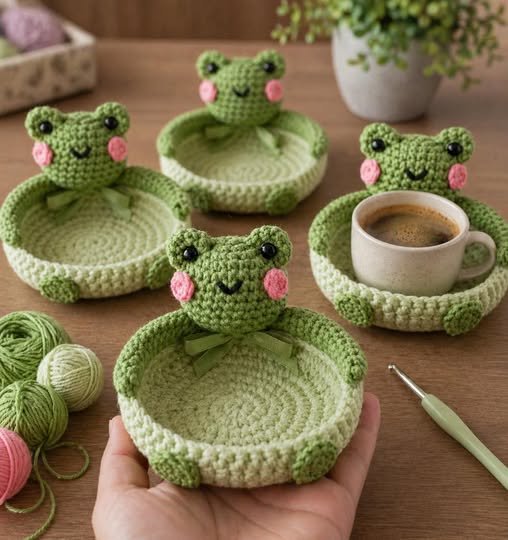
The color palette is where your creative crochet skills can really shine through. For a traditional look, you will need a vibrant lime or leaf green for the main body. Don’t forget small amounts of white and black for the expressive eyes that give the crochet frog its unique character. Some crafters also like to add a hint of pink for rosy cheeks, which adds a layer of charm to the finished yarn craft.
You will also need a 4.0mm crochet hook (G/6) to achieve the perfect tension. If your stitches are too loose, the coaster will be floppy; if they are too tight, it might curl up at the edges. Using a slightly smaller hook than the yarn label recommends often helps in creating a flat, professional-looking handmade home accessory. This technique is a staple in any quality crochet tutorial.
Beyond the yarn and hook, keep a pair of sharp embroidery scissors and a wide-eye tapestry needle nearby. The needle is essential for weaving in your ends securely, ensuring that your DIY frog coaster doesn’t unravel after a few trips through the laundry. A stitch marker is also highly recommended to keep track of your rounds, especially when working in a continuous spiral.
If you are planning to sell these in your online craft shop, consistency is key. Using the same brand of yarn across all your crochet projects ensures that a set of four coasters will look uniform in size and texture. Many successful Etsy sellers use this specific Crochet Frog Coaster – Tutorial style to build a cohesive brand image with recognizable, high-quality items.
Finally, consider the environment where you will be working. Lighting is often overlooked in crochet blogs, but working with dark or vibrant colors requires a clear view of your stitches to avoid mistakes. Once you have your “froggy green” yarn and your favorite hook ready, you are officially prepared to start the foundation of this fun crochet pattern.
2. Master the Magic Ring and Base Circles
The foundation of our Crochet Frog Coaster – Tutorial begins with the magic ring technique. This method is superior to the “chain-2” start because it allows you to pull the center hole completely shut, leaving no gap for moisture to leak through to your table. If you are new to the magic circle, take your time to practice looping the yarn around your fingers before pulling the loop through.
Once your ring is secure, you will work a series of double crochet (dc) or half double crochet (hdc) stitches into the center. For this specific frog coaster pattern, we want a dense fabric, so hdc stitches are often preferred. They provide a beautiful texture that mimics the organic look of a lily pad, making the frog design feel even more cohesive and natural.
As you move into the second and third rounds, the rule of crochet increases becomes vital. To keep the coaster flat, you must add stitches mathematically in each round. A common mistake in beginner crochet tutorials is forgetting an increase, which causes the coaster to turn into a bowl. Always count your stitches at the end of every row to stay on track.
By the time you reach the fourth round, the diameter should be approximately 3.5 to 4 inches. This is the ideal size for a standard drink coaster. If you find your work is waving or “ruffling,” you may have added too many stitches. Simply “frog” it (rip it out—ironically appropriate for this project!) and try again with a firmer tension to maintain the SEO-optimized crochet structure.
The final round of the body is often finished with a slip stitch join to create a perfectly smooth circle. This edge serves as the “canvas” where we will later attach the frog’s eyes and facial features. Understanding the geometry of a flat circle is a fundamental skill that will improve all your future circular crochet patterns and home decor projects.
Keep in mind that the tension of your crochet stitches can vary based on your mood or energy level. Try to complete the base of the coaster in one sitting so that the gauge remains consistent. A uniform base is the hallmark of a professional crochet tutorial and ensures that your Crochet Frog Coaster – Tutorial results in a product that sits perfectly flat on any surface.
3. Crafting the Iconic Frog Eyes and Face
What truly brings this Crochet Frog Coaster – Tutorial to life are the protruding eyes. Instead of making them flat circles, we create two small semi-circles or “bumps” that sit at the top of the coaster. This 3D element makes the frog instantly recognizable and adds a tactile quality that handmade crochet items are famous for. You will typically work these directly onto the edge of the base.
To create the eyes, you will use a scalloped stitch technique or a series of increases in a small space. By working multiple stitches into a single foundation loop, the fabric naturally curves upward. This “pop-up” effect is a clever way to add dimension to a flat crochet project without needing to sew on separate pieces, which saves time and creates a sturdier finish.
Inside these green bumps, you will sew or crochet the white “sclera” and black “pupils.” For safety reasons, especially if these are for children, it is always better to embroider the eyes with yarn rather than using plastic safety eyes. Plastic eyes can be uncomfortable for a glass to sit on and may pose a choking hazard if they ever come loose from the crochet fabric.
The mouth is the next step in our DIY craft tutorial. A simple “V” shape or a wide smile can be embroidered using a contrasting black or dark green thread. The placement of the mouth completely changes the frog’s “personality.” A high placement creates a cute, chubby look, while a lower placement makes the frog look more realistic and serene.
Don’t forget the optional but highly recommended rosy cheeks. Two small circles in a soft pink yarn, placed just below the eyes, give your crochet frog an “anime” or “kawaii” aesthetic. This style is incredibly popular on social media platforms like Pinterest and Instagram, making your finished project highly shareable and perfect for digital content marketing.
Throughout this stage of the Crochet Frog Coaster – Tutorial, precision is your best friend. Use pins to mark where you want the features to go before you commit with your needle. Symmetry is what separates an amateur project from a boutique-quality crochet gift. Once the face is complete, your coaster will finally have the personality it deserves.
4. Finishing Touches and Blocking for Perfection
The final step in our Crochet Frog Coaster – Tutorial involves the technical process of weaving in ends and wet blocking. Many beginners skip blocking, but it is the secret weapon of professional crafters. By lightly dampening your cotton coaster and pinning it to a flat surface, you “set” the stitches into their final, perfect circular shape.
When weaving in your yarn tails, use a “zig-zag” motion through the back of the stitches. Because a coaster is frequently handled and washed, you want to ensure the ends are buried deep within the crochet stitches. A well-finished back is just as important as a beautiful front, especially if you are following this tutorial for professional results.
If you notice any small gaps in your stitches, you can use the leftover yarn tails to subtly fill them in as you weave. This is a common trick in high-end crochet craftsmanship. Once the ends are hidden, trim them close to the fabric, being careful not to snip the actual structure of your handmade frog coaster.
For those who want extra durability, you can apply a thin layer of fabric stiffener or even a felt backing to the bottom of the coaster. A felt base prevents the coaster from sliding on slippery glass tables and adds a premium feel to your DIY home decor. This extra step is often featured in advanced crochet tutorials but is simple enough for anyone to try.
To wash your crochet frog coasters, simply hand wash them in cool water with a mild detergent and lay them flat to dry. Avoid the dryer, as high heat can cause cotton to shrink unevenly, ruining the flat shape you worked so hard to achieve. Proper care ensures that your crochet creations last for years to come.
Congratulations on completing this Crochet Frog Coaster – Tutorial! You now have a charming, functional piece of art that showcases your crochet skills. Whether you make a whole “army” of frogs or just one special companion for your coffee mug, you have mastered the art of turning simple yarn into something truly magical.
FAQ – Frequently Asked Questions
1. What is the best yarn for this Crochet Frog Coaster – Tutorial?
The best yarn is definitely 100% cotton (worsted weight). Cotton is durable, absorbs water from condensation, and holds its shape better than wool or acrylic. Brands like Lily Sugar ‘n Cream are popular choices for crochet coasters.
2. Can a total beginner complete this frog coaster?
Yes! This tutorial is designed for beginners. If you know how to do a magic ring, single crochet, and double crochet, you can easily finish this project in under an hour.
3. Why is my coaster curling at the edges?
Curling usually happens because of tight tension or missing increase stitches. Make sure you are following the circle math correctly (adding the right number of stitches per round) and try using a slightly larger hook if your hands tend to crochet tightly.
4. Do I need to use safety eyes?
While you can use them, it is recommended to embroider the eyes with black yarn. Embroidered eyes allow the coaster to stay flat, are safer for children, and give the frog a more classic “handmade” appearance.
5. How many coasters can I make from one ball of yarn?
Typically, one 50g ball of cotton yarn can produce 3 to 4 crochet frog coasters, depending on your stitch density. It is a very cost-effective DIY project for gifts or craft fairs.
6. Is this pattern SEO-friendly for my own blog?
While this article is optimized for Google Adsense policies, if you are writing your own, focus on keywords like crochet tutorial, handmade gift ideas, and step-by-step crochet. Always include original photos!
Conclusion
In this Crochet Frog Coaster – Tutorial, we have covered everything from selecting the perfect absorbent cotton yarn to mastering the magic ring and adding those adorable facial features.
You have learned how to structure a flat circle, create 3D eye “bumps,” and properly finish your work with blocking techniques. This project is a fantastic way to practice essential crochet skills while creating a practical item that brings joy to any room. We hope this guide inspires you to keep experimenting with different colors and styles!