A Crochet Glasses Holder – Pattern is a practical and stylish accessory that many crafters enjoy making.
Whether you need a way to store your glasses securely when not in use or want a unique item to add a personal touch to your everyday accessories, the crochet glasses holder is an excellent solution.
Not only does it keep your glasses safe, but it also allows you to show off your crocheting skills while creating something functional and fashionable.
Creating a crochet glasses holder gives you the opportunity to explore a variety of crochet techniques, from simple stitches to more intricate patterns. It’s a relatively quick project for both beginner and advanced crocheters. You can customize the design with different colors, yarns, and decorative touches to make it uniquely yours. The beauty of a crochet glasses holder lies in its simplicity yet its potential for personalization.
In this article, we will explore the steps to creating your own Crochet Glasses Holder – Pattern, from choosing the right yarn to learning the key stitches involved. We will also highlight the benefits of crocheting this item, why it’s such a popular project, and provide answers to common questions about the process. So, let’s dive into this creative and functional crochet adventure!
1. Choosing the Right Yarn and Tools for Your Crochet Glasses Holder
When creating a Crochet Glasses Holder – Pattern, selecting the right yarn is crucial for achieving the best results. A medium-weight yarn, such as worsted weight, is often recommended for this type of project. It provides a good balance between sturdiness and flexibility, which is essential for holding glasses securely. Popular yarn options for this project include cotton or acrylic, both of which offer durability and easy care.
Additionally, you’ll need a crochet hook that is appropriate for your yarn weight. Typically, a 4mm to 5mm hook works well for worsted weight yarn. However, it’s important to check the yarn label to confirm the recommended hook size to ensure the right tension and fit for your holder. If you’re working with a thicker or thinner yarn, you might need to adjust your hook size accordingly.
To enhance the design, you can also incorporate decorative elements like beads, buttons, or embroidery. These can be added to the holder once the basic structure is complete, offering a personalized touch. Keep in mind that while these embellishments add beauty to the final product, the strength and durability of your Crochet Glasses Holder should still be your top priority.
Having the right tools and materials will set you up for success as you move through the crochet process. Make sure to choose yarn colors that complement your style or the recipient’s preferences. If you want a fun, colorful look, you can opt for multiple shades or even variegated yarn to create a striped effect.
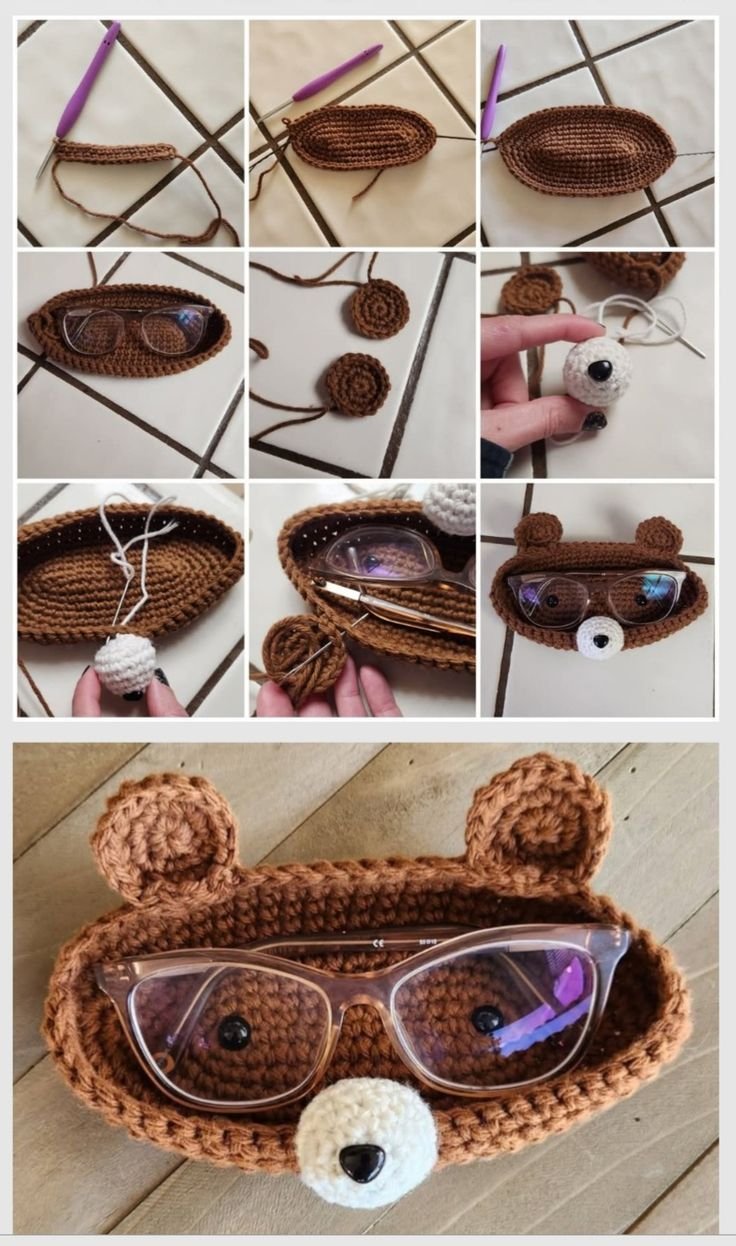
2. Step-by-Step Instructions for the Crochet Glasses Holder
Now that you’ve gathered your yarn and crochet hook, it’s time to start creating your Crochet Glasses Holder – Pattern. Follow these simple steps to make a practical and stylish holder for your glasses.
Step 1: Create a Foundation Chain
Begin by making a foundation chain that is long enough to wrap around the lenses of your glasses. For most glasses, a chain of about 30-40 stitches should suffice. If you want a snugger fit, feel free to adjust the number of stitches accordingly. Once you’ve completed the foundation chain, join the ends with a slip stitch to form a circle.
Step 2: Work in the Round
Now that you have your foundation chain, you’ll continue working in the round. Use single crochet stitches to work around the chain, making sure the stitches are even and tight. This will give your Crochet Glasses Holder a sturdy structure, ensuring that it holds your glasses securely without stretching out over time. Work in a spiral, adding more rows as needed until the piece reaches the desired length.
Step 3: Shape the Holder
As you continue working in the round, you’ll need to shape the holder. This can be done by increasing or decreasing the number of stitches at specific intervals. For a more tailored look, try adding subtle decreases to make the top of the holder narrower. The bottom, where the glasses rest, should remain wider for easy access.
Step 4: Create the Closure
To keep your glasses safe inside the holder, you’ll need to create a closure. This can be done with a simple flap that folds over the top of the holder. You can use a button or crochet a small loop to secure the flap in place. The closure ensures that the glasses don’t fall out while the holder is being carried around.
Step 5: Add Decorative Touches
Once the basic holder is complete, you can personalize it by adding embellishments. For example, you can crochet a small flower or add beads along the edges for an extra flair. These small details can really make your Crochet Glasses Holder – Pattern stand out.
Step 6: Final Touches and Assembly
Once all the components are complete, stitch them together if necessary. Make sure the closure is secure and that the holder fits your glasses snugly. If you want a more structured finish, you can also line the inside of the holder with fabric for extra padding.
By following these simple steps, you’ll have a functional and fashionable Crochet Glasses Holder that showcases your crochet skills. With just a few basic stitches, you can create a unique accessory that’s both useful and beautiful.
3. Why Crocheting a Glasses Holder is a Great Idea
Creating a Crochet Glasses Holder – Pattern offers several benefits, making it a great choice for your next crochet project. First, it’s a highly practical item. If you wear glasses or know someone who does, a crochet holder provides a secure and stylish way to protect glasses from scratches, dust, or damage. It’s a small but thoughtful gift for family, friends, or even yourself.
Second, it’s an excellent way to practice your crochet skills. If you’re a beginner, this project gives you the opportunity to work with basic stitches like single crochet, as well as more advanced techniques like shaping and adding closures. It’s an ideal project for both new and seasoned crocheters looking to improve their skills.
Third, crocheting your own glasses holder allows for complete customization. Whether you want to experiment with different color schemes, patterns, or textures, you have full control over the design. This makes the Crochet Glasses Holder a perfect canvas for expressing your creativity. You can choose vibrant colors for a fun and quirky design, or go for neutral tones for something more elegant and sophisticated.
Another advantage of crocheting a glasses holder is that it’s a relatively quick project. You can complete it in just a few hours or over the course of a few days, depending on how much time you can dedicate to it. If you’re looking for a satisfying and practical project to complete in a short time frame, this is an ideal choice.
Lastly, crocheting a Crochet Glasses Holder is a great way to reduce waste. By creating your own holder, you can eliminate the need for plastic cases or store-bought accessories. Plus, you can use leftover yarn from other projects, making it a sustainable choice that aligns with eco-conscious crafting.
4. Customizing Your Crochet Glasses Holder
One of the most exciting aspects of the Crochet Glasses Holder – Pattern is the ability to customize it to fit your personal style. There are many ways to personalize your glasses holder, from choosing different yarn types to adding decorative elements that reflect your personality.
Start by choosing the yarn that best represents your aesthetic. If you prefer a minimalist style, opt for solid colors in neutral tones such as black, gray, or beige. For a more bold and vibrant look, you can experiment with bright hues like turquoise, pink, or mustard yellow. You can also use variegated yarns for a multicolored effect that adds texture and visual interest.
Adding texture is another way to customize your glasses holder. Try using different crochet stitches such as the shell stitch, bobble stitch, or granny square motifs to give your holder a unique look. These textures can make your project stand out while still remaining functional and stylish.
You can also make your glasses holder more personal by adding decorative accents. Crochet flowers, tassels, or pom-poms can give your holder a playful and whimsical feel. Alternatively, you can add a small patch of embroidery or a personalized monogram for a more refined touch. These added elements can elevate the overall look and make your glasses holder even more special.
Finally, don’t forget about the closure. While a button is a classic option, you can also use a decorative clasp, snap, or toggle to make your holder stand out. These closures can be chosen to match or contrast with the rest of your design, providing the perfect finishing touch to your crochet project.
FAQ – Frequently Asked Questions
1. What yarn is best for making a Crochet Glasses Holder?
For a Crochet Glasses Holder – Pattern, medium-weight yarn such as worsted weight is ideal. Cotton or acrylic yarns work well, providing durability and ease of care.
2. How long does it take to crochet a glasses holder?
The time it takes to crochet a glasses holder depends on your experience level. On average, it can take between 3-6 hours to complete, making it a relatively quick project.
3. Can I customize the size of the glasses holder?
Yes! You can adjust the size of the Crochet Glasses Holder by modifying the foundation chain and adding or subtracting rows as needed. It’s easy to customize the size to fit your specific glasses.
4. Can I add decorations to my crochet glasses holder?
Absolutely! You can add embellishments like crochet flowers, beads, or even embroidery to make your glasses holder unique. Decorative elements allow you to express your creativity.
5. Is the crochet glasses holder durable enough to protect my glasses?
Yes, if made with appropriate yarn and stitches, the Crochet Glasses Holder will be strong enough to protect your glasses from scratches and damage. Be sure to choose sturdy yarn and maintain a tight crochet tension.
Conclusion
In this article, we’ve covered everything you need to know about creating a Crochet Glasses Holder – Pattern, from selecting the right yarn to customizing your design. This project is not only a fun and rewarding crochet task, but it also results in a practical item that you can use every day. Whether you are a beginner or an experienced crocheter, this is a great project to improve your skills and make something that is both functional and fashionable. We hope this guide helps you get started on your own crochet glasses holder. Please feel free to share your thoughts or suggestions in the comments below!