Looking for a cozy and charming project? This Crochet Granny Blanket Pattern You Will Love – Pattern is a timeless design that never goes out of style.
Whether you’re new to crochet or have years of experience, this pattern combines simplicity with beauty, offering a fun and relaxing crafting experience.
Granny square blankets have become a staple in the world of crochet for a reason. Their repetitive structure and colorful combinations make them incredibly satisfying to create.
Each square is like a mini canvas, and when joined together, they transform into a warm, vintage-inspired masterpiece. You can make your blanket as big or as small as you’d like, and tailor the colors to match your personal style or home décor.
In this article, we’ll guide you through everything you need to know about making your own crochet granny blanket, from choosing yarn and tools to finishing touches. This Crochet Granny Blanket Pattern You Will Love – Pattern is not just a set of instructions—it’s a creative journey that will leave you with a handmade treasure you’ll be proud of.
1. Choosing the Right Materials and Colors
The success of any crochet granny blanket starts with choosing the right yarn and tools. You’ll want to pick materials that offer both comfort and durability for everyday use.
A medium-weight yarn, like worsted or DK, is ideal for granny square blankets. These yarns are easy to work with and offer a cozy, plush texture. Choose a yarn that’s soft but strong, and preferably machine washable for practical care.
Select a color palette that speaks to you. Many crafters love the rainbow style, while others opt for more subdued tones like pastels or earth shades. You can also use yarn scraps for a sustainable, eco-friendly approach.
Make sure to use the correct hook size recommended on your yarn label. Typically, a 4mm to 5.5mm crochet hook works well for granny square blankets. A good ergonomic hook will also help prevent hand fatigue during long crochet sessions.
You’ll also need a yarn needle for weaving in ends and scissors for trimming. A stitch marker may come in handy when working in rounds or for keeping track of your squares.
Lastly, prepare your space for creativity. Having a designated crochet basket or box can keep your yarn tangle-free and your supplies organized as you work through this Crochet Granny Blanket Pattern You Will Love – Pattern.
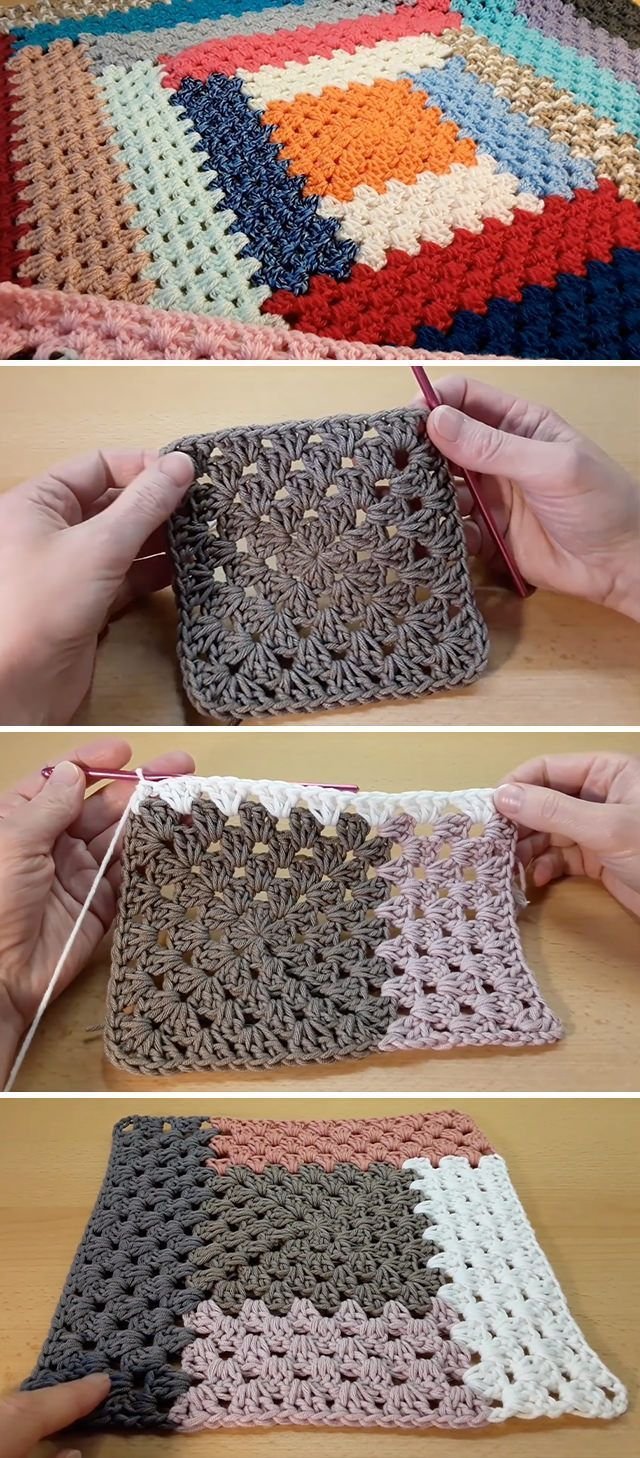
2. Mastering the Basic Granny Square
The foundation of your blanket lies in mastering the classic granny square—a small, repetitive pattern that’s easy to learn and perfect for beginners.
Start with a magic circle or chain 4 and join to form a ring. This center ring is where your first stitches will go. It’s the beginning of every square in this Crochet Granny Blanket Pattern You Will Love – Pattern.
From there, crochet a series of double crochets and chain spaces to form the first round. The traditional structure is four clusters of double crochets, separated by chain-2 spaces in the corners.
As you move into the second round, you’ll be building on the previous clusters. Corners are formed by crocheting into the chain spaces, which allows the square to grow outward symmetrically.
Each new round adds more clusters, and the square gets bigger. The pattern remains consistent, making it easy to memorize and repeat. You can use the same color for each round or switch it up for a multicolored effect.
Once your squares are complete, block them if needed. Blocking helps them hold their shape and makes them easier to join later. Simply dampen the squares, lay them flat, and pin them into place.
Repeat this process to make as many squares as needed. The number of squares will depend on your desired blanket size—baby, throw, twin, or even king-size. The flexibility of this granny blanket pattern is part of what makes it so lovable.
3. Joining the Squares and Assembling the Blanket
After completing your squares, it’s time to transform them into a full-size granny blanket by joining them together in a neat and visually appealing way.
There are several techniques to join granny squares. You can use whip stitch for a nearly invisible seam, or opt for single crochet for a raised, textured border between each square. The join-as-you-go method is another popular option that saves time.
Lay out all your squares in your desired pattern before joining. This is your chance to rearrange the colors or adjust the overall design. Take a photo once you’re satisfied so you can follow it during assembly.
Work row by row or column by column. Keep your tension consistent and take your time to ensure all edges line up properly. A tidy join will give your blanket a polished look.
Once all squares are connected, fasten off and weave in all yarn tails using your yarn needle. This step is crucial to keep your blanket looking clean and professional.
Don’t forget to inspect the blanket for loose ends or uneven edges. Fix any minor flaws before adding the border. The more attention you give to the finishing, the better the final result.
The joining phase is where the project truly comes to life. Seeing all your hard work come together in a colorful and cozy creation is what makes this Crochet Granny Blanket Pattern You Will Love – Pattern so rewarding.
4. Adding a Border and Caring for Your Blanket
Finishing your blanket with a border not only enhances the look but also helps secure the edges, making it more durable and long-lasting.
There are countless options for borders. A simple single crochet border provides a clean edge, while a scalloped or shell stitch border adds a decorative flair. Choose one that complements your granny square design.
Start by working a round of single crochet evenly around the entire blanket. This helps smooth out any unevenness and prepares the base for your chosen border stitch.
If your blanket is multicolored, consider using a neutral shade for the border to tie everything together. White, gray, or black can provide a nice contrast and frame your squares beautifully.
Don’t be afraid to add more than one round to your border. Layering different stitches—like alternating single and double crochets—can create a beautiful edge that stands out.
Once your border is complete, fasten off and weave in the final tail. Give your blanket one last gentle blocking to help it lay flat and even out any tension irregularities.
To care for your granny blanket, hand wash or machine wash on a delicate cycle with cold water. Lay flat to dry to maintain its shape and softness. With proper care, your blanket will remain a cherished item for years to come.
FAQ – Crochet Granny Blanket Pattern You Will Love – Pattern
1. Is this pattern beginner-friendly?
Yes! The Crochet Granny Blanket Pattern You Will Love – Pattern is perfect for beginners. The repetitive nature of granny squares makes it easy to practice and improve your skills.
2. How many granny squares do I need for a full-size blanket?
It depends on the size of each square and the blanket size you want. A throw blanket usually needs around 80 to 100 6-inch squares.
3. Can I use different yarn weights?
Yes, but be consistent throughout the project. Mixing yarn weights can lead to uneven squares and a distorted blanket.
4. What’s the best way to join granny squares?
The join-as-you-go method is efficient and seamless. You can also use whip stitch or single crochet, depending on your preferred look.
5. How long does it take to make a granny blanket?
It varies by size and your crochet speed. A baby blanket can take a few days, while a full-size blanket may take a few weeks.
6. Can I add my own twist to the pattern?
Absolutely! Feel free to customize colors, square size, and border styles. That’s what makes the Crochet Granny Blanket Pattern You Will Love – Pattern so versatile.
Conclusion
This Crochet Granny Blanket Pattern You Will Love – Pattern offers an enjoyable and relaxing way to create something meaningful with your own hands. From choosing your yarn and crafting each square to assembling and finishing the blanket, every step is filled with creativity and joy.
Whether you’re crocheting for yourself, a loved one, or even as a heartfelt gift, this pattern will guide you in making a timeless piece that reflects your personality. It’s more than just a project—it’s an experience that connects tradition, comfort, and modern design.
We’d love to hear your thoughts! Please leave your honest opinion in the comments below, and feel free to share suggestions or questions. Your feedback helps us grow and provide even more helpful patterns and tutorials!