A Crochet granny square cardigan – Tutorial is the perfect way to combine vintage charm with modern fashion, allowing you to create a unique, handmade wardrobe staple. Whether you are a seasoned pro or a curious beginner, building a garment from individual squares is a rewarding experience that simplifies the complex world of sweater construction. This guide will walk you through the essential steps, from selecting your yarn to the final assembly, ensuring you end up with a high-quality piece you’ll be proud to wear.
When you start a Crochet granny square cardigan – Tutorial, you are participating in a timeless tradition of “slow fashion” that values craftsmanship over mass production. The beauty of the granny square is its versatility; you can play with infinite color combinations, varying textures, and different stitch patterns to express your personal style. In this comprehensive guide, we will focus on creating a well-structured, comfortable, and aesthetically pleasing crochet cardigan that fits perfectly and lasts for years to come.
The technical foundation of this Crochet granny square cardigan – Tutorial relies on mastering the classic double crochet stitch and understanding how to join your motifs seamlessly. Beyond just the stitches, we will explore the importance of gauge, yarn weight, and fiber content, all of which play a crucial role in how your finished garment drapes on the body. By following this structured approach, you will learn not only how to make this specific crochet sweater but also gain the skills to design your own custom pieces in the future.
1. Choosing the Right Materials for Your Crochet Granny Square Cardigan
Selecting the perfect yarn is the first vital step in any Crochet granny square cardigan – Tutorial. For a garment that is wearable year-round, many makers prefer a cotton blend or a high-quality acrylic yarn. These fibers offer the durability needed for a piece that will see frequent use while maintaining the definition of your crochet stitches.
The crochet hook size you choose should correspond to your yarn weight, typically a 4mm or 5mm hook for medium/worsted weight yarn. Using the correct hook ensures that your granny squares are not too stiff or too loose. If your stitches are too tight, the cardigan will feel heavy; if they are too loose, the garment may lose its shape over time.
Don’t forget the essential notions like stitch markers, a tapestry needle, and sharp fabric scissors. These tools are indispensable when it comes to the assembly phase of your Crochet granny square cardigan – Tutorial. Stitch markers help you align the squares perfectly, while the needle is used for weaving in ends—a task best done as you go to avoid a mountain of work at the end.
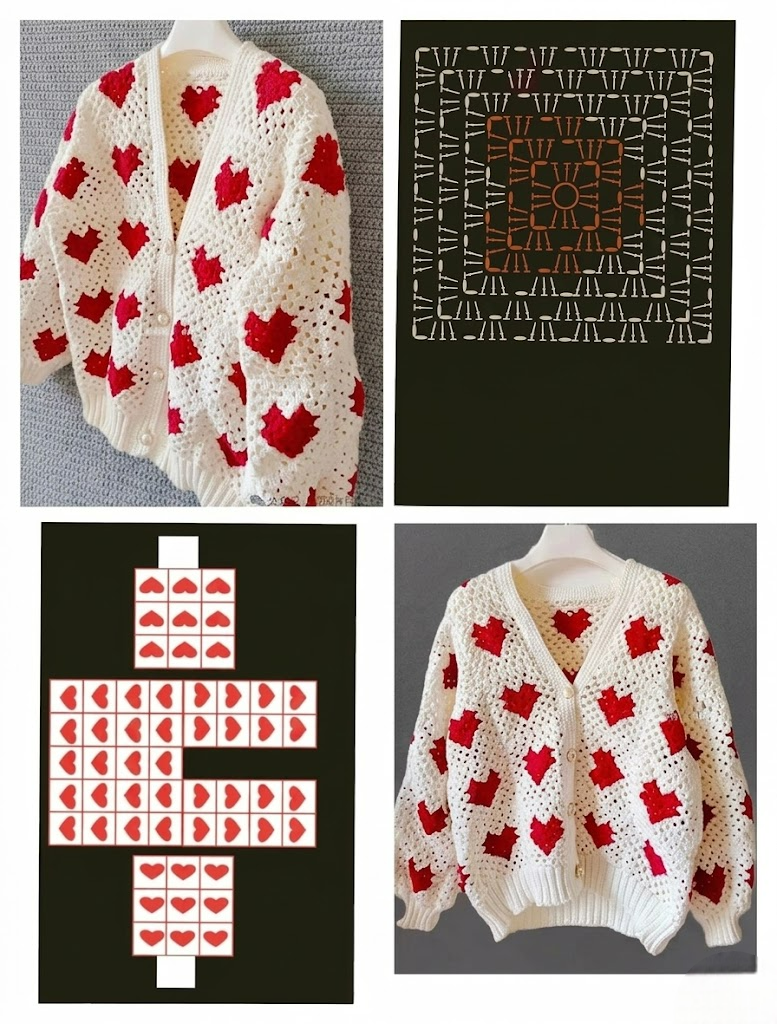
Color selection is where your crochet granny square cardigan truly comes to life. You can opt for a monochromatic look for a sophisticated vibe or go for a multi-colored “scrapghan” style to use up leftover yarn. Planning your color palette beforehand ensures a cohesive look throughout the front panels, back panel, and sleeves.
Consider the drape of the fabric when testing your initial squares. A drapey fabric moves with the body, which is ideal for a boho-style cardigan. To achieve this, you might even go up half a hook size from what the yarn label recommends. This is a pro-tip often shared in a high-level Crochet granny square cardigan – Tutorial.
Lastly, always check your dye lots if you are buying a large quantity of yarn. Even a slight variation in shade can be noticeable once all the squares are joined together. Ensuring all your yarn comes from the same batch will keep the visual consistency of your handmade cardigan professional and polished.
2. Mastering the Basic Square and Pattern Layout
To begin the actual construction in this Crochet granny square cardigan – Tutorial, you must first master the classic granny square. This usually involves a magic ring or a small chain loop, followed by rounds of double crochet clusters separated by chain spaces. Consistency in each square is the secret to a flat, even garment surface.
The layout of your cardigan is determined by the number of squares you produce. For a standard medium-sized crochet cardigan, you might need approximately 30 to 40 squares. The back panel is typically a large rectangle (e.g., 4×4 squares), while the front panels are narrower (e.g., 2×4 squares each), leaving space for the neck opening.
Designing the sleeves is a highlight of a Crochet granny square cardigan – Tutorial. Sleeves can be made by joining squares into a tube or by using a tapered crochet method where you add rows of stitches directly to the armhole. The square-based sleeve gives a trendy, boxy fit that is very popular in modern crochet fashion.
Blocking your squares is a step you shouldn’t skip. Blocking involves wetting your finished squares and pinning them to a specific measurement to dry. This ensures every single granny square is the exact same size, making the joining process much easier and giving the cardigan a high-end, store-bought finish.
Once your squares are blocked, lay them out on a flat surface to finalize the color placement. This “dry run” allows you to see if two identical colors are touching or if the pattern flow looks balanced. Taking a photo of this layout is a helpful reference for the next steps of the Crochet granny square cardigan – Tutorial.
Understanding sizing is critical. If you want an oversized cardigan, simply add an extra row of squares or add a wide crochet border around the entire assembly. For a more fitted look, you can reduce the number of rounds in each individual square, showcasing the flexibility of this modular crochet technique.
3. Joining Techniques for a Professional Finish
The way you connect your motifs in this Crochet granny square cardigan – Tutorial will define the overall look of the piece. The slip stitch join creates a flat, almost invisible seam on the inside, while the whip stitch is a quick and sturdy method using a tapestry needle. Both are excellent for maintaining the structural integrity of the cardigan.
For those who want a more decorative look, the join-as-you-go (JAYGO) method is a game-changer. This technique involves joining the squares during the final round of crochet. It eliminates the need for sewing at the end and provides a beautiful, lacy lattice effect between the granny squares, adding unique detail to your tutorial project.
The mattress stitch is another professional favorite for crochet garments. It creates a completely flat seam that is nearly invisible from the right side. Using this method in your Crochet granny square cardigan – Tutorial will result in a garment that looks exceptionally neat, especially along the shoulder seams and side panels.
When joining the sleeves to the body, ensure you align the centers perfectly. Use locking stitch markers to hold the pieces in place before you start your joining stitches. This prevents the fabric from shifting, which could lead to a crooked or uncomfortable fit around the armhole.
Pay close attention to the tension of your joins. If you pull your yarn too tight while sewing or crocheting the pieces together, the seams will pucker. Keeping a relaxed, consistent tension ensures the Crochet granny square cardigan remains flexible and moves naturally with your body.
After all the panels and sleeves are attached, you will see the cardigan finally take shape. This is the most exciting part of the Crochet granny square cardigan – Tutorial, as you transition from working with small bits of fabric to holding a nearly finished handmade sweater.
4. Adding Borders, Ribbing, and Final Touches
No Crochet granny square cardigan – Tutorial is complete without discussing the finishing touches. Adding a ribbed border to the bottom hem, cuffs, and neckline provides a snug fit and a polished appearance. The front post and back post double crochet stitches are the industry standard for creating this stretchy ribbing.
The neckline can be customized to your preference. You can create a V-neck by tapering the front panels or a simple shawl collar by adding several rows of half double crochet along the inner edges. A well-crafted collar adds weight and “hang” to the cardigan, preventing it from sliding off your shoulders.
Buttons are optional but highly recommended for a functional crochet cardigan. If you decide to add them, you’ll need to create buttonholes. This is easily done by replacing a few stitches with a chain space in your border row. Choose buttons that complement your yarn color and the overall boho aesthetic.
Weaving in your ends is the final technical hurdle. Use your tapestry needle to thread the yarn tails back through the bulk of the crochet stitches. Going back and forth three times is the “golden rule” to ensure the ends never pop out, even after multiple washes in the laundry.
Give your finished Crochet granny square cardigan – Tutorial project a final steam block. Lightly steaming the seams and the ribbing helps the fibers relax and settle into their final shape. Be careful not to touch the iron directly to acrylic yarn, as it can “kill” the fiber and cause it to lose its elasticity.
Finally, take a moment to admire your work. You have successfully navigated the complexities of garment construction, color theory, and stitch consistency. Your granny square cardigan is now a functional piece of art that reflects your dedication to the craft of crochet.
FAQ – Frequently Asked Questions
How many squares do I need for a Crochet granny square cardigan?
The number of squares depends on the size of the squares and your desired fit. Generally, a medium cardigan requires between 34 and 45 granny squares.
What is the best yarn for a granny square cardigan?
A Level 4 Worsted Weight yarn is highly recommended for beginners. Cotton blends are great for breathability, while premium acrylics offer softness and ease of care.
Is this project suitable for beginners?
Yes! Because the cardigan is made of small, manageable squares, it is much less intimidating than crocheting a sweater in one continuous piece. It is a perfect entry-level garment project.
How do I wash my handmade crochet cardigan?
It is best to hand wash your cardigan in cool water with a mild detergent and lay it flat to dry. This prevents the crochet stitches from stretching or felting.
Can I make a long cardigan using this tutorial?
Absolutely. You can simply add more rows of granny squares to the bottom of the panels to create a duster-length cardigan.
How do I prevent the cardigan from being too heavy?
Using a lighter weight yarn (like DK or Category 3) and a slightly larger hook will create a more open, lightweight fabric that isn’t too heavy for daily wear.
Conclusion
In this Crochet granny square cardigan – Tutorial, we have covered everything from selecting the right yarn and hook to the final blocking and assembly.
You’ve learned how to create individual granny squares, join them using professional techniques, and add ribbed borders for a perfect fit. This project is a wonderful way to practice SEO-friendly crochet techniques and build a wardrobe that is truly one-of-a-kind. We hope this guide has inspired you to pick up your hook and start creating your own crochet masterpiece.