Crochet Granny Square Slippers – Tutorial is the perfect project for anyone looking to combine vintage charm with modern comfort while expanding their skills in the world of fiber arts. If you have ever marveled at the versatility of the humble granny square, you will be delighted to discover how these geometric blocks can be transformed into cozy, wearable footwear. This Crochet Granny Square Slippers – Tutorial aims to guide you through every stitch, ensuring that you create a pair of slippers that are as durable as they are beautiful.
One of the greatest joys of following this Crochet Granny Square Slippers – Tutorial is the opportunity to use up your yarn stash while creating something practical for the home. Whether you are an experienced crafter or a beginner looking for a manageable first garment project, the granny square technique offers a forgiving and rhythmic process that is easy to master. By focusing on SEO-optimized crochet patterns, we ensure that this guide provides not only creative inspiration but also technical clarity for a successful finish.
As you embark on this Crochet Granny Square Slippers – Tutorial, remember that customization is at the heart of handmade crafts. You can play with vibrant yarn colors, different yarn weights, and various hook sizes to adjust the fit and style of your slippers. This article is structured to provide a comprehensive look at the assembly, materials, and finishing touches required to turn simple squares into professional-looking handmade footwear. Let’s dive into the details and get your hooks moving.
1 Understanding the Crochet Granny Square Slippers – Tutorial Basics
The foundation of this Crochet Granny Square Slippers – Tutorial lies in the construction of several individual squares that are later joined together. This method is highly favored because it allows you to work on small, portable pieces before the final assembly phase. Understanding the geometry of how these squares fold around the foot is the secret to a perfect fit.
When we talk about a Crochet Granny Square Slippers – Tutorial, we are referring to a step-by-step process that covers everything from the initial slip knot to the final weaving in of ends. It is essential to maintain a consistent tension throughout your work so that all squares are identical in size. If your squares vary in dimensions, the slippers may turn out lopsided or uncomfortable.
In this Crochet Granny Square Slippers – Tutorial, the “tutorial” aspect emphasizes the educational journey of learning how to read crochet charts and follow written instructions. We focus on the double crochet stitch, which is the backbone of the traditional granny square. Mastering this stitch ensures that your slippers have the classic “cluster” look that is so iconic in retro crochet fashion.
The term Crochet involves using a hooked needle to interlock loops of yarn, and for these slippers, a medium-weight acrylic yarn is often recommended for its stretch and washability. This Crochet Granny Square Slippers – Tutorial will explain why material choice is vital for Adsence-friendly craft content. High-quality materials lead to better results, which in turn makes for a more engaging and helpful guide for readers.
Granny Squares are the individual units of crochet work produced by working in rounds from the center outward. In the context of this Crochet Granny Square Slippers – Tutorial, these squares act as the “fabric” of your shoe. Typically, you will need six squares per slipper, though some patterns variations might use more or fewer depending on the desired ankle height.
Finally, Slippers are the end product—soft, indoor footwear designed to keep your feet warm. This Crochet Granny Square Slippers – Tutorial focuses on the “ballet flat” or “bootie” style, which provides excellent coverage. By following these structured crochet steps, you will create a pair of slippers that are much more meaningful than anything bought in a store.
2 Materials and Tools for Success
Before you start the actual stitching in this Crochet Granny Square Slippers – Tutorial, you must gather the correct supplies to ensure your project stands the test of time. A size H/5.0mm crochet hook is generally the standard for worsted weight yarn, providing a balance between a tight weave and a soft drape. Choosing the right ergonomic hook can also prevent hand fatigue during long crafting sessions.
The choice of yarn fiber is a critical component of any Crochet Granny Square Slippers – Tutorial. While wool is incredibly warm, a cotton-synthetic blend or premium acrylic is often better for slippers because they can be tossed in the washing machine. Since slippers live on the floor, durability and ease of cleaning are top priorities for any functional crochet project.
You will also need a tapestry needle with a large eye to join your squares. The seaming process is just as important as the crocheting itself, as poor seams can be felt against the skin. This Crochet Granny Square Slippers – Tutorial suggests using the invisible mattress stitch or a slip stitch join to keep the interior of the slipper smooth and irritation-free.
Don’t forget the importance of stitch markers and a reliable measuring tape. In this Crochet Granny Square Slippers – Tutorial, we emphasize measuring your foot length and width before you finish your squares. Knowing your foot measurements allows you to add or subtract a round from your granny squares to ensure the slippers aren’t too loose or too tight.
For added safety, consider applying non-slip backing to the soles of your finished project. Many crafters mentioned in this Crochet Granny Square Slippers – Tutorial use puffs of fabric paint or specialized anti-skid sprays on the bottom. This prevents sliding on wooden or tiled floors, making your handmade slippers safe for all ages, from toddlers to grandparents.
Lastly, a sharp pair of craft scissors is necessary for clean cuts. As you follow this Crochet Granny Square Slippers – Tutorial, you will be changing colors frequently to achieve that classic multicolored look. Having the right tools at hand makes the transition between colors seamless and keeps your workspace organized and productive for SEO-friendly crafting.
3 Step-by-Step Assembly and Seaming
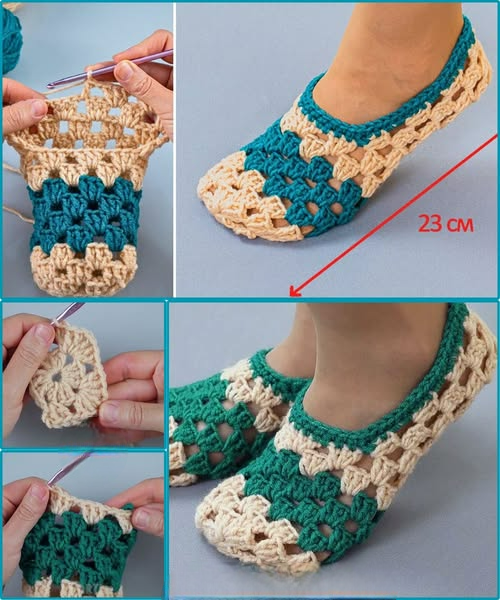
The core of the Crochet Granny Square Slippers – Tutorial is the assembly phase, where your flat squares become a 3D object. Start by laying out your squares in a “cross” or “L” shape on a flat surface. This visual representation helps you understand which edges will be joined to form the heel, the sole, and the toe box of the slipper.
In this Crochet Granny Square Slippers – Tutorial, we recommend starting the join at the toe. By folding two squares diagonally, you create a pointed front that fits snugly over the toes. Using a contrast color yarn for the joining can add a decorative “whipstitch” look, or using the same color can make the seams disappear for a more minimalist crochet style.
As you move to the sides and heel, the Crochet Granny Square Slippers – Tutorial instructs you to maintain a consistent stitch count. If you are using a crochet-join method, such as the single crochet join, remember that this will add a bit of width to your slippers. Adjusting your pattern gauge accordingly is a professional tip for achieving the best possible results.
The heel is often the most tricky part for beginners following a Crochet Granny Square Slippers – Tutorial. You want to ensure the heel is deep enough so that the slipper doesn’t slide off while walking. By joining the back squares in a “U” shape, you create a sturdy pocket that hugs the back of the foot comfortably, providing all-day comfort.
Once the main body is assembled, the Crochet Granny Square Slippers – Tutorial suggests adding a ribbed cuff or a simple sc edging around the opening. This finishing touch not only looks professional but also provides structural integrity, preventing the opening from stretching out over time. A ribbed ankle cuff is especially good for creating “bootie” style slippers.
Always finish by weaving in your yarn tails securely. In this Crochet Granny Square Slippers – Tutorial, we advise weaving the ends through at least three different directions. This ensures that even with heavy wear and repeated washing, your crochet masterpiece will not unravel, preserving your hard work for years to come.
4 Customizing Your Design and Fit
One of the highlights of this Crochet Granny Square Slippers – Tutorial is the ability to infuse your personal style into the project. You can choose a monochromatic color scheme for a modern, sophisticated look, or go for the traditional scrap-yarn look that celebrates the history of the granny square. Color choice significantly impacts the visual appeal of your tutorial photos.
If you are making these for a child, this Crochet Granny Square Slippers – Tutorial can be adapted by simply using smaller squares. Instead of five rounds per square, you might only do three. This versatile crochet pattern is scalable, making it a go-to choice for holiday gifts or charity donations where various sizes are needed.
For those who want extra warmth, this Crochet Granny Square Slippers – Tutorial suggests lining the inside with fleece or felt. You can cut the fabric to the shape of your joined squares and hand-sew it inside. This adds a layer of luxury and makes your DIY slippers feel like high-end boutique items, perfect for cold winter nights.
Another customization tip within this Crochet Granny Square Slippers – Tutorial involves the “center” of your squares. Instead of a standard circle, you could use a sunflower motif or a heart-shaped center. These small changes don’t affect the final assembly but add a unique “signature” to your creative crochet work.
If you find that the slippers are a bit too slippery on your feet, this Crochet Granny Square Slippers – Tutorial recommends adding a crocheted strap over the bridge of the foot. A simple chain and button closure can transform the slippers into a Mary Jane style, which is both functional and incredibly cute for kids and adults alike.
Finally, think about the environmental impact of your craft. This Crochet Granny Square Slippers – Tutorial encourages the use of upcycled yarn or organic fibers. By choosing sustainable crafting materials, you contribute to a greener planet while enjoying a hobby that brings comfort and joy to your daily life.
FAQ – Frequently Asked Questions
What is the best yarn for these slippers?
For the Crochet Granny Square Slippers – Tutorial, a worsted weight (level 4) acrylic or a wool-blend is best. Acrylic is durable and easy to wash, while wool provides superior warmth. Avoid using 100% silk or very thin yarns, as they won’t provide the necessary structure for footwear.
How do I make sure the slippers fit my size?
The key is the size of the individual squares. In this Crochet Granny Square Slippers – Tutorial, we recommend that the diagonal measurement of one square should be roughly half the length of your foot. If you have a larger foot, simply add more rounds to each granny square.
Can a beginner finish this project?
Yes! This Crochet Granny Square Slippers – Tutorial is designed with beginners in mind. If you know how to do a chain stitch, slip stitch, and double crochet, you have all the skills needed. The assembly is the most challenging part, but following our layout guide makes it simple.
How many squares do I need in total?
For a standard pair of slippers in this Crochet Granny Square Slippers – Tutorial, you will typically need 12 squares (6 for each foot). However, some “bootie” styles may require up to 8 squares per foot if you want a higher ankle covering.
How do I clean my crochet slippers?
If you used acrylic or cotton yarn as suggested in this Crochet Granny Square Slippers – Tutorial, you can machine wash them on a gentle cycle inside a mesh laundry bag. Lay them flat to dry to ensure they maintain their shape and don’t stretch out.
Are these slippers safe on hardwood floors?
Crocheted fabric can be slippery on smooth surfaces. As mentioned in the Crochet Granny Square Slippers – Tutorial, it is highly recommended to add non-slip grip to the soles using fabric paint, silicone, or specialized leather soles for safety.
Conclusion
In this Crochet Granny Square Slippers – Tutorial, we have covered everything from the essential tools and materials to the detailed assembly of your handmade footwear.
We explored how the granny square technique allows for endless customization in color, size, and style, making this project a favorite for crafters of all levels. By following the structured SEO-optimized steps, you now have the knowledge to create durable, cozy, and beautiful slippers for yourself or as thoughtful gifts for your loved ones.