Creating a crochet hair bow – pattern is one of the easiest and most enjoyable ways to add a handmade touch to your hair accessories collection.
Whether you’re a beginner looking for a quick win or an experienced crocheter seeking a charming gift idea, this simple yet elegant project delivers both style and satisfaction.
These small accessories can be made in a matter of minutes, and their versatility makes them perfect for everyday wear, special occasions, or as thoughtful handmade gifts.
With the right yarn and a few basic stitches, you’ll soon be creating bows that are cute, practical, and endlessly customizable.
In this guide, we’ll walk through everything you need to know about crafting a beautiful crochet hair bow – pattern, from tools and techniques to creative variations and usage tips. Let’s get started with this delightful crochet project that adds a personal touch to any hairstyle.
1. Why Crochet Hair Bows are a Must-Try Project
There’s something timeless and playful about a hair bow, and when it’s made by hand, it carries even more charm. The crochet hair bow – pattern is not only easy to follow but also adaptable to many styles, sizes, and textures. It’s a perfect project for using up leftover yarn from other projects.
One of the best things about crocheting hair bows is how beginner-friendly the process is. If you know how to make a chain stitch and single or double crochet, you already have the skills needed to create your first bow. This makes it a fantastic entry point for those new to the world of crochet.
The compact size of the project also means you can make several in one sitting. These bows make excellent additions to craft fair booths, small business inventories, or last-minute gifts for friends and family. You can even add them to headbands, barrettes, or elastic ties for children.
Because the crochet hair bow – pattern is so simple, you can easily modify it. Change the size, yarn weight, or color to match a specific outfit or holiday. Add embellishments like buttons, beads, or faux pearls to create a more personalized look.
Another major benefit of crochet hair bows is that they’re gentle on the hair. Unlike metal or plastic accessories, crochet bows made from soft yarn reduce the risk of hair breakage, making them a smart and stylish option for children and adults alike.
Whether you’re crafting one for yourself or someone else, this pattern is a heartwarming way to show off your crochet skills. And since the supplies are minimal, it’s a low-cost way to create something beautiful and functional.
2. Materials and Tools You’ll Need
To start your crochet hair bow – pattern, you’ll only need a few basic materials. Most of these are likely already in your crochet kit, making this project quick to begin and fun to repeat.
The most important item is yarn. For a classic, soft finish, choose worsted weight cotton yarn. It holds its shape well and comes in a wide variety of colors. Acrylic yarn also works if you prefer something more flexible or colorful.
Next, you’ll need a crochet hook that matches your yarn. For worsted weight yarn, a 4.0mm to 5.0mm hook is typically ideal. The hook size will affect the final size of your bow, so feel free to experiment to find your favorite look.
Have a pair of sharp scissors handy for cutting your yarn cleanly. You’ll also want a yarn needle (also called a darning needle) to weave in the ends and secure the center of the bow.
If you plan to attach the bow to hair accessories like clips, headbands, or hair ties, gather those items in advance. Hot glue guns or needle and thread work great for fastening the bow securely to the base.
Some crafters like to block their bows to help them hold their shape. You can use a steamer or simply dampen the bow and pin it to a blocking mat until dry. This step is optional but adds a polished touch.
Keep your work area clean and organized. Because this is a small project, you can take it anywhere: the sofa, a cafe, or even while traveling. It’s one of those delightful crafts you can enjoy anytime.
3. Step-by-Step: How to Crochet a Hair Bow
Now we’ll walk through how to create your own crochet hair bow – pattern step-by-step. This version uses simple stitches and works up in under 30 minutes.
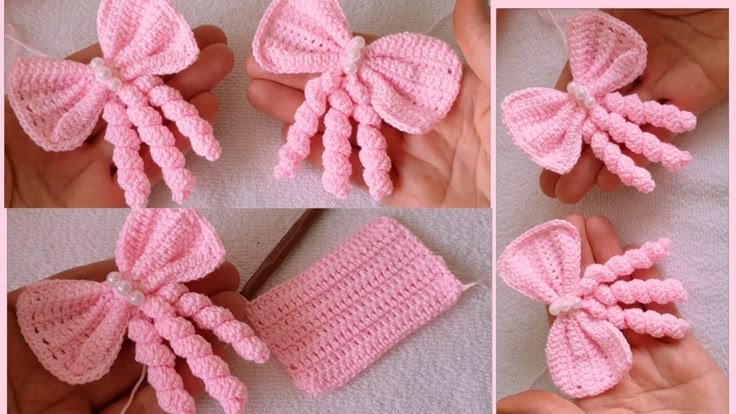
Begin by chaining 20 (or more depending on your desired bow width). Turn your work and single crochet in each stitch across. Chain 1 and turn at the end of each row. Repeat this process for about 5 to 6 rows until you have a rectangular piece.
Once you’ve reached your preferred size, fasten off and leave a long tail. This tail will be used to cinch the center of your bow and give it that classic gathered look.
Fold the rectangle in half lengthwise, or simply pinch it in the center. Using the yarn tail and a yarn needle, wrap the yarn tightly around the center several times to form the bow shape.
Secure the end by stitching through the back of the bow. You can also tie a knot and hide the ends within the wrapped center for a clean finish.
Now your crochet hair bow is complete! At this point, you can attach it to any hair accessory you choose. Use hot glue, or hand stitch it in place depending on your preference and the material.
4. Creative Ideas and Variations
One of the joys of working with a crochet hair bow – pattern is the endless variety it offers. Once you master the basic pattern, you can explore all sorts of fun and fashionable twists.
Try using variegated or gradient yarn for a colorful bow that changes shades across the piece. This works especially well for festive occasions or to match vibrant outfits.
Adjust the shape by changing the dimensions of your rectangle. A wider rectangle gives you a fuller bow, while a narrower one produces a more delicate, subtle accessory.
You can also create a layered bow by crocheting two rectangles in different sizes and stacking them before wrapping the center. This creates a 3D effect and gives your bow more volume.
For kids’ accessories, consider adding small details like crochet flowers, animal ears, or embroidered initials. This makes your handmade bow even more personal and fun.
Use metallic or shimmer thread for an elegant version perfect for weddings or evening wear. A simple color change can transform your bow from playful to sophisticated.
Finally, use the crochet hair bow – pattern as inspiration for other projects. Add bows to hats, scarves, bags, or even as appliqués on sweaters and blankets for a cohesive handmade touch.
FAQ – Crochet Hair Bow – Pattern
1. How long does it take to crochet a hair bow?
Typically, it takes 15–30 minutes depending on your skill level and the size of the bow. It’s a quick project that can be done in one sitting.
2. Can I use any type of yarn for this pattern?
Yes, but worsted weight cotton or acrylic yarn works best for shape and durability. Lightweight yarns may result in floppier bows.
3. How do I attach the bow to a clip or headband?
Use a hot glue gun or sew the bow directly onto the clip or band with a needle and thread. Ensure it’s secure for safe wear.
4. Is the crochet hair bow suitable for babies?
Yes, as long as it’s securely attached and made with soft, baby-friendly yarn. Always supervise babies when wearing accessories.
5. Can I wash crochet hair bows?
Most crochet bows are washable, especially if made from cotton or machine-washable acrylic. Hand washing is recommended for longevity.
6. Do I need to block the bow after finishing?
Blocking is optional but helps the bow keep its shape. It’s especially useful if you’re selling or gifting the bow for a neater appearance.
Conclusion
Creating a crochet hair bow – pattern is a rewarding project that offers both creativity and practicality. With just a few materials and a simple set of instructions, you can produce beautiful, handmade hair accessories for yourself or as thoughtful gifts. The pattern is flexible, fun, and perfect for all skill levels.
We hope this guide inspired you to try your own version and explore new variations. If you’ve made a crochet hair bow, we’d love to hear about your experience. Please leave a sincere opinion or share your suggestions for other patterns you’d like us to cover. Your feedback helps us create better content for crafters like you.