Crocheting is an incredibly versatile and enjoyable craft that allows you to create beautiful, functional pieces for your home.
One of the most popular projects among crocheters is the Crochet Handy Basket – Pattern.
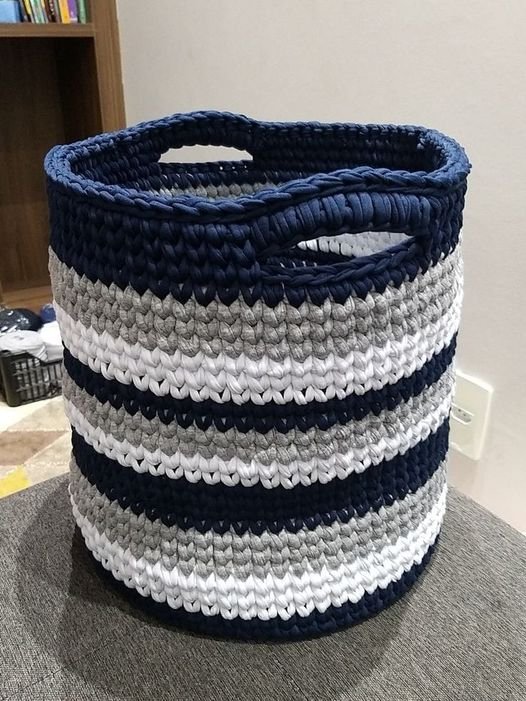
This practical and stylish basket can be used for organizing small items around the house, serving as a decorative storage solution, or even as a gift.
The Crochet Handy Basket – Pattern is simple to follow, making it a great project for beginners and experienced crocheters alike.
If you’re interested in learning how to create your own Crochet Handy Basket, you’re in the right place. In this article, we’ll guide you step-by-step through the process of crocheting your very own basket. We’ll also provide tips, tricks, and insights on how to customize the pattern to suit your preferences. Whether you’re making a basket for your living room, office, or bathroom, the Crochet Handy Basket – Pattern is a versatile piece that can add a touch of personal charm to any space.
Before we dive into the instructions, it’s important to familiarize yourself with some key terms and concepts related to crochet and basket making. Understanding these terms will help you complete the project with confidence and ensure that your basket turns out just as you’d like it. So, let’s get started on our crochet journey by exploring the essential details of the Crochet Handy Basket – Pattern.
1. Materials You Need for the Crochet Handy Basket
When starting any crochet project, it’s essential to gather the right materials. For the Crochet Handy Basket – Pattern, you’ll need a few basic supplies to begin. Here’s a list of the materials required for this project:
- Yarn: Choose a medium-weight yarn, such as worsted weight. You can select any color or texture that fits your style, but keep in mind that the sturdiness of the basket will depend on the yarn’s thickness.
- Crochet Hook: The recommended size for the Crochet Handy Basket is typically a 5mm (H-8) hook. This size works well for most worsted-weight yarns and ensures a tight, sturdy weave for the basket.
- Scissors: Keep a pair of scissors handy to cut your yarn once you’ve finished crocheting.
- Yarn Needle: You’ll need a yarn needle to weave in the ends once your basket is complete.
- Stitch Markers: These can help you keep track of your stitches and rounds, especially when you’re working in the round, as in this pattern.
Now that you have your materials, you’re ready to begin crocheting your Crochet Handy Basket – Pattern. The next step is learning the basic crochet stitches required for this project, including the chain stitch, slip stitch, single crochet, and double crochet. These are the foundational stitches that you’ll use throughout the pattern.
2. Step-by-Step Guide to Crocheting the Handy Basket
Crocheting the Handy Basket is a straightforward process that involves creating a circular base and then working up the sides. Here’s a step-by-step guide to help you complete your basket:
1. Create the Base of the Basket
Start by making a slip knot and chaining four stitches. Join the chain to form a ring by slip stitching into the first chain. This will form the center of your basket. Then, work in rounds, increasing the number of stitches in each round to gradually expand the base.
2. Increase in Each Round
As you continue crocheting the base, you’ll want to increase the number of stitches in each round. For this, work two single crochets in the same stitch (increase) at regular intervals around the circle. This helps to create a flat, circular base for your basket.
3. Work Up the Sides
Once the base reaches the desired size, begin working up the sides of the basket. Instead of increasing, work a single crochet stitch into each stitch around the perimeter of the base. This will create the walls of the basket, and you’ll continue this until the basket reaches the height you want.
4. Shape the Basket’s Top Edge
To finish off the basket, you can add a simple border around the top edge to give it a clean, finished look. You can use a slip stitch or a decorative stitch, such as a crab stitch, for added texture.
5. Weave in the Ends
After completing the basket, use a yarn needle to weave in any loose ends. This ensures a neat, professional finish and prevents any stray threads from showing.
By following these steps, you will create a Crochet Handy Basket that’s both functional and stylish. Whether you choose a simple design or add embellishments like handles or a lining, the possibilities are endless.
3. Tips and Tricks for Perfecting Your Crochet Basket
Crocheting a Crochet Handy Basket is an enjoyable project, but there are a few tips and tricks to ensure your basket turns out perfectly:
1. Choose the Right Yarn
The type of yarn you choose can affect the outcome of your basket. For a sturdy, durable basket, opt for a cotton yarn or a yarn blend designed for home décor projects. If you want a softer, more flexible basket, acrylic yarn is a great option.
2. Make Your Stitches Even
Maintaining an even tension throughout your work is key to a neat and uniform basket. If you notice that your stitches are too tight or too loose, try adjusting your grip on the yarn or using a different-sized hook.
3. Customize the Size
If you’d like to make a larger or smaller basket, simply adjust the number of stitches you make in the base. For a larger basket, continue increasing the base size until it’s the diameter you want, then work the sides as usual. For a smaller basket, stop increasing once you’ve reached the desired size for the base.
4. Add Handles
Handles are a wonderful addition to a Crochet Handy Basket, making it easier to carry or move around. To add handles, simply crochet a chain long enough to fit the size of your basket and attach it to the sides. You can sew the handles into place or crochet them directly onto the basket.
5. Experiment with Stitch Patterns
While the Crochet Handy Basket pattern is typically done with a basic single crochet, you can experiment with other stitch patterns for added texture. Try using a half double crochet or a shell stitch for a unique design.
6. Keep Your Work Tight
A basket needs to be firm and structured, so be sure to crochet with consistent tension. If your stitches are too loose, your basket may lack the support it needs to hold its shape. If necessary, use a smaller crochet hook to achieve a firmer texture.
4. Creative Ways to Use Your Crochet Handy Basket
Now that you’ve completed your Crochet Handy Basket, there are countless creative ways to use it around the house. Here are a few ideas:
1. Storage for Small Items
Use your basket to store miscellaneous items like keys, pens, or toiletries. It’s a great way to keep your home organized while adding a handmade touch.
2. Decorative Piece
A crochet basket can be a beautiful accent in your living room or bedroom. Fill it with faux flowers, decorative stones, or even throw blankets to add a cozy, inviting atmosphere.
3. Gift Basket
Consider using your Crochet Handy Basket as a gift basket. You can fill it with goodies such as snacks, candles, or small toys. It’s a thoughtful and personal gift for any occasion.
4. Plant Pot Holder
Transform your basket into a decorative plant pot holder. Simply place a potted plant inside and enjoy the natural beauty it brings to your space.
5. Travel Organizer
Use the basket to organize your toiletries or travel accessories. It’s perfect for keeping your suitcase neat and tidy during vacations.
6. Toy Storage
If you have children, the Crochet Handy Basket makes a great toy storage solution. It’s soft, safe, and easy for little ones to access their toys.
FAQ
1. What size crochet hook should I use for a Crochet Handy Basket?
For most medium-weight yarn, a 5mm (H-8) crochet hook is ideal. This ensures a sturdy basket while maintaining a manageable stitch tension.
2. Can I make my basket larger or smaller?
Yes, you can customize the size of your basket by adjusting the number of stitches in the base. Increase or decrease the number of rounds to fit your desired dimensions.
3. What type of yarn is best for a Crochet Handy Basket?
Cotton yarn or acrylic yarn blends are both excellent choices for crocheting a basket. Cotton is sturdy and holds its shape well, while acrylic offers more flexibility.
4. Can I add handles to the basket?
Yes, you can add handles by crocheting a chain and attaching it to the sides of the basket. Handles make the basket more practical for carrying.
5. How do I keep my basket’s shape firm?
Maintain even tension throughout your project. If the stitches are too loose, the basket may lose its shape. Consider using a smaller hook or firmer yarn for a sturdier result.
Conclusion
In this article, we’ve covered everything you need to know about the Crochet Handy Basket – Pattern, from the materials needed to the step-by-step instructions. We’ve also provided helpful tips and ideas for customizing your basket. With a little patience and creativity, you can make a beautiful, functional crochet basket for your home or as a thoughtful gift.
We hope this guide has inspired you to start your crochet project today! Don’t forget to share your thoughts and any suggestions in the comments below. Happy crocheting!