Creating a Crochet Happy Flower Wall Decor is a fun and creative way to brighten up your space.
With its vibrant colors and cheerful design, this crochet project can easily add a warm, welcoming touch to any room.
Whether you’re looking to decorate a nursery, living room, or even your office, a Crochet Happy Flower Wall Decor pattern is a perfect solution for personalizing your environment.
Not only is this project visually appealing, but it’s also an excellent way to practice and enhance your crochet skills. The intricate yet simple pattern allows you to experiment with different colors, yarn textures, and flower shapes. Plus, it’s a great beginner project that allows for plenty of room to explore creativity while still being easy to complete.
In this article, we’ll walk you through everything you need to know to make a Crochet Happy Flower Wall Decor, from gathering the materials to completing the final touches. Whether you’re new to crochet or an experienced crafter, this guide will help you create a beautiful and fun wall decor piece. Let’s get started!
1. Materials Needed for Your Crochet Happy Flower Wall Decor
Before you begin, gathering the right materials is essential for creating a Crochet Happy Flower Wall Decor. While this project doesn’t require too many supplies, having everything ready will ensure the process goes smoothly.
- Yarn: You will need various colors of yarn to make the flowers. Consider choosing vibrant and cheerful colors such as yellow, pink, blue, green, and purple to create a lively and happy look. Cotton yarn is an excellent choice for crochet projects, as it is soft, durable, and holds its shape well.
- Crochet Hook: The size of the crochet hook will depend on the yarn you use. For most cotton yarns, a 4mm (G-6) crochet hook works perfectly. However, always check the yarn label for recommended hook sizes to ensure the correct fit.
- Scissors: A sharp pair of scissors is necessary for trimming your yarn once you finish a piece. Having a clean, precise cut will help maintain a neat appearance.
- Tapestry Needle: This tool will be used to weave in the ends after completing your crochet flowers. It ensures that your work remains neat and secure.
- Embellishments (Optional): If you want to add extra detail, consider adding buttons, beads, or sequins to the center of each flower for a more decorative touch.
- Glue Gun or Needle and Thread: You can either sew the flowers onto the wall decor using a needle and thread or use a glue gun to attach them securely. Both methods work well, but stitching may provide more durability.
Having these materials on hand before you start your project will make the entire process smoother and more enjoyable.
2. Understanding the Crochet Happy Flower Wall Decor Pattern
The Crochet Happy Flower Wall Decor pattern is made up of several simple crochet techniques that can be easily mastered. Here’s a breakdown of the key steps involved in creating this wall decor piece:
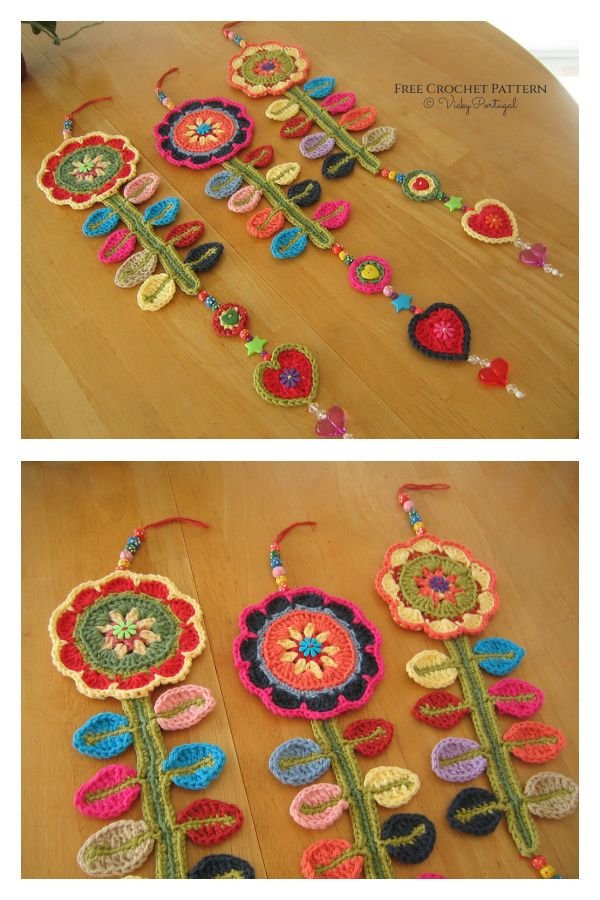
- Make the Flower Centers: Start by crocheting small circles for the center of each flower. You’ll begin with a magic ring and work in rounds to create a solid center. You can also use a small yellow yarn to represent the middle of a daisy-like flower, or any other color you prefer.
- Create the Flower Petals: For the petals, you’ll need to crochet a series of chain stitches followed by double crochet or treble crochet to create a soft, elongated petal shape. The petals can be adjusted to be longer or shorter depending on the size of your desired flower.
- Attach the Petals: Once the petals are completed, attach them to the flower center. It’s important to space them evenly around the center to create a symmetrical look. You can sew them on using a tapestry needle or, if you prefer, you can use a glue gun.
- Assemble the Flowers: After completing your individual flowers, arrange them in the desired pattern on your wall. You can create a cluster of flowers, or hang them individually, depending on the look you’re going for.
- Create the Wall Decor Base: For added effect, you might want to crochet a vine or stem to connect the flowers. This can be done with a simple chain stitch and slip stitches to form a delicate, trailing vine.
- Hang and Display: Once you’ve arranged and attached your flowers to the wall decor base, it’s time to hang them up. Use a picture hanging kit, or attach a ribbon to the top for easy hanging. You can place the flowers at varying heights for a whimsical, free-flowing look.
The Crochet Happy Flower Wall Decor pattern is incredibly versatile, so feel free to experiment with different flower shapes, sizes, and colors to create your unique design.
3. Tips and Tricks for Perfecting Your Crochet Flowers
Creating the perfect Crochet Happy Flower Wall Decor requires some practice and attention to detail. Here are some tips to help you improve your crochet technique and get the best results:
- Use a Consistent Tension: Consistency in your tension is crucial for maintaining an even look. If your stitches are too tight, your flowers may be too small, and if they are too loose, the petals may appear floppy. Try to keep a consistent tension throughout the project.
- Experiment with Different Petal Shapes: The great thing about crochet flowers is that you can customize the shape of the petals. If you want more rounded petals, use half double crochet stitches. For longer, sharper petals, use treble crochet stitches.
- Add Texture to the Flowers: If you want to add a little extra flair, consider incorporating textured stitches like shell stitches or popcorn stitches into your flower petals for a 3D effect.
- Mix Yarn Types for Unique Effects: Try mixing different types of yarns for a more interesting texture. For example, glittery yarns or multicolored yarns can create a fun, sparkly effect on the petals.
- Play with Flower Arrangement: When arranging your flowers on the wall, don’t feel limited to a symmetrical arrangement. Embrace an asymmetrical design for a more organic and playful look.
- Use a Background Color: Consider crocheting a solid background piece, like a rectangular or circular mat, to attach the flowers to. This provides a cohesive base for the flowers and makes them stand out even more.
By incorporating these tips into your crochet process, you’ll be able to perfect your Crochet Happy Flower Wall Decor and take it to the next level.
4. How to Personalize Your Crochet Flower Wall Decor
One of the best aspects of crochet projects is the ability to make them truly your own. Here’s how you can personalize your Crochet Happy Flower Wall Decor:
- Incorporate Your Favorite Colors: Don’t be afraid to use colors that represent your personality or your space. If you’re decorating a nursery, pastel shades work wonderfully. For a more vibrant living room, choose bold, saturated colors.
- Add Special Embellishments: You can add buttons, beads, or sequins in the center of your flowers to give them a more unique touch. These little additions can transform a simple flower into a personalized design that stands out.
- Incorporate Text: For a truly custom touch, consider adding a crochet phrase or word in between or around the flowers. Phrases like “home sweet home” or “love” can give your decor a heartwarming touch.
- Use Different Flower Patterns: Try combining different flower patterns within the same project. You can alternate between daisies, roses, or sunflowers to create a more diverse and eclectic look.
- Add Leaves and Vines: If you want your flowers to have more depth, crochet some leaves or vines to complement the flowers. This adds a natural, organic feel to the decor.
- Create a Flower Garland: Instead of attaching individual flowers to a wall, you can crochet a flower garland to hang across a room or above a window. This can be a great way to add a playful and charming touch to any space.
Personalizing your Crochet Happy Flower Wall Decor makes it more meaningful and tailored to your space, allowing you to create something truly one-of-a-kind.
Frequently Asked Questions (FAQ)
1. What type of yarn should I use for the Crochet Happy Flower Wall Decor?
For the Crochet Happy Flower Wall Decor, it’s best to use cotton yarn, as it holds its shape well and provides a clean finish. You can also use acrylic yarn for a softer feel, but cotton is recommended for durability.
2. Can I make a Crochet Happy Flower Wall Decor without a pattern?
Yes, you can absolutely make your own design! While the pattern is a great starting point, feel free to experiment with petal shapes, flower sizes, and color combinations.
3. How do I hang my crochet flowers on the wall?
You can attach your crochet flowers to the wall using double-sided tape, wall hooks, or by sewing them onto a fabric background. For a more permanent solution, a picture hanging kit or a frame can work well.
4. How long does it take to make a Crochet Happy Flower Wall Decor?
The time it takes to create your Crochet Happy Flower Wall Decor depends on your experience and the number of flowers you plan to make. On average, it could take anywhere from a few hours to a couple of days.
5. Can I wash the Crochet Happy Flower Wall Decor?
If your wall decor is made with cotton or acrylic yarn, you can wash it gently by hand or in a delicate cycle. Be sure to air dry the piece to maintain its shape.
Conclusion
In this article, we’ve walked through everything you need to know to create a Crochet Happy Flower Wall Decor. From the materials required to understanding the pattern, to tips for personalizing your piece, you now have the tools to create a beautiful and custom decoration for your space.
We hope this guide has inspired you to pick up your crochet hook and start working on this cheerful project. Don’t forget to share your thoughts, leave any suggestions, and let us know how your crochet flowers turn out! Happy crocheting!