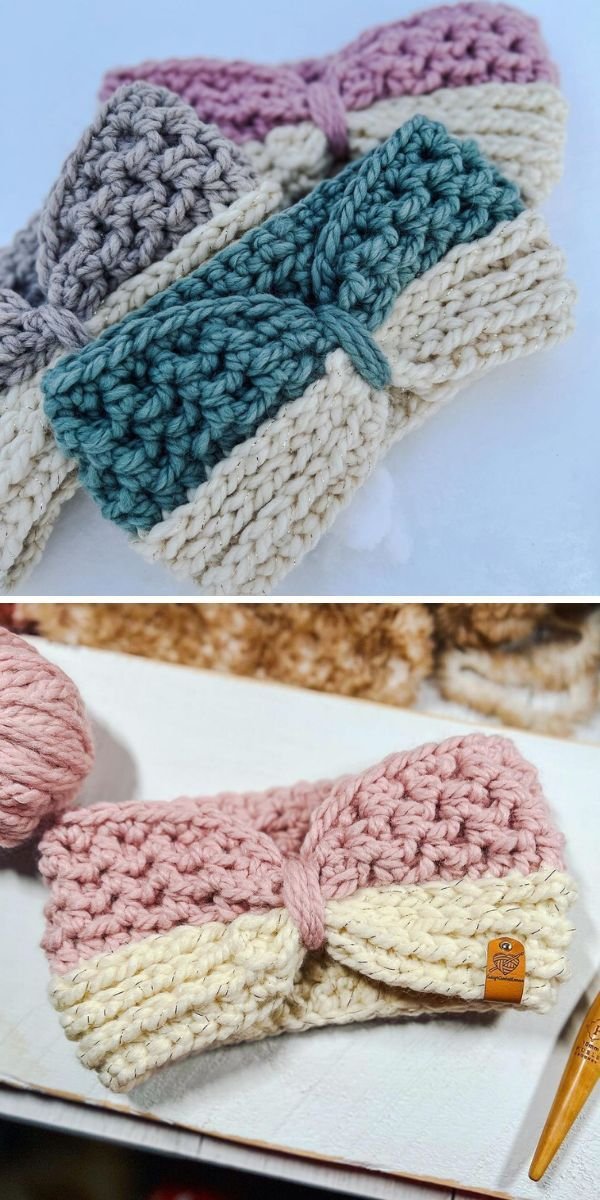
If you’re looking for a simple, stylish, and practical handmade project, the CROCHET HEADBAND – PATTERN is the perfect choice. Whether you’re new to crochet or a seasoned yarn lover, headbands are fun to make, quick to finish, and ideal for gifting or wearing in every season. These versatile accessories are more than just fashion statements—they’re a way to stay warm, express your creativity, and reduce yarn scraps.
A crochet headband can be elegant or casual, thick or thin, textured or simple. Depending on the stitch and yarn you choose, your finished piece can have a completely different personality. That’s the beauty of working from a pattern—you get the structure to guide your creativity while still having space to make it your own.
This article will guide you through the CROCHET HEADBAND – PATTERN, including what materials you need, how to choose your style, step-by-step instructions, and ways to personalize your piece. Whether you’re crocheting for yourself, your kids, or your handmade shop, this project will quickly become a favorite.
1. Why Choose a Crochet Headband Pattern
A CROCHET HEADBAND – PATTERN is one of the best beginner-friendly projects in the world of crochet. It’s small enough to finish quickly and simple enough to avoid frustration, making it ideal for anyone just starting out or looking for a quick win.
One of the key reasons people love making crochet headbands is their versatility. You can wear them as an ear warmer during cold weather, as a stylish accessory to keep your hair back, or even as part of a festival or boho outfit. They’re equally functional and fashionable.
A crochet headband also gives you the opportunity to experiment with different stitches. From simple single crochets to more textured shell or puff stitches, the pattern can be adjusted to match your skill level and design preference. This is a great way to learn new techniques without committing to a large project like a blanket or sweater.
Another reason these patterns are so popular is the ability to customize sizing. You can make headbands for babies, kids, teens, or adults simply by adjusting the length and width. Most patterns are stretchy, which gives you flexibility in fit without needing exact measurements.
The portability of this project is another huge plus. You can work on a headband while watching TV, riding public transit, or waiting in line. All you need is a hook and a small ball of yarn, making it a perfect on-the-go project.
And of course, let’s not forget the gifting potential. A handmade crochet headband is a thoughtful, personal gift that can be made in your friend’s favorite color or embellished with buttons, bows, or flowers. It’s fast, affordable, and made with love.
2. Materials and Tools You’ll Need
To begin your CROCHET HEADBAND – PATTERN, you’ll want to gather a few essential supplies. Thankfully, this is a low-cost project that doesn’t require a huge yarn stash or fancy equipment.
First, you’ll need yarn. Most headbands are made with worsted weight yarn (category 4), but you can experiment with bulky yarn for a cozier feel or lighter yarn for a delicate look. Acrylic, cotton, or blends all work well depending on the intended season of wear.
Choose a crochet hook that matches your yarn weight. For worsted yarn, a 5.0mm (H-8) hook is a common choice. If you’re aiming for a tighter or looser stitch, you can adjust accordingly.
You’ll also want a measuring tape or ruler. Since fit is important with headbands, you’ll need to measure your chain or band length accurately to ensure comfort without slippage.
A yarn needle will be necessary to weave in the ends and sew the band together if the pattern calls for joining the ends. Some patterns are seamless, while others are made flat and then sewn.
Keep scissors on hand for trimming yarn ends and tidying up your finished piece. A stitch marker can also be helpful, especially if you’re working in rounds or using a more complex stitch pattern.
Optional tools include buttons, embellishments, or even faux leather tags to give your headband a professional touch. These accessories aren’t required, but they can elevate your finished product.
3. Step-by-Step: Making a Crochet Headband
Ready to begin your CROCHET HEADBAND – PATTERN? Here’s a general step-by-step guide that you can customize based on your stitch preferences and head size.
Start by measuring the head of the person you’re making it for, or use a size chart. A standard adult headband is about 20–22 inches in circumference, but you’ll subtract about 1–2 inches for stretch.
Begin with a foundation chain that matches your desired length. Keep in mind that the chain should be a little shorter than the actual head measurement for a snug fit. Avoid twisting if you’re joining in the round.
Once your chain is complete, start your first row of stitches. For a basic design, single or half-double crochet works well. For texture, you might try a twisted stitch, a front post double crochet, or even a cable-like pattern.
Continue crocheting rows (if working flat) or rounds (if in the round) until your headband reaches the desired width, usually around 3 to 5 inches. Thicker widths are better for ear warmers; thinner ones are ideal for summer styles.
If you’re working flat, finish by joining the ends using a slip stitch, whip stitch, or twist-and-sew method to create a turban-style center. If you worked in the round, simply fasten off and weave in the ends.
Try on your headband to check the fit and feel. If desired, now’s the time to add embellishments like bows, crochet flowers, or buttons. This is where your creativity really shines.
4. Styling and Customization Ideas
Your finished crochet headband is a blank canvas for creativity. With just a little effort, you can personalize it to match any outfit, mood, or season.
For a boho look, try using lightweight yarns and lacy stitches. Add fringe or a tassel on one side for a festival-ready accessory that pairs perfectly with dresses and summer tops.
If you’re aiming for a winter-ready headband, use chunky yarn and thick stitches like puff or bobble to create warmth and volume. Neutral tones or jewel shades work beautifully in colder seasons.
You can make matching sets with gloves, scarves, or boot cuffs using the same stitch pattern and yarn color. This is especially great for holiday gifts or personalizing your own wardrobe.
Add buttons, bows, or faux fur accents for a stylish touch. You can even sew on a patch or embroidery to display initials, flowers, or small motifs.
For kids, think colorful! Use bright, fun yarn and add ears (like cat or bear ears) to turn the headband into a playful accessory. It’s a hit for costume days or just everyday fun.
And don’t forget to make your headbands seasonal. Think red and green stripes for Christmas, pastel colors for Easter, or deep oranges and browns for fall. It’s a subtle but festive way to celebrate year-round.
FAQ: CROCHET HEADBAND – PATTERN
Q1: How long does it take to make a crochet headband?
Most headbands take between 30 minutes to 2 hours, depending on the stitch complexity and your speed. It’s a great weekend or even one-evening project.
Q2: What size should I make the headband?
For adults, 20–22 inches in length is common. Subtract 1–2 inches for stretch. Kids’ and baby sizes vary, so always measure or check a size chart before starting.
Q3: Can I use any yarn for a crochet headband?
Yes, but worsted or bulky yarns are most common. Cotton is great for breathability, while acrylic and wool blends offer warmth.
Q4: How do I make the headband stretchy?
Use stitches like half-double crochet in the back loop or ribbing techniques to create natural elasticity.
Q5: Can beginners make this pattern?
Absolutely! A CROCHET HEADBAND – PATTERN is one of the best beginner projects. Start with basic stitches and simple construction, then build your skills from there.
Q6: How do I wash a crochet headband?
Hand wash in cool water with mild soap and lay flat to dry. Some yarns are machine washable, so always check the yarn label.
Conclusion
The CROCHET HEADBAND – PATTERN is a must-try for crocheters of all skill levels. It’s fast, fun, and practical—whether you’re making one for yourself, gifting it to a loved one, or adding it to your craft market collection. With endless customization options and a variety of yarn and stitch choices, no two headbands ever have to be the same.
In this article, we covered the materials you’ll need, step-by-step guidance to create your headband, customization ideas, and answered the most common questions
about the pattern. Now it’s your turn!
We’d love to hear from you! Share your honest opinion and suggestions in the comments below. Have you made your own crochet headband? What yarn and stitch did you use? Let’s inspire each other with creative ideas!