Making a Crochet Heart Bracelet – Tutorial is a wonderful way to dive into the world of handmade jewelry while mastering a charming, romantic motif. This Crochet Heart Bracelet – Tutorial is designed to guide both beginners and seasoned crafters through the process of creating a delicate, wearable piece of art. Whether you are looking to make a meaningful gift for a loved one or simply want to add a touch of “cottagecore” aesthetic to your own wardrobe, learning this Crochet Heart Bracelet – Tutorial will provide you with a versatile skill that can be adapted for necklaces, anklets, or even decorative bunting.
Handmade accessories carry a level of sentimental value that store-bought items simply cannot replicate, and the Crochet Heart Bracelet is a prime example of this. By using the techniques found in this Crochet Heart Bracelet – Tutorial, you are not just following a pattern; you are engaging in a meditative practice that results in a unique fashion statement. The Crochet Heart Bracelet is lightweight, comfortable for all-day wear, and highly customizable in terms of color, yarn weight, and closure styles, making it a favorite project for the modern fiber artist.
In this comprehensive Crochet Heart Bracelet – Tutorial, we will explore the essential materials, the step-by-step construction of the hearts, and how to assemble them into a cohesive jewelry piece. We have structured this guide to be SEO-friendly and easy to navigate, ensuring that you find all the technical details required for a professional finish. From selecting the right crochet hook to understanding the tension needed for small-scale projects, this Crochet Heart Bracelet – Tutorial covers every angle to ensure your success in crafting a beautiful handmade heart bracelet.
1. Essential Materials for the Crochet Heart Bracelet – Tutorial
Selecting the right yarn for crochet jewelry is the first step in ensuring your project looks polished. For a Crochet Heart Bracelet, a mercerized cotton yarn is highly recommended because it offers a subtle sheen and excellent stitch definition. This type of thread is durable and holds its shape well, which is crucial for small motifs that will be handled frequently on the wrist.
A smaller ergonomic crochet hook, typically ranging from 2.0mm to 3.0mm, is ideal for this Crochet Heart Bracelet – Tutorial. Using a smaller hook creates tighter crochet stitches, preventing the heart from looking floppy or losing its form. Having a sharp pair of embroidery scissors nearby will also make the process of finishing your ends much cleaner and more efficient.
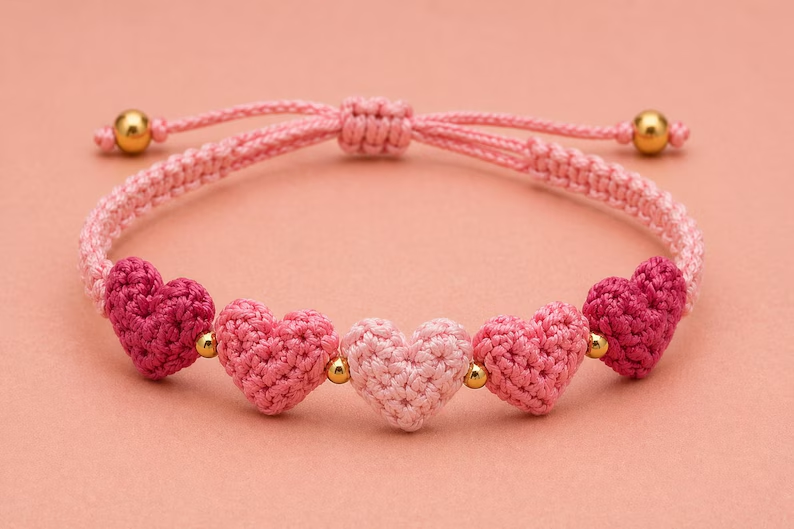
The clasp and hardware you choose will define the final look of your Crochet Heart Bracelet. While some prefer a completely crocheted tie-enclosure, others opt for lobster claws or toggle clasps for a more professional jewelry feel. If you choose metal hardware, you may also need jump rings and a pair of jewelry pliers to secure the crochet work to the metal components.
Don’t forget the importance of a tapestry needle or a yarn needle with a fine point. In this Crochet Heart Bracelet – Tutorial, weaving in ends is a vital step because the project is small, and any loose threads will be very noticeable. A high-quality needle allows you to hide your yarn tails inside the heart stitches so they remain invisible even with regular use.
Stitch markers can be incredibly helpful, especially if you are working on multiple hearts and want to ensure they are all uniform in size. In this Crochet Heart Bracelet – Tutorial, consistency is key to a high-end result. Marking the first stitch of each round helps you keep track of your progress without having to recount your stitches constantly during the crafting process.
Lastly, consider adding beads or charms to your Crochet Heart Bracelet for extra flair. You can string beads onto your yarn before you begin the crochet tutorial or sew them on afterward. Small seed beads or pearls can be integrated into the center of each heart to elevate the design from a simple craft project to an elegant piece of crochet jewelry.
2. Mastering the Basic Stitches for the Crochet Heart Bracelet
The foundation of any Crochet Heart Bracelet – Tutorial lies in mastering the Magic Ring (or Magic Circle). This technique allows you to start your work with a tight, adjustable center, which is essential for making hearts that don’t have a hole in the middle. Learning the magic ring technique ensures that your crochet heart looks professional and symmetrical from the very first stitch.
To create the shape of the heart, you will primarily use a combination of double crochet (dc) and treble crochet (tr) stitches. In this Crochet Heart Bracelet – Tutorial, the height of the treble stitch provides the rounded “humps” of the heart, while the double crochet helps transition down toward the point. Understanding the height difference between these basic crochet stitches is what gives the heart its iconic silhouette.
The chain stitch (ch) acts as the bridge between your heart motifs in this Crochet Heart Bracelet – Tutorial. Depending on how much space you want between each heart, you will create a specific number of chain stitches to form the “string” of the bracelet. This keeps the design fluid and ensures the bracelet length is adjustable to fit any wrist size perfectly.
A slip stitch (sl st) is used to close each heart and move to the next section of the pattern without adding unnecessary bulk. In the context of this Crochet Heart Bracelet – Tutorial, the slip stitch is your best friend for creating clean transitions. It allows you to join rounds or move the yarn to the starting point of the next heart motif seamlessly.
Half-double crochet (hdc) is often used in the lower sections of the heart to create a smooth taper toward the bottom point. By alternating between treble, double, and half-double stitches, you create a gradient of stitch heights. This Crochet Heart Bracelet – Tutorial emphasizes this “staircase” effect to ensure your hearts look crisp and well-defined rather than just circular.
Tension control is a “hidden” skill you will develop while following this Crochet Heart Bracelet – Tutorial. Because jewelry is small, even a slight change in how tightly you hold your yarn can result in hearts of different sizes. Practicing a consistent crochet tension will ensure that every link in your handmade bracelet is identical, resulting in a much more balanced and aesthetically pleasing piece.
3. Step-by-Step Assembly of the Crochet Heart Bracelet
The assembly phase of the Crochet Heart Bracelet – Tutorial begins once you have mastered the individual heart pattern. You have two choices: you can crochet each heart separately and sew them together, or you can use the continuous crochet method. Most crafters prefer the continuous method as it reduces the number of ends to weave in and makes the bracelet structure much stronger.
To start the chain of hearts, you will first create a long foundation chain that serves as one half of the clasp or tie. Then, you begin your first heart directly from that chain. This Crochet Heart Bracelet – Tutorial recommends making a small loop at the very beginning to act as a buttonhole if you aren’t using metal clasps, which adds a charming rustic crochet touch.
Once the first heart is complete, you will chain a specific number of stitches—usually 3 to 5—before starting the next magic ring for the second heart. This spacing is vital for the Crochet Heart Bracelet to sit flat against the skin. If the hearts are too close, they may overlap and look cluttered; if they are too far apart, the bracelet design may look sparse.
As you progress through this Crochet Heart Bracelet – Tutorial, you will repeat the heart pattern until the piece reaches your desired measurement. A standard adult bracelet size is usually between 6.5 to 7.5 inches. It is always better to measure the recipient’s wrist beforehand to ensure the custom crochet gift fits comfortably without being too tight or sliding off.
After reaching the final length, you will finish the Crochet Heart Bracelet by creating a finishing chain that mirrors the beginning. If you are using a button, this is where you would secure it. This Crochet Heart Bracelet – Tutorial suggests using a wooden button or a large pearl to complement the soft texture of the cotton yarn, creating a cohesive and natural look.
The final step in assembly is blocking your crochet. Even though it is a small item, lightly steaming or dampening the Crochet Heart Bracelet and pinning it straight can help open up the stitches. This “finishing touch” mentioned in our Crochet Heart Bracelet – Tutorial ensures the hearts don’t curl at the edges and that the bracelet lays perfectly flat during wear.
4. Customizing Your Design and Color Schemes
One of the best parts of this Crochet Heart Bracelet – Tutorial is the ability to play with color theory. While classic red or pink hearts are always popular, trying a multicolor yarn or a “gradient” effect can make your bracelet stand out. You can change colors for every heart or use a variegated cotton thread to let the yarn do the color-changing work for you.
For those who love a more minimalist style, a Crochet Heart Bracelet worked in neutral tones like beige, cream, or slate grey looks incredibly sophisticated. These colors highlight the stitch texture rather than the shape alone. Following this Crochet Heart Bracelet – Tutorial with a high-quality linen thread can create a piece that looks like high-end boutique jewelry.
Adding embroidery details to your finished hearts is another way to personalize the project. Once you finish the Crochet Heart Bracelet – Tutorial, you can take a needle and some contrasting thread to add “French knots” or small “lazy daisy” flowers onto the surface of each heart. This turns a simple crochet pattern into a complex, multi-layered piece of mixed-media art.
Adjusting the scale is also an option; by using thicker yarn like worsted weight, you can turn this Crochet Heart Bracelet – Tutorial into a pattern for a headband or a belt. The logic of the heart construction remains the same, but the utility of the project changes. This versatility is why the heart motif is a staple in the crochet community.
You can also experiment with bead integration. By sliding beads onto your yarn before you start the Crochet Heart Bracelet – Tutorial, you can drop a bead into the center of the heart or along the connecting chain. This adds weight and “jingle” to the Crochet Heart Bracelet, making it a more tactile and interesting accessory to wear.
Lastly, consider the seasonal appeal of your creations. Use pastels for a Spring Crochet vibe, or deep jewel tones like emerald and burgundy for a Winter Fashion accessory. This Crochet Heart Bracelet – Tutorial is a year-round resource that allows you to create trendy, sustainable, and eco-friendly jewelry regardless of the current fashion season or holiday.
FAQ – Frequently Asked Questions
1. What is the best yarn for a Crochet Heart Bracelet?
The best choice is size 10 crochet thread or a fine mercerized cotton. These yarns are thin enough for jewelry but strong enough to hold the heart shape without stretching out over time.
2. Is this Crochet Heart Bracelet – Tutorial suitable for absolute beginners?
Yes! If you know how to make a chain, a double crochet, and a treble crochet, you can follow this Crochet Heart Bracelet – Tutorial. The most “difficult” part is the magic ring, which can be replaced by a small chain loop if needed.
3. How long does it take to make one bracelet?
A typical Crochet Heart Bracelet takes about 30 to 60 minutes to complete, depending on your speed and the number of hearts you choose to include. It is a perfect “one-sitting” project.
4. Can I wash my crochet bracelet?
Absolutely. Since it is made of cotton, you can hand wash it with mild soap and lay it flat to dry. This makes the Crochet Heart Bracelet a practical choice for daily wear.
5. How do I make the bracelet adjustable?
You can finish the ends with long braided tails instead of a clasp. This allows the wearer to tie the Crochet Heart Bracelet at their preferred tightness, making it a “one size fits all” accessory.
6. What hook size should I use if I have loose tension?
If your stitches are loose, drop down to a 1.75mm or 1.5mm hook. This will force the stitches to stay tight and ensure the Crochet Heart Bracelet motifs remain crisp and firm.
Conclusion
In this Crochet Heart Bracelet – Tutorial, we have covered everything from the initial selection of mercerized cotton yarn to the final assembly of your handmade jewelry.
We explored how to use treble and double crochet stitches to create the perfect heart shape and discussed the importance of tension and blocking for a professional finish. This project is a fantastic way to practice small-scale crochet while creating something truly beautiful and functional. We hope this guide inspires you to create your own collection of colorful bracelets.