If you’re searching for the perfect holiday project, look no further than the Crochet Reindeer Hat – Pattern. This delightful and cozy accessory brings charm, warmth, and a whole lot of holiday cheer. Whether you’re crocheting it for a child, a baby’s first Christmas, or a fun adult gift, this pattern makes everyone smile. It’s playful, versatile, and makes a fantastic handmade present or photo prop.
The beauty of a Crochet Reindeer Hat – Pattern lies in its adaptability. You can customize it with red noses (hello, Rudolph!), textured antlers, and even tiny bells or pompoms. Plus, with the right yarn and hook size, you can create sizes from newborn to adult, ensuring no one gets left out of the fun. This project blends simple stitches with a creative twist, making it ideal for both beginner and experienced crocheters.
In this article, you’ll learn everything you need to know about creating your own Crochet Reindeer Hat – Pattern, from choosing materials and mastering the steps, to adding personalized touches and exploring creative variations. We’ll even include a helpful FAQ and conclusion to ensure you’re ready to stitch something truly magical.
1. Why the Crochet Reindeer Hat – Pattern is a Holiday Favorite
The Crochet Reindeer Hat – Pattern has become a beloved seasonal project for good reason. It combines warmth, charm, and festive joy in a way that few other handmade items can. Whether worn during a family photo shoot, at a Christmas party, or just for cozy winter wear, this hat is always a hit.
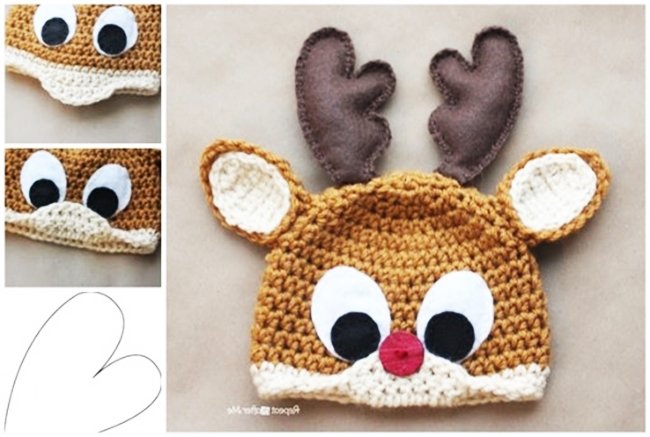
This pattern is incredibly versatile. You can choose between realistic designs with brown and beige tones, or whimsical styles with cartoon-like faces, big eyes, and oversized antlers. Some even feature red yarn for Rudolph’s iconic nose.
It’s also a great stash-busting project. If you have leftover brown, white, red, or tan yarn from previous projects, this hat is a fun way to use it up while creating something adorable and functional.
Because it’s such a kid-friendly design, many crafters love making reindeer hats as part of gift sets for children or babies. When paired with matching mittens or booties, it becomes an unforgettable holiday keepsake.
Another reason the pattern is so loved is its crochet simplicity. Most versions use basic stitches like single crochet, half-double crochet, and increases/decreases, making it approachable for beginners while still allowing more experienced crocheters to get creative.
Finally, it’s ideal for small business crafters. Crochet reindeer hats are a hit at Christmas craft fairs, Etsy shops, and holiday markets. You can personalize each one to appeal to different age groups and customer preferences.
2. Materials and Tools You’ll Need
To create a successful Crochet Reindeer Hat – Pattern, it’s important to start with the right tools and supplies. A little planning ensures that your project will look polished, fit well, and last for many winters to come.
Start with worsted weight (category 4) yarn, which offers both warmth and structure. Acrylic is a popular choice for its affordability and durability, but you can also opt for soft blends like wool-acrylic or even cotton if making a lightweight version.
You’ll typically need two to four yarn colors:
- Brown or beige for the hat base
- Dark brown for antlers
- White for eyes or snout accents
- Red or black for the nose
A crochet hook size H/5.0 mm is commonly used with worsted weight yarn, but always check your gauge to ensure proper sizing. Adjust the hook size if needed for tighter or looser tension.
Other essentials include:
- Yarn needle for sewing pieces together and weaving in ends
- Stitch markers for keeping track of rounds
- Stuffing (optional) for plush noses or antlers
- Buttons or safety eyes (optional) if not crocheting the eyes
For those adding extra details like bows, pompoms, or jingle bells, you’ll also need basic craft supplies like thread, sewing needles, and scissors.
It’s a good idea to keep your printed or digital Crochet Reindeer Hat – Pattern nearby so you can follow each step without missing details. Some crafters also like to jot down notes or stitch counts as they go.
3. How to Crochet Your Reindeer Hat Step-by-Step
Now it’s time to start working through the Crochet Reindeer Hat – Pattern. While specific instructions may vary slightly by designer, most versions follow a similar structure and can be broken into manageable steps.
Start with the hat base, which is usually crocheted from the crown down in continuous rounds. Begin with a magic circle and single crochet increases to form a flat disc, then continue in rounds to create the body of the hat.
Once the desired height is reached, stop increasing and work evenly around. Adjust for different sizes (baby, toddler, child, adult) by following size charts and using stitch markers to count rows. Always check your gauge for a proper fit.
Create earflaps or ribbed edging, depending on the style. Earflaps add extra warmth and cuteness, especially for kids, while ribbed brims offer a snug, stretchy finish. You can add braids or tassels to earflaps for a fun touch.
Crochet and attach the reindeer facial features. Start with the snout in white or beige yarn, then the nose in red (for Rudolph) or black. The eyes can be crocheted circles or safety eyes, depending on your preference.
For the antlers, most patterns use brown yarn and work in amigurumi-style rounds. Some antlers are stuffed for dimension, while others are flat and sewn on. Be sure they’re symmetrical and securely fastened to the top of the hat.
Once all the pieces are attached, weave in all ends, check for loose threads, and give the hat a gentle stretch or steam block if needed. Now your festive crochet masterpiece is ready to wear or gift!
4. Creative Variations and Customizations
One of the best things about the Crochet Reindeer Hat – Pattern is how easy it is to personalize. With a few tweaks, you can turn a simple design into something completely unique and suited to the recipient’s personality or the occasion.
For a Rudolph-inspired version, use red yarn for the nose and consider adding tiny jingle bells to the antlers for extra holiday cheer. This is a hit for kids’ Christmas parties or themed photo shoots.
To create a woodland-style hat, use neutral tones like gray, tan, and cream. Leave off the nose for a more minimalist, rustic look, perfect for winter wear even after the holidays are over.
Add gender-specific details like a crochet flower or a bow behind one antler for a more feminine touch. You can also use pastel colors for babies or add initials to personalize each hat.
Make it part of a crochet costume set by adding matching reindeer mittens, a tail (for babies), or even a little sweater with paw prints. Great for holiday card photos or themed family pajamas.
Turn your hat into a crochet animal series. Use the same base hat pattern and swap facial features to create a bear, fox, or moose. This way, you can create a whole lineup of winter animal hats using similar techniques.
For adult versions, opt for sophisticated textures. Use wool blends, add cables or puff stitches, or keep the colors muted for a more subtle and stylish take on the reindeer theme.
FAQ: Crochet Reindeer Hat – Pattern
Q1: Is the Crochet Reindeer Hat – Pattern beginner-friendly?
Yes, most versions use basic stitches and easy shaping techniques. Beginners can start with simple designs and add more advanced features like antlers later.
Q2: What size should I make for babies or toddlers?
Use size charts for head circumference: 14–16″ for newborns, 16–18″ for 3–6 months, and so on. Adjust hook size and stitch count accordingly.
Q3: Can I sell hats made from this pattern?
Many free and paid patterns allow handmade sales with credit to the designer. Always check the pattern’s terms of use before selling.
Q4: What kind of yarn is best for baby hats?
Choose soft, non-irritating yarns like baby-safe acrylic or cotton blends. Make sure they’re machine-washable and free of small parts if for infants.
Q5: Can I machine wash a finished reindeer hat?
If made with washable yarn, yes—but hand washing and laying flat to dry is recommended to maintain shape, especially if it has stuffed or sewn-on details.
Q6: How long does it take to make one hat?
A baby-size hat can be finished in 2–3 hours. Larger sizes with detailed features may take 4–6 hours depending on your speed and experience.
Conclusion
The Crochet Reindeer Hat – Pattern is a joyful and rewarding project that brings warmth and laughter to the holiday season. Whether you’re making it for your child, a festive photoshoot, or a cozy handmade gift, this pattern offers countless opportunities for
creativity and love.
We’ve explored the magic of this pattern, from materials and steps to creative customizations and frequently asked questions. Now, it’s your turn to pick up your hook and bring a reindeer to life!