The Crochet Rose Granny Square – Pattern combines the timeless appeal of the granny square with the elegant beauty of a rose, making it a standout project for both beginners and seasoned crocheters.
This design not only brings a fresh twist to traditional crochet squares but also adds a touch of floral sophistication to your handmade pieces.
Whether you’re creating a blanket, cushion cover, or decorative wall art, this pattern is a charming addition to your crochet repertoire.
One of the best things about the crochet rose granny square is its versatility. With just a few rounds of yarn, you can turn a simple center rose into a colorful, square-framed motif that becomes part of something much bigger. You can choose delicate pastel colors for a vintage feel or bold, vibrant shades for a more contemporary look.
In this comprehensive guide, we’ll explore the Crochet Rose Granny Square – Pattern in detail. You’ll learn what makes this pattern special, how to select the best yarn and tools, step-by-step guidance on making your squares, and creative ideas for using them in different projects. We’ll also answer the most common questions people have about this pattern and wrap things up with a helpful summary.
1. What Makes the Crochet Rose Granny Square Special?
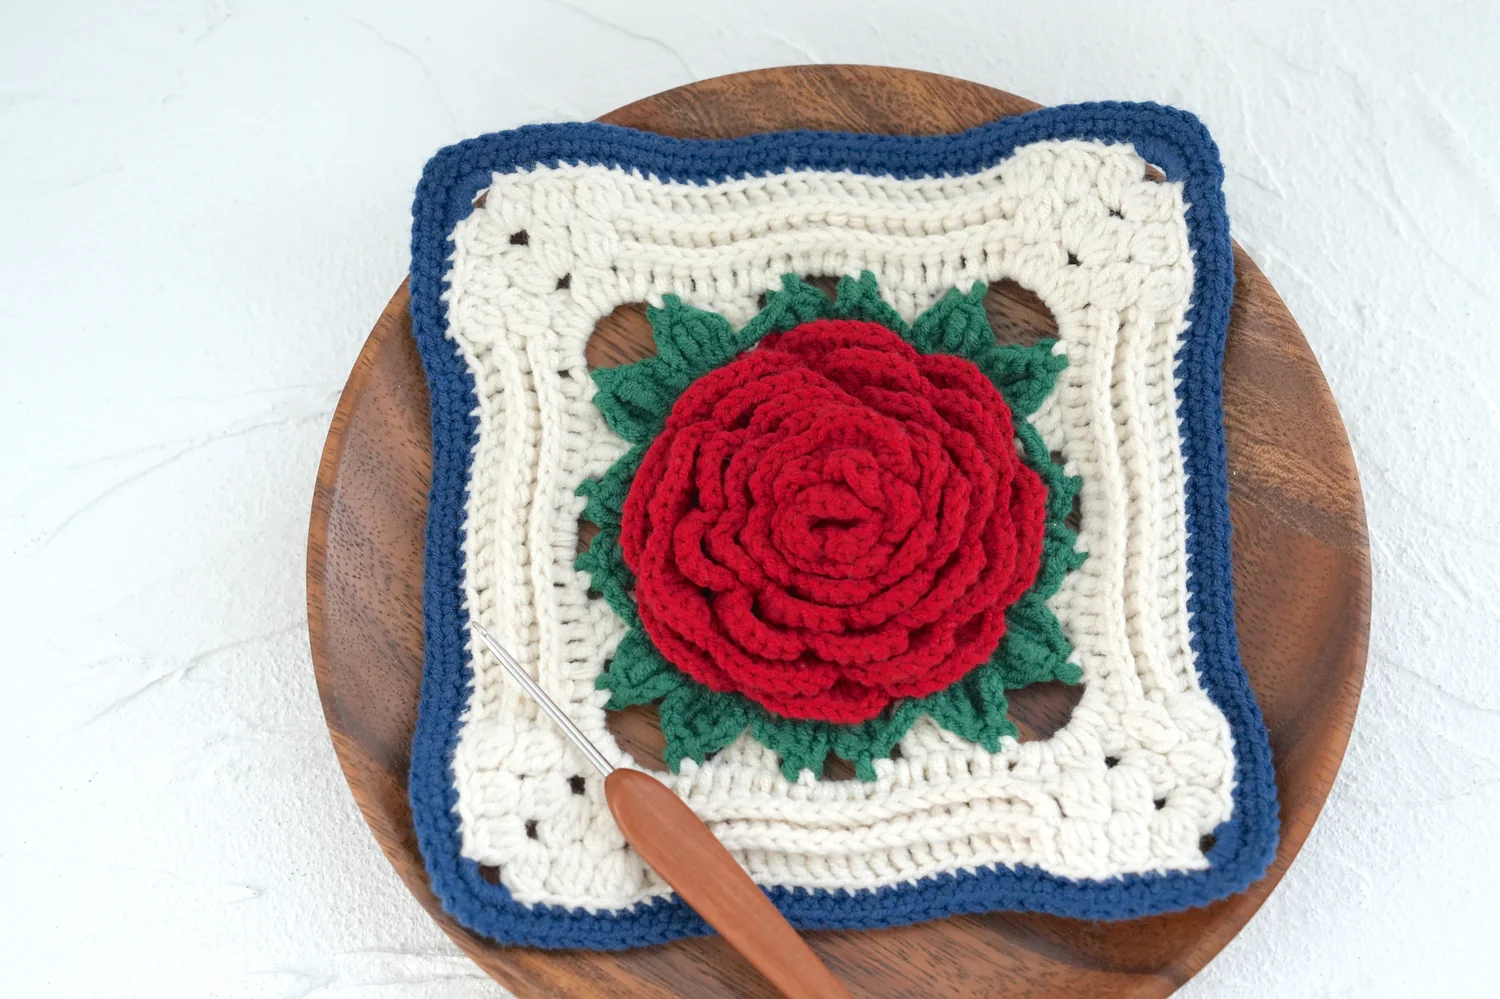
The Crochet Rose Granny Square – Pattern stands out because it blends floral design with geometric structure. At the center of each square is a rose motif, which is usually made with layered petals. Surrounding the rose, the square framing gives stability, contrast, and the ability to join other squares seamlessly.
This fusion of flower and square gives crocheters a way to bring natural beauty into their projects without compromising structure. The central rose adds texture and dimension that’s visually appealing and tactilely pleasing.
Another unique aspect is how customizable the pattern is. You can make a three-dimensional rose that pops out from the square, or you can flatten the rose slightly if you prefer a more subtle look. The square border can be done in any stitch pattern—simple double crochets or intricate lace—to match your desired style.
Because each square is made individually, it’s a portable project. You can work on a square here and there in your free time, then later assemble them into a larger creation. It’s perfect for people who enjoy manageable projects that eventually become grand pieces.
Also, the crochet rose granny square is a beautiful way to use up scrap yarn. Small amounts of pink, red, or any rose-colored yarn can form the flower, while greens or neutrals can make up the square background.
Lastly, this pattern is a wonderful introduction to combining 2D and 3D crochet techniques. It teaches layering, shaping, and joining—all essential skills that you’ll use in more advanced projects.
2. Materials and Tools You’ll Need
Before you begin your Crochet Rose Granny Square – Pattern, gathering the right tools and materials will help ensure a smooth and enjoyable experience. Like many crochet projects, this pattern doesn’t require a long list of supplies, but choosing quality materials makes a difference in your final result.
Start by selecting your yarn. You’ll need at least two colors: one for the rose and one for the square background. Acrylic yarns are budget-friendly and available in many colors, but if you want a more refined finish, consider using 100% cotton yarn. Cotton offers a smooth texture and crisp stitch definition—ideal for floral motifs.
You’ll also need a suitable crochet hook. Most patterns for rose granny squares use a 4.0mm to 5.0mm hook, but this can vary depending on your yarn weight. Always check the yarn label and adjust the hook size to maintain proper tension and stitch clarity.
A yarn needle is essential for weaving in ends and joining your squares if you’re making a blanket or other multi-square project. Small, sharp scissors are also handy for cutting your yarn cleanly and accurately.
Some crafters like to use stitch markers to track rounds or petal layers—especially helpful if you’re following a complex rose pattern. These markers can prevent mistakes and save time on counting.
Optional but useful: blocking tools. Blocking helps even out your squares, making them easier to join later. Foam mats and rust-proof pins are ideal for this purpose, especially if you’re working with natural fibers that benefit from shaping.
Lastly, consider printing out or bookmarking a written or visual version of the Crochet Rose Granny Square – Pattern to refer to as you work. Clear instructions will help guide you through each step.
3. How to Crochet the Rose Granny Square
Creating a Crochet Rose Granny Square – Pattern typically involves two main stages: crocheting the rose center and then building the square frame around it. It may look intricate, but the process becomes intuitive once you understand the structure.
Start with a magic ring or chain loop and work the first round of petals using double crochets or half-double crochets. Most rose centers begin with a round of basic stitches followed by layered petals formed in the front and back loops. This layering creates a blooming effect.
As you move through the petal layers, use increases to add volume. The rose should gradually grow in size, and each petal should overlap slightly with the one next to it. Once you complete the rose, you can fasten off or continue directly into the square.
The square framing begins by forming corner spaces around the rose. This is often done with chain stitches and double crochets to create four distinct corners. Once you have the square base, work in the round, adding more rows until your desired square size is reached.
Some patterns suggest fastening off the rose and attaching a new yarn color to begin the square. This gives more contrast and helps the rose stand out. Others allow you to build the square without cutting the yarn.
Be sure to keep your tension consistent throughout both the rose and square sections. If your petals are too loose or the square border is too tight, the finished square may warp or not lie flat.
Once your square is complete, weave in all loose ends with a yarn needle. Lightly steam or wet block your square to enhance its shape and make assembly easier if you’re joining multiple squares later.
4. Creative Uses for Rose Granny Squares
One of the most exciting parts of the Crochet Rose Granny Square – Pattern is figuring out how to use your finished squares. These beautiful motifs are more than just practice pieces—they can become the building blocks of incredible projects.
A popular project is a rose granny square blanket. By making multiple squares and joining them, you create a stunning floral-themed quilt that’s both cozy and decorative. It’s perfect as a throw blanket, baby gift, or heirloom piece.
You can also use individual squares to make home décor items. Sew one or more into a pillowcase front, or make a wall hanging by joining several in a row or grid. These projects are great for showcasing your squares without needing dozens of them.
Fashion accessories are another great use. A rose granny square can become the front panel of a small bag, or even part of a headband or scarf. When made with finer yarn, the square can be delicate enough for wearable projects.
If you enjoy giving handmade gifts, these squares are ideal. Turn one into a coaster, bookmark, or sachet pouch by adding some backing and finishing touches. Handmade rose-themed items are especially loved around holidays like Mother’s Day or Valentine’s Day.
Don’t forget seasonal decorations. A garland of rose granny squares in different colors can brighten up any room. Try white and red for winter, pink and yellow for spring, or bold purples and oranges for fall.
Lastly, mix rose granny squares with other granny square types in a mixed-pattern blanket or bag. This adds variety and allows you to explore even more stitches and colors.
Frequently Asked Questions (FAQ)
1. What is a Crochet Rose Granny Square?
It’s a crochet motif that features a rose flower in the center and a square border around it. The design combines 3D floral elements with the structure of a classic granny square.
2. Is the pattern beginner-friendly?
Yes, but it’s best suited for confident beginners or intermediates. While the square portion is simple, the layered rose requires basic knowledge of crochet techniques.
3. What yarn is best for this pattern?
100% cotton or soft acrylic yarn is ideal. Choose contrasting colors for the rose and the square background to make the design pop.
4. Can I join multiple squares together?
Absolutely! You can join them using slip stitch, whip stitch, or a join-as-you-go method to create blankets, bags, and more.
5. Do I need to block the squares?
Blocking is recommended to ensure the squares are uniform in size and shape, especially before joining them into larger projects.
6. How long does it take to make one square?
On average, it takes 30 to 60 minutes to complete one crochet rose granny square, depending on your speed and skill level.
Conclusion
The Crochet Rose Granny Square – Pattern offers the perfect blend of beauty, creativity, and versatility. From crafting a single floral square to assembling a full quilt, the possibilities are endless with this charming design. Whether you’re making gifts, home décor, or wearable art, this pattern is a wonderful way to enhance your crochet skills.
We hope this guide has inspired you to pick up your hook and yarn and start creating. If you’ve tried this pattern, we’d love to hear from you. Please leave your honest opinion and share any suggestions—
your feedback helps us grow and support the crochet community!
Would you like a printable pattern or video tutorial for this design?