
Crochet Shells Pattern is one of the most beautiful and versatile techniques in the world of crochet. Whether you are creating decorative appliqués, coastal-themed projects, blankets, garments, accessories, or home décor, this timeless Crochet Shells Pattern offers elegance, texture, and endless creative possibilities. Its curved stitches beautifully imitate the shape of real seashells, making it a favorite among beginners and experienced crocheters alike.
One of the greatest advantages of the Crochet Shells Pattern is its simplicity combined with an impressive visual effect. With only a few basic crochet stitches such as chain stitches, single crochet, half double crochet, and double crochet, you can create realistic shell motifs that look intricate while remaining enjoyable to make. This makes the pattern suitable for relaxing crochet sessions as well as advanced decorative projects.
If you are looking for a charming crochet project inspired by nature, the Crochet Shells Pattern is an excellent choice. Throughout this guide, you will learn the recommended materials, understand the construction process, follow a complete stitch-by-stitch tutorial using standard U.S. crochet terminology, discover helpful finishing techniques, avoid common mistakes, and find creative ideas for using your finished crochet shells in countless handmade projects.
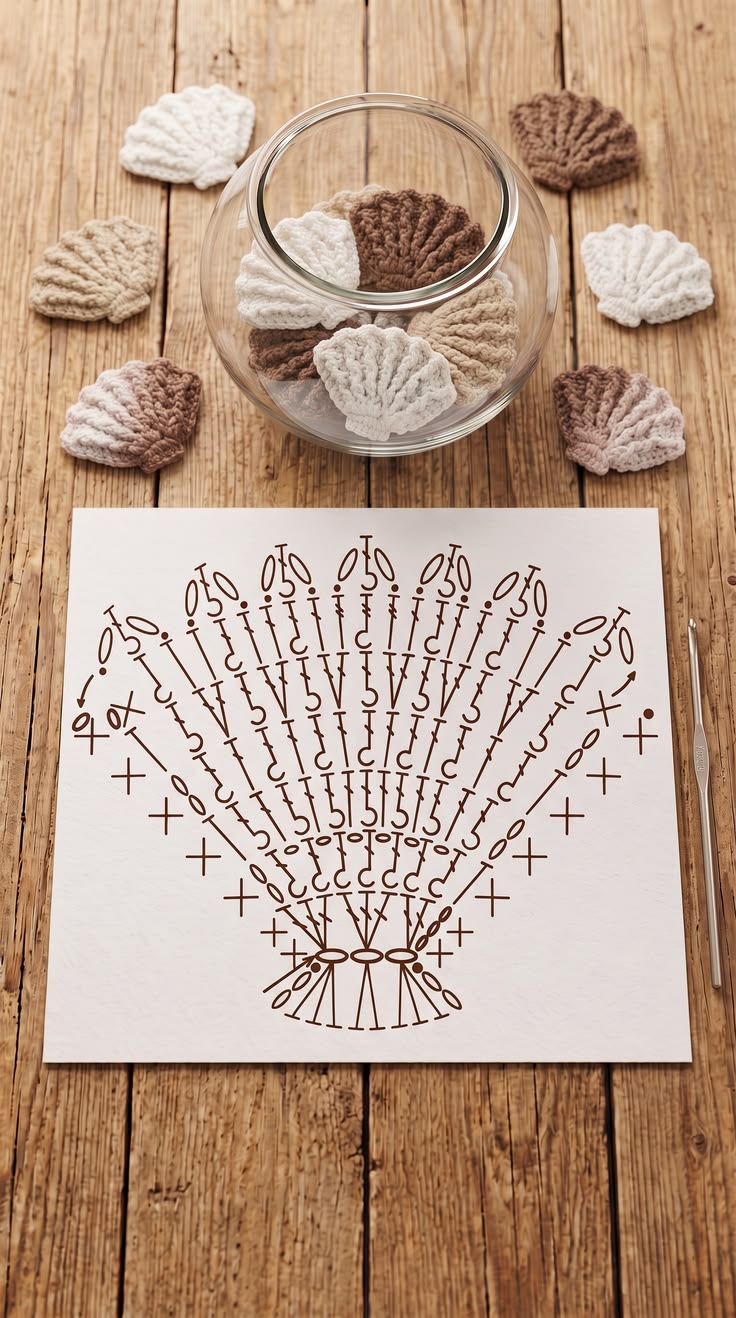
Materials and Basic Preparation for the Crochet Shells Pattern
Choosing the right yarn makes a noticeable difference in the final appearance of your Crochet Shells Pattern. Cotton yarn is highly recommended because it provides excellent stitch definition while helping the shell maintain its shape. Mercerized cotton creates crisp edges, while soft cotton blends give a slightly more delicate finish.
A crochet hook between 3.0 mm and 4.0 mm works well for most medium-weight cotton yarns. If you prefer larger decorative shells, simply increase both the yarn weight and hook size while maintaining the same stitch sequence. Smaller hooks produce firmer stitches that emphasize the shell’s ridges.
Before beginning your project, gather scissors, a yarn needle for weaving in ends, and stitch markers if desired. Having all your supplies ready allows you to focus entirely on stitch consistency throughout the project.
Practice maintaining even tension before starting. Consistent tension ensures that each shell remains symmetrical and creates a professional-looking result regardless of yarn color or size.
Neutral shades such as ivory, sand, cream, beige, mocha, and white create realistic seashell effects. However, pastel blues, lavender, coral, mint, blush pink, and ocean-inspired gradients also produce stunning decorative shells.
Finally, familiarize yourself with the U.S. crochet abbreviations used in this tutorial:
- ch – Chain
- sc – Single Crochet
- hdc – Half Double Crochet
- dc – Double Crochet
- sl st – Slip Stitch
Step-by-Step Crochet Shells Pattern Instructions
Begin with a magic ring or create a foundation using four chain stitches joined with a slip stitch to form a small circle. Either method creates a solid center for the shell motif.
Round 1: Ch 2, work 8 dc into the center ring. Join with a sl st into the first dc. This creates the base from which the shell will grow.
Round 2: Ch 2. Work 2 dc into each stitch around. Join with a sl st. The increased stitches create the width needed for the shell’s fan shape.
Round 3: Ch 2. Work 1 dc in the first stitch, 2 dc in the next stitch. Repeat this increase sequence around the entire row. Join with a slip stitch.
Round 4: Continue increasing gradually by placing 2 dc into every third stitch. This gentle expansion prevents curling while producing the rounded shell appearance.
Now begin shaping the shell ridges. Instead of working complete circles, crochet only across the front portion of the shell. Each row becomes slightly shorter than the previous one, naturally forming the fan shape seen in classic seashells.
Continue reducing each row by leaving one stitch unworked at each side. Work dc stitches across the remaining center stitches. Repeat until a beautiful shell shape appears with softly curved edges and visible vertical ridges.
For additional texture, work front post double crochet stitches along selected rows. These raised stitches imitate the natural grooves found on real seashells and add realistic dimension.
Finish by working one complete round of single crochet evenly around the shell. This neat edging stabilizes the motif and gives it a polished appearance suitable for sewing onto larger crochet projects.
Fasten off, leaving a long yarn tail. Use the yarn needle to weave in all loose ends carefully through the back of the stitches without adding unnecessary bulk.
Tips for Creating Beautiful and Professional Crochet Shells
Even tension is one of the biggest factors affecting the appearance of your Crochet Shells Pattern. Tight stitches may distort the shell, while loose stitches reduce the beautiful ridge definition.
Blocking is highly recommended after completing your shell. Lightly dampen the finished motif, gently shape the edges, and allow it to dry completely on a flat surface. This simple step greatly improves symmetry.
Experiment with color combinations inspired by nature. Sandy beige, ivory, pearl white, soft taupe, and light brown create realistic coastal shells, while pastel rainbow colors offer a playful decorative style.
Adding tiny seed beads or pearl embellishments near the base of the shell can transform it into an elegant embellishment for bags, hats, pillows, or holiday ornaments.
If making multiple shells for one project, periodically compare their sizes while crocheting. Small tension differences become noticeable when several motifs are placed together.
Don’t rush the finishing process. Carefully weaving in ends, shaping the shell, and checking stitch consistency all contribute to a professional handmade appearance.
Creative Ways to Use the Crochet Shells Pattern
One of the most popular uses for the Crochet Shells Pattern is creating beach-themed garlands. Several shells connected with simple chain stitches make beautiful summer decorations for homes, parties, or nurseries.
Crochet shells also make charming appliqués for baby blankets. Sew them onto ocean-themed afghans alongside starfish, fish, turtles, or seaweed motifs to create an imaginative underwater design.
These shell motifs work beautifully on handbags and tote bags. Arranging several shells in layered colors creates an elegant textured accent that instantly elevates a simple crochet bag.
Home décor enthusiasts often attach crochet shells to decorative wreaths, table runners, pillow covers, or framed wall art. Their timeless coastal appearance complements farmhouse, rustic, and nautical decorating styles.
Smaller shells can become keychains, zipper pulls, bookmarks, gift toppers, ornaments, earrings, necklaces, or brooches. Their lightweight design makes them perfect for wearable accessories.
You can even combine multiple Crochet Shells Pattern motifs into larger artistic compositions. Arranging shells with coral, waves, sea stars, and pearls creates stunning decorative panels celebrating the beauty of the ocean.
Frequently Asked Questions
Is the Crochet Shells Pattern suitable for beginners?
Yes. Beginners who already know basic stitches such as chain, single crochet, and double crochet can complete this pattern successfully by following each step carefully.
Which yarn works best?
Cotton yarn is generally the preferred choice because it provides excellent stitch definition and helps the shell maintain its shape after blocking.
Can I use acrylic yarn?
Absolutely. Acrylic yarn produces softer shells that work well for blankets, decorative projects, and children’s items, although the stitch definition may be slightly less crisp than cotton.
How long does one shell take to crochet?
Most crocheters can complete one shell in approximately 20 to 45 minutes, depending on yarn weight, stitch speed, and the desired level of detail.
Can I make larger shells?
Yes. Simply use thicker yarn with a larger crochet hook while following the same construction process. You may also add additional increase rows before shaping the shell.
How do I keep the shell flat?
Gradual increases, even tension, and proper blocking after completion help maintain a flat, symmetrical shell.
Are crochet shells washable?
Yes. Most cotton and acrylic yarns are washable according to the manufacturer’s care instructions. Gentle washing and air drying help preserve the shell’s shape.
What projects can use crochet shells?
They are perfect for blankets, bags, garments, baby items, wall décor, wreaths, keychains, bookmarks, ornaments, pillows, table decorations, and countless other handmade creations.
Conclusion
The Crochet Shells Pattern is a timeless crochet design that combines elegance, simplicity, and versatility into one beautiful project. Throughout this guide, you learned how to choose the best materials, prepare your supplies, understand the basic stitch abbreviations, and crochet each section of the shell step by step using U.S. crochet terminology. You also discovered professional finishing techniques, helpful tips for improving stitch consistency, and many creative ways to incorporate your finished shells into decorative and functional crochet projects.
With patience and regular practice, each shell becomes more symmetrical, textured, and realistic, allowing you to confidently create stunning handmade pieces inspired by the beauty of the sea. Whether you make a single decorative appliqué or an entire collection of shells for larger projects, this pattern offers endless opportunities for creativity.