If you’re looking for a warm and practical handmade project, the Crochet Slipper Socks – Pattern is a perfect choice for crafters of all skill levels.
These soft, cozy socks are ideal for chilly mornings, relaxing evenings, or even as thoughtful gifts for friends and family.
With just a hook, yarn, and a bit of time, you can create custom slipper socks that are not only functional but also stylish.
The Crochet Slipper Socks – Pattern has gained popularity for its simplicity, flexibility, and usefulness. Whether you prefer ankle-length, mid-calf, or knee-high slipper socks, there’s a pattern variation to match your style. The pattern allows for creativity in terms of yarn choices, stitch patterns, and even color combinations, making each pair of socks truly one-of-a-kind.
This article will walk you through everything you need to know about the Crochet Slipper Socks – Pattern, including essential materials, basic techniques, step-by-step instructions, and creative design ideas. You’ll also find answers to common questions and expert tips to help make your sock-making journey fun and successful.
1. What is a Crochet Slipper Socks – Pattern?
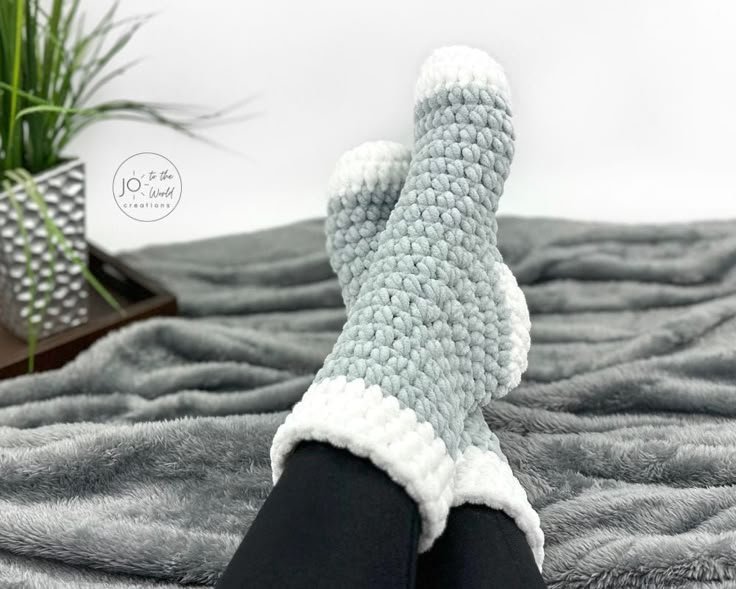
The Crochet Slipper Socks – Pattern is a set of instructions that allows you to create soft, flexible, and warm footwear entirely by hand. These socks are thicker and more structured than regular socks, making them perfect for indoor wear. They’re often designed with extra padding at the sole and a snug fit around the ankle to ensure comfort and warmth.
Unlike traditional socks, crochet slipper socks are made with medium to bulky weight yarns, which help provide insulation against cold floors. They can be made in one solid piece or constructed in separate sections that are sewn together. Most patterns include options for customizing the size, style, and even the level of warmth based on the stitches and yarn weight used.
One of the reasons people love the Crochet Slipper Socks – Pattern is the range of customization it allows. You can choose from various designs—some with open toes, some with decorative cuffs, and even others that mimic the look of boots or sneakers. This versatility makes them ideal for different age groups and fashion tastes.
In terms of construction, slipper socks generally begin at the toe or the heel and are worked in the round or in rows, depending on the design. Stitches like single crochet, half double crochet, and front post/back post stitches are commonly used to create a firm and comfortable fabric.
The Crochet Slipper Socks – Pattern is often used by beginners to practice foundational crochet techniques, while more advanced crafters enjoy experimenting with textures, colorwork, and shaping. It’s a great way to develop confidence in your skills while producing a practical item.
Additionally, these patterns are great for quick projects or last-minute gifts. Many crocheters appreciate that they can finish a pair in just a few hours, making them a satisfying and useful creation.
2. Materials and Tools Needed for Crochet Slipper Socks – Pattern
Starting your own pair of Crochet Slipper Socks – Pattern begins with gathering the right materials. Having the proper tools and yarn can make the process more enjoyable and the results more comfortable and durable.
The first and most essential item is yarn. For slipper socks, worsted weight (#4) or bulky weight (#5) yarn is commonly recommended. These provide both warmth and structure. Acrylic yarn is a popular choice because it’s affordable, washable, and comes in many colors, while wool or wool-blends offer added warmth and natural breathability.
Next, you’ll need a crochet hook that corresponds with your yarn weight. Most patterns for slipper socks call for hook sizes between 5.0 mm and 6.5 mm, but always refer to the specific pattern you’re following. Getting the right gauge is important for ensuring your slipper socks fit properly.
Other handy tools include stitch markers, which are useful for marking the beginning of rounds or important pattern changes. Scissors and a yarn needle are essential for weaving in ends and sewing any parts of the slipper socks together.
If you want to add durability and grip to your socks, consider applying non-slip soles or fabric paint to the bottom. This is especially useful for children or anyone wearing them on slippery floors. Leather or suede patches can also be sewn on for a polished, long-lasting finish.
For those who want a bit of cushioning or extra warmth, you can add a lining using soft fleece fabric, or even insert foam pads before closing up the soles. These enhancements can make the socks more comfortable and winter-ready.
Lastly, make sure you have a reliable pattern to follow. A clear and detailed Crochet Slipper Socks – Pattern will guide you through the construction process and help you avoid mistakes, especially if you’re new to crochet footwear.
3. How to Make Crochet Slipper Socks Step-by-Step
Once you’ve gathered your materials, you’re ready to start following your Crochet Slipper Socks – Pattern. While each design is different, most slipper socks follow a general structure that includes the toe, foot, heel, and cuff.
Start by creating the toe section. If the pattern is toe-up, you’ll often begin with a magic ring or foundation chain, then increase in rounds to form the shape of the toe box. This ensures a snug and rounded fit for the front of the sock.
Next, move on to constructing the foot portion. This is usually done in rounds or rows without increases, keeping the tube shape that fits around the arch and instep. You can modify this section to fit your exact foot length before moving on to the heel.
For the heel, some patterns use a “short row” method, while others crochet a flat piece and fold it to form a cup shape. Precision is key here to ensure the sock hugs the back of your foot comfortably and doesn’t slip off during wear.
After shaping the heel, continue with the cuff or ankle area. This part can be made with ribbing for a snug fit or left loose for a more relaxed style. Some designs include button flaps, ties, or folded-down cuffs to add personality and flair.
Finish off your slipper socks by adding decorative details, such as contrasting color stripes, bobble stitches, or even pom-poms. These additions make your handmade socks unique and fun to wear or give away.
Finally, don’t forget to block your socks if needed and apply any optional non-slip material to the soles. Once complete, weave in all loose ends, try them on, and enjoy your handmade comfort.
4. Customization and Styling Tips for Crochet Slipper Socks
One of the best aspects of using a Crochet Slipper Socks – Pattern is the endless opportunity for personalization. With just a few tweaks, you can tailor your socks to match your wardrobe, personality, or the preferences of the person you’re gifting them to.
Start by choosing a color scheme that reflects your style. Monochrome slipper socks give a minimalist vibe, while bright colors and contrasting accents bring a playful energy. You can even use leftover yarn from other projects to create multicolored or striped designs.
Experiment with different stitch textures to add interest. A simple change from single crochet to a puff or shell stitch can give the socks a completely different feel and appearance. Texture not only adds style but can also improve warmth and grip.
Consider adding personal touches like initials, appliques, or themed motifs. Crocheted hearts, stars, or animals can be sewn onto the top of the foot or around the ankle. These little details make each pair of slipper socks feel extra special.
If you’re making the socks as a gift, size is important. Most Crochet Slipper Socks – Pattern designs offer instructions for adjusting length and width. Always measure the recipient’s foot or refer to a size chart to get the right fit.
For a seasonal twist, incorporate holiday-themed elements. Use red and green yarn for Christmas, pastel shades for Easter, or autumnal tones for fall. You can even attach small jingle bells or snowflake charms for festive flair.
Lastly, document your process and final product. Taking pictures and writing notes on what worked well will help you refine your approach for future pairs. Over time, you can develop your own signature Crochet Slipper Socks – Pattern style.
FAQ – Crochet Slipper Socks – Pattern
Q1: Are crochet slipper socks hard to make?
Not at all. Many Crochet Slipper Socks – Pattern options are beginner-friendly and require only basic stitches. With a bit of practice, anyone can make a cozy pair.
Q2: What yarn is best for slipper socks?
Medium to bulky weight yarns (like worsted or chunky acrylic) are best. Wool blends also offer warmth and durability, especially for cold climates.
Q3: Can I make non-slip slipper socks?
Yes! You can add fabric paint, hot glue, or pre-made non-slip soles to the bottom to prevent slipping on hard surfaces.
Q4: How long does it take to make a pair?
Most people can complete a pair of basic slipper socks in 4–8 hours, depending on size and complexity of the pattern.
Q5: How do I wash crocheted slipper socks?
Most yarns are machine washable, but it’s best to use the gentle cycle and air dry. Always check the yarn label for specific care instructions.
Q6: Can I sell slipper socks made from a pattern I found online?
It depends on the pattern’s licensing. Many designers allow handmade items to be sold, but always read the pattern’s terms of use and credit the original creator if required.
Conclusion
The Crochet Slipper Socks – Pattern is more than just a project—it’s a way to blend creativity with comfort. We’ve covered everything from what the pattern entails, materials you need, step-by-step instructions, and styling ideas, to a full FAQ to guide you further.
Whether you’re making them for yourself or as a thoughtful gift, these socks are a delightful way to stay cozy and creative. We’d love to hear your thoughts, tips, or suggestions. Have you tried making your own slipper socks? Share your honest opinion and ideas in the comments to help inspire other crafters!