
Crochet Star Pattern projects are among the most enjoyable and versatile designs for crochet enthusiasts. Whether you want to decorate your home, create handmade gifts, personalize Christmas ornaments, or simply practice new stitches, a beautiful Crochet Star Pattern is a timeless project that combines elegance with creativity. This guide will walk you through every important step while explaining the crochet stitches and construction techniques needed to achieve a professional-looking result.
Crocheting stars has become increasingly popular because they are quick to make and can be customized in countless ways. You can experiment with different yarn colors, textures, hook sizes, and finishing methods to create unique pieces for every season. Although festive colors are commonly chosen, the same pattern can be adapted for birthdays, baby showers, weddings, or rustic home décor. Learning a reliable Crochet Star Pattern opens the door to dozens of future projects.
One of the greatest advantages of this project is that it is suitable for crocheters of different skill levels. Beginners can practice fundamental stitches while experienced makers can focus on improving stitch definition and experimenting with decorative techniques. Throughout this guide, you will learn which crochet stitches are used, how each round is built, how the star points are formed, how to finish the project neatly, and how to customize your final design while keeping the structure balanced and attractive.
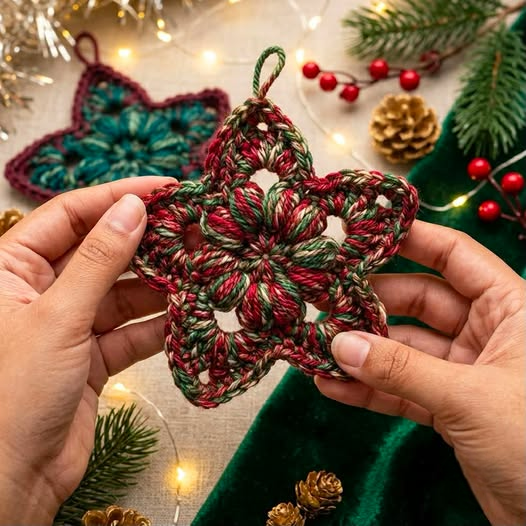
Understanding the Crochet Star Pattern and Gathering Materials
Before beginning your Crochet Star Pattern, gathering the correct materials will make the entire process smoother. Choosing quality yarn and an appropriate hook greatly influences the final appearance, helping the stitches remain clean and evenly shaped.
A medium-weight yarn is an excellent starting point because it offers enough structure while still allowing flexibility. Cotton yarn creates crisp stitch definition, while acrylic yarn produces a softer and lighter ornament. Multicolored yarns can add beautiful visual effects without requiring frequent color changes.
For this project, prepare a crochet hook recommended for your chosen yarn, a yarn needle for weaving in ends, scissors, and stitch markers if desired. These simple tools are enough to complete the project from beginning to end.
The center of the star usually begins with a magic ring or a chain loop. The magic ring creates a tighter center and allows you to eliminate any visible opening once tightened.
The primary stitches used throughout this Crochet Star Pattern include Chain (ch), Slip Stitch (sl st), Single Crochet (sc), Half Double Crochet (hdc), Double Crochet (dc), Treble Crochet (tr), and Picot stitches for optional decorative edging.
Maintaining even tension throughout the project is one of the biggest secrets to producing symmetrical points. Consistent tension allows each point of the star to match the others in size and shape.
Step-by-Step Crochet Stitches for Building the Star
Begin by creating a magic ring. Chain one to secure the ring, then work twelve Double Crochet (dc) stitches into the center. Pull the ring tightly closed and join with a Slip Stitch (sl st) into the first stitch to complete the opening round.
Round two creates the foundation petals. Chain three, work two Double Crochet (2 dc), Chain two, then work three Double Crochet (3 dc) into the same stitch space. Skip the next stitch and repeat this sequence around the circle until six evenly spaced petal groups are formed.
The next round begins shaping the star. Slip stitch into the nearest chain space, then Chain one and work Single Crochet (sc), Half Double Crochet (hdc), Double Crochet (dc), Treble Crochet (tr), Chain two, Slip Stitch into the second chain from the hook, Treble Crochet (tr), Double Crochet (dc), Half Double Crochet (hdc), and Single Crochet (sc) back into the same petal. This forms the first pointed section.
Repeat this complete stitch sequence inside each petal space until all six points have been created. Count your stitches carefully to ensure each point remains identical in height and width.
After completing all the points, join with a Slip Stitch to the first stitch. If desired, add another decorative edging by working Single Crochet stitches evenly around the outer edge, placing extra stitches near each point to maintain the shape without curling.
Fasten off the yarn, leaving a long tail for weaving. Use a yarn needle to hide all loose ends carefully inside the stitches. Blocking the finished star with light steam or gentle wet blocking helps each point stay crisp and symmetrical.
Tips for Creating a Professional Crochet Star Pattern
Choosing complementary yarn colors greatly enhances the visual impact of your Crochet Star Pattern. Traditional festive colors are always beautiful, but soft neutrals, jewel tones, pastel combinations, or elegant monochrome palettes can transform the project into year-round décor.
Pay close attention to stitch counts throughout every round. Missing or adding even one stitch may cause uneven spacing, making one point appear larger than the others.
Blocking is one of the most overlooked finishing techniques. After completing your crochet star, gently shape every point and allow the project to dry completely. This simple step dramatically improves the final appearance.
If your star feels too loose, consider using a crochet hook half a size smaller than recommended. Smaller hooks create tighter stitches and help the ornament maintain its shape.
Experiment with textured yarns, metallic threads, or glitter fibers for decorative versions. These specialty yarns can create elegant stars for holiday decorating without changing the underlying construction.
Once you feel comfortable with the basic Crochet Star Pattern, try creating multiple sizes simply by adjusting the yarn weight and hook size. This allows you to build coordinated decoration sets with minimal changes to the pattern itself.
Creative Ways to Use Your Finished Crochet Star Pattern
A completed Crochet Star Pattern can become a beautiful holiday ornament by simply attaching a small hanging loop at the top. This makes it perfect for decorating trees, wreaths, gift packages, or seasonal displays.
Several stars can be joined together into a festive garland. Alternate different colors or yarn textures to create visual variety while maintaining the same basic pattern structure.
These crochet stars also make thoughtful handmade gifts. Attach one to a greeting card, include it inside a gift basket, or use it as a decorative package topper that recipients can reuse every year.
Smaller versions can become keychains, zipper pulls, bookmarks, or backpack accessories. Their lightweight design makes them practical while still showcasing beautiful crochet craftsmanship.
Larger stars work wonderfully as table decorations, wall hangings, pillow appliqués, blanket embellishments, or framed fiber art. The same construction method scales well with thicker yarns.
Many crocheters also enjoy combining several completed stars into larger blankets, cushions, bags, or seasonal centerpieces. This modular approach allows endless creativity while practicing the same familiar stitches repeatedly.
FAQ About Crochet Star Pattern
Is this Crochet Star Pattern suitable for beginners?
Yes. Beginners who already know basic crochet stitches such as Chain, Single Crochet, Double Crochet, and Slip Stitch can successfully complete this project with patience and careful stitch counting.
Which yarn works best?
Cotton yarn produces excellent stitch definition and firm structure. Acrylic yarn offers softness and affordability, while blended fibers provide a balance between durability and flexibility.
What crochet hook size should I use?
Always follow the yarn manufacturer’s recommendation as a starting point. Most medium-weight yarns work well with hooks between 4.0 mm and 5.5 mm, although personal tension may require slight adjustments.
Why are my star points uneven?
Uneven points are usually caused by inconsistent tension, incorrect stitch counts, or accidentally skipping stitches. Carefully counting every stitch during each round helps maintain symmetry.
Can I make larger stars?
Absolutely. Using thicker yarn and a larger crochet hook increases the finished size while preserving the overall design. You can also add additional decorative rounds if desired.
Should I block the finished star?
Yes. Blocking helps define every point, smooth the edges, improve symmetry, and create a more professional-looking finished project.
Can I use multiple colors?
Certainly. Color changes between rounds or even within each point create beautiful visual effects. Self-striping yarns also produce unique patterns automatically.
How long does it take to complete?
Most crocheters can finish a single Crochet Star Pattern in one to two hours, depending on experience level and yarn complexity.
Conclusion
The Crochet Star Pattern is a rewarding project that combines beautiful stitch work with endless creative possibilities. Throughout this guide, you learned how to gather the proper materials, build the center foundation, shape each star point using classic crochet stitches such as Chain (ch), Slip Stitch (sl st), Single Crochet (sc), Half Double Crochet (hdc), Double Crochet (dc), and Treble Crochet (tr), apply finishing techniques like blocking, and explore numerous decorative ideas for displaying your finished creation.
By practicing consistent tension, counting stitches carefully, and experimenting with different yarns and colors, you can confidently create elegant crochet stars for every occasion.