Making a Crochet Strawberry Bag – Tutorial is one of the most delightful projects you can undertake if you love blending functional fashion with whimsical aesthetics. This charming accessory has taken the crafting world by storm, offering a pop of color and a touch of nature-inspired beauty to any outfit. Whether you are looking for a gift for a loved one or a treat for yourself, learning how to master this crochet strawberry bag will provide you with a versatile skill set that combines basic stitches with creative shaping techniques.
The beauty of a Crochet Strawberry Bag – Tutorial lies in its accessibility for crafters of various skill levels, as it primarily utilizes the magic ring, double crochet, and puff stitches to create that iconic berry texture. By choosing the right shades of vibrant red and lush green, you can transform simple cotton yarn into a durable, eco-friendly tote or crossbody bag. This guide is designed to walk you through every step of the process, ensuring your finished piece is both sturdy and visually stunning, perfectly optimized for your handicraft blog or personal collection.
In this comprehensive Crochet Strawberry Bag – Tutorial, we will dive deep into the essential materials, the structural foundation of the bag, and the finishing touches that bring the “seeds” and “leaves” to life. Beyond just following a pattern, you will learn the “why” behind the stitch placement and how to ensure your tension remains consistent throughout the project. Prepare your hooks and yarn as we embark on this creative journey to craft the ultimate handmade strawberry accessory that is as sweet as it is practical.
1 Understanding the Essentials of a Crochet Strawberry Bag – Tutorial
Before starting your Crochet Strawberry Bag – Tutorial, it is vital to select a high-quality cotton yarn or a cotton-blend, as these fibers offer the structural integrity needed for a bag. Unlike wool, cotton does not stretch excessively when weight is added, ensuring your crochet bag maintains its shape over time.
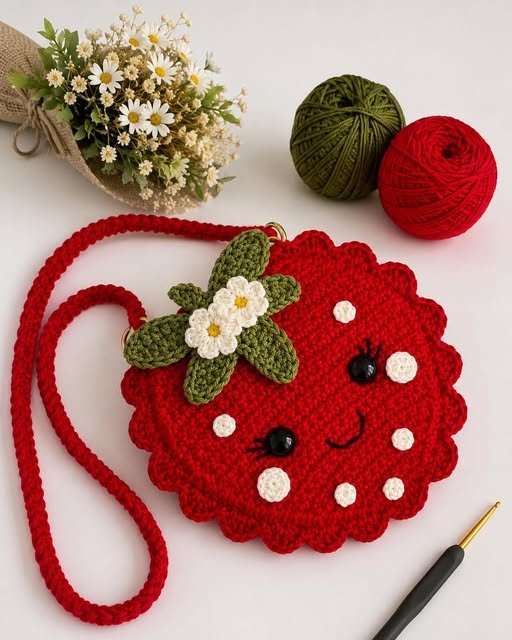
The primary focus of this Crochet Strawberry Bag – Tutorial is achieving the “strawberry” look through a specific textured stitch, often referred to as the bobble stitch or popcorn stitch. These stitches mimic the bumpy surface of a real strawberry, adding a 3D element to your handmade project.
Another key term in any Crochet Strawberry Bag – Tutorial is the gauge, which refers to the number of stitches per inch. Maintaining a tight gauge is essential for bags so that small items don’t fall through the gaps between your crochet stitches.
A Crochet Strawberry Bag – Tutorial also emphasizes the importance of a sturdy strap. You can choose between a romanian cord, a simple chain stitch reinforced with single crochet, or even a braided handle to complement the fruit theme.
The “leaves” or the top of the strawberry are usually created using green yarn and a series of increases and decreases. This part of the Crochet Strawberry Bag – Tutorial teaches you how to transition colors seamlessly using the tapestry crochet technique.
Finally, a Crochet Strawberry Bag – Tutorial is incomplete without discussing lining. Adding a fabric lining inside your crochet strawberry bag provides a professional finish and prevents the yarn from sagging, making it a truly SEO-optimized and durable craft.
2 Mastering the Foundation Stitches and Color Transitions
The first step in our Crochet Strawberry Bag – Tutorial involves creating a solid base, usually starting with a magic circle. This technique allows you to pull the center tight, leaving no hole at the bottom of your berry-shaped bag.
As you progress through the Crochet Strawberry Bag – Tutorial, you will alternate between single crochet for the base and more complex stitches for the body. The red section of the bag is where the visual impact happens, requiring focused stitch counting.
Effective color transitions are a hallmark of a great Crochet Strawberry Bag – Tutorial. When moving from the red fruit body to the green sepals, you should pull the new color through the last two loops of the previous stitch for a clean finish.
Incorporating white or yellow seeds into your Crochet Strawberry Bag – Tutorial can be done in two ways: either by working the color in as you go or by using a tapestry needle to embroider the seeds afterward. Both methods add incredible detail and realism.
The Crochet Strawberry Bag – Tutorial also covers the “leafy” top, which often uses picot stitches or triangular flaps to mimic the look of strawberry greens. These elements provide the necessary “lid” or closure for your crochet purse.
By following this Crochet Strawberry Bag – Tutorial, you gain a better understanding of shaping. Since a strawberry is wider at the top and narrower at the bottom, you will learn the art of gradual increases to achieve that perfect fruit silhouette.
3 Assembling the Components and Adding Hardware
Once the body is complete, this Crochet Strawberry Bag – Tutorial shifts focus to assembly. You will learn how to use a slip stitch or a whip stitch to join different parts, such as the strap or the decorative leaves, to the main strawberry body.
Many people following a Crochet Strawberry Bag – Tutorial want to know about closures. You can install a magnetic snap, a zipper, or even a drawstring made of green yarn to keep your belongings secure inside your fruit bag.
The Crochet Strawberry Bag – Tutorial also suggests adding stitch markers during the assembly phase. This ensures that your straps are perfectly centered and that the bag hangs evenly when worn as a crossbody crochet bag.
For a more modern look, this Crochet Strawberry Bag – Tutorial encourages the use of metal D-rings or swivel hooks. Attaching your crochet straps to hardware instead of directly to the yarn can prevent wear and tear over long-term use.
Reinforcing the bottom of the bag is another expert tip found in this Crochet Strawberry Bag – Tutorial. You can use a piece of plastic canvas or heavy interfacing to ensure the crochet strawberry bag sits upright when placed on a surface.
Lastly, the Crochet Strawberry Bag – Tutorial highlights the importance of blocking. Wet blocking your finished crochet project helps even out the stitches and sets the final shape, giving it a high-end, boutique-quality appearance.
4 Caring for Your Handmade Crochet Strawberry Bag
After completing your Crochet Strawberry Bag – Tutorial, knowing how to maintain it is essential for longevity. Because it is a handmade item, gentle care is required to keep the vibrant red yarn from fading or pilling.
This Crochet Strawberry Bag – Tutorial recommends hand washing your bag in cool water with a mild detergent. Avoid wringing the bag, as this can distort the crochet stitches and ruin the strawberry shape you worked so hard to create.
Drying your project from the Crochet Strawberry Bag – Tutorial should always be done by laying it flat on a towel. This prevents the weight of the water from stretching the yarn fibers out of place while the bag is wet.
If you used acrylic yarn instead of cotton in your Crochet Strawberry Bag – Tutorial, be careful with heat. High temperatures from an iron can “kill” the acrylic, causing it to lose its bounce and become limp or even melt.
To keep the “seeds” looking sharp, this Crochet Strawberry Bag – Tutorial suggests checking the embroidery or puff stitches periodically. If a thread comes loose, use a yarn needle to tuck it back into the fabric of the crochet bag.
Sharing your journey through this Crochet Strawberry Bag – Tutorial on social media is a great way to connect with the crafting community. Use relevant hashtags and tag other crochet enthusiasts to showcase your beautiful, functional piece of fruit-themed art.
Frequently Asked Questions (FAQ)
What is the best yarn for a Crochet Strawberry Bag – Tutorial?
The most recommended yarn is 100% mercerized cotton. It provides a beautiful sheen, excellent stitch definition for the “seeds,” and the durability needed to carry items without the bag stretching too much.
How long does it take to finish a Crochet Strawberry Bag – Tutorial?
For an intermediate crocheter, this project typically takes between 5 to 10 hours. This includes the time needed for the body, the leaf details, the strap, and any lining or assembly required.
Can a beginner follow this Crochet Strawberry Bag – Tutorial?
Yes, while it uses some textured stitches, a beginner who knows the basic crochet stitches (single, double, and slip stitch) can successfully complete this bag by following the step-by-step instructions carefully.
Do I need to line my crochet strawberry bag?
While not strictly mandatory, lining your bag is highly recommended. It prevents the crochet fabric from stretching under weight and ensures that smaller items like keys or coins don’t slip through the stitches.
What size crochet hook is best for this project?
Usually, a 3.5mm (E) or 4.0mm (G) hook is ideal. You want to use a hook size slightly smaller than what the yarn label recommends to create a dense, tight fabric that holds its shape well.
How do I make the strawberry seeds look realistic?
You can either use a bobble stitch in a contrasting color while crocheting the body, or you can use a yarn needle to embroider small “V” shapes across the red surface after the bag is finished.
Conclusion
This Crochet Strawberry Bag – Tutorial has provided you with all the foundational knowledge and advanced tips needed to create a stunning, fruit-inspired accessory.
We have covered everything from selecting the perfect cotton yarn and mastering the textured puff stitches to the final assembly and proper care of your handmade bag. By combining these techniques, you can produce a high-quality item that stands out for its craftsmanship and charm. Whether you are making this for a craft fair, a gift, or your own wardrobe, the skills learned here will serve you well in all your future crochet endeavors.