The Crochet Sun Granny Square – Pattern is a delightful and cheerful design that brings warmth and brightness to any crochet project.
Whether you’re making a blanket, pillow, or a scarf, this pattern adds a unique, sunny touch that is sure to stand out.
The use of color, combined with the traditional granny square structure, creates a stunning visual effect that is both simple and sophisticated.
If you’re familiar with granny squares, you already know the versatility they offer. However, the Crochet Sun Granny Square – Pattern adds an extra layer of creativity. With its radiant, sun-like design, this square pattern incorporates vibrant colors and creative stitchwork that makes it perfect for a variety of projects. From beginners to seasoned crocheters, this pattern offers a great way to experiment with new techniques and showcase your color coordination skills.
The beauty of the Crochet Sun Granny Square – Pattern lies in its simplicity, while also allowing room for creativity and personal flair. The pattern features a combination of basic crochet stitches that create a warm, sun-like effect, perfect for any project needing a touch of sunshine. In this article, we will walk you through the steps to create your own Crochet Sun Granny Square, tips for working with color, and some fun ideas for how to incorporate these squares into your crochet projects.
1. The Basics of the Crochet Sun Granny Square – Pattern
The Crochet Sun Granny Square – Pattern is an easy-to-follow design that can be customized with different colors, making it a great option for any level of crocheter. To start, it’s important to understand the basic components that make up this pattern.
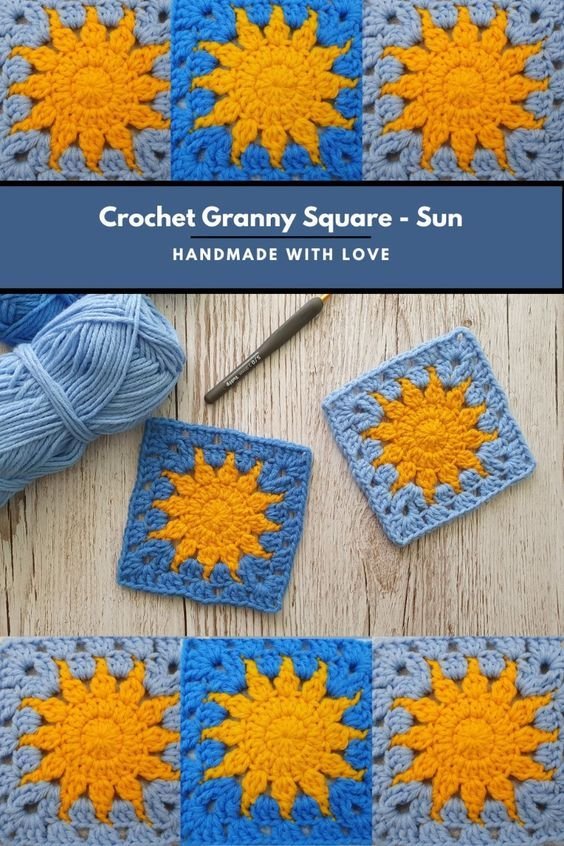
A granny square is typically worked in the round, beginning with a small loop, and is built up with multiple rounds of crochet stitches. The Crochet Sun Granny Square – Pattern adds an extra touch by using vibrant, contrasting colors to create a sun-like effect, which is typically achieved by incorporating a yellow or golden center to represent the sun and radiating petals around it.
The key stitches used in this pattern are chain stitches, slip stitches, and double crochet stitches. The combination of these stitches creates the visual texture needed to give the square its shape and sun-like appearance. While the basic steps are easy to follow, the true beauty of this pattern lies in the color choices. By using bright, bold colors for the sun’s rays, you can create a vibrant and eye-catching square.
Before diving into the steps, make sure you have a solid understanding of basic crochet stitches. This pattern does not require advanced skills but does require attention to detail when switching between colors and maintaining consistent tension throughout. With that in mind, let’s dive into creating your own Crochet Sun Granny Square – Pattern!
2. Materials and Preparation for the Crochet Sun Granny Square – Pattern
Before starting the Crochet Sun Granny Square – Pattern, you will need to gather a few materials. Having everything prepared ensures a smooth crocheting experience. Let’s go through what you’ll need:
1. Yarn
For the Crochet Sun Granny Square – Pattern, you will need yarn in multiple colors. The typical color scheme involves a yellow or golden shade for the sun’s center and vibrant colors like orange, red, or pink for the rays. You may also want a neutral color (like white or cream) for the background of the square.
2. Crochet Hook
A medium-sized crochet hook, typically a size H-8 (5.0mm) or G-6 (4.0mm), will work best for this pattern. Make sure to choose a hook size that matches your yarn thickness.
3. Scissors and Yarn Needle
You’ll need a pair of scissors to cut your yarn when changing colors and a yarn needle to weave in the ends of the yarn at the end of the project.
4. Stitch Markers
If you’re a beginner or if you’re working with multiple colors, stitch markers are incredibly helpful for keeping track of where each round starts.
Once you’ve gathered all your materials, you’re ready to begin crocheting your first Crochet Sun Granny Square – Pattern. Make sure to choose colors that resonate with you and fit your intended project, as this pattern is all about making it your own.
3. Step-by-Step Guide to Creating the Crochet Sun Granny Square – Pattern
Now it’s time to start making your Crochet Sun Granny Square – Pattern! Follow this simple, step-by-step guide to create your own beautiful squares.
Step 1: Make a Slip Knot
Start by creating a slip knot with your chosen yarn. Insert your crochet hook into the loop and tighten it to secure it on the hook. This is the beginning of your foundation ring.
Step 2: Create the Center of the Sun
To create the sun’s center, chain 4 stitches and join with a slip stitch to form a ring. Once you have the ring, work 12 double crochet stitches into the ring, being careful not to twist the stitches. Once you have completed 12 double crochet stitches, join with a slip stitch into the first stitch to close the round.
Step 3: Add the Sun’s Rays
In this round, you will start to build the rays of the sun. For each ray, chain 3 stitches to create a tall stitch, then work a double crochet stitch into the next stitch. This creates a petal-like shape. Continue working in this manner around the square. At each corner, chain 3 stitches to create a space between the rays.
Step 4: Change to the Next Color
Now, choose a bright, contrasting color for the rays of the sun. Join the new color to any chain space from the previous round and work a double crochet stitch. Continue around the square, making sure to keep the color change consistent. The contrasting color creates the vibrant rays, giving your square that sun-like effect.
Step 5: Complete the Square
After you’ve completed the rays, you can work a final round in your background color. Chain 1 and work single crochet stitches evenly around the square to give it a neat border. When you reach the end, join with a slip stitch and cut the yarn, leaving a small tail for weaving in the end.
Step 6: Weave in Ends
Finally, use your yarn needle to weave in any loose ends from your color changes. Be sure to tidy up all the yarn tails to give your Crochet Sun Granny Square – Pattern a polished, professional look.
4. Creative Ideas for Using Your Crochet Sun Granny Square – Pattern
Once you’ve mastered the Crochet Sun Granny Square – Pattern, you can use it in a variety of creative ways. Whether you’re making a large project or small accents, here are some fun ideas to inspire your next crochet project.
1. Sun-Themed Blanket
The most popular use for Crochet Sun Granny Squares is to create a sun-themed blanket. By joining multiple squares together, you can create a colorful and bright blanket that will add warmth and happiness to any space.
2. Pillow Covers
Another great idea is to make pillow covers using the Crochet Sun Granny Square – Pattern. Choose a fun, bold color scheme for a vibrant look, or use calming pastel colors for a more subtle effect. You can make one large pillow or several smaller ones to create a cohesive design.
3. Wall Hangings
Use your granny squares to create a unique wall hanging. By arranging your squares in a fun pattern, you can create a radiant piece of art that brightens up any room.
4. Bags and Accessories
The sun granny square can also be used to make accessories like bags, pouches, or scarves. Create a functional and fun piece by joining several squares together to form the body of the bag or scarf.
5. Baby Blankets
The Crochet Sun Granny Square – Pattern is perfect for making a colorful and cheerful baby blanket. The sun motif brings warmth and light, making it a great choice for a baby gift.
6. Coasters or Table Mats
For a smaller project, create sun-themed coasters or table mats by crocheting just a few squares. These make for lovely, handmade gifts or charming additions to your home.
FAQ About the Crochet Sun Granny Square – Pattern
1. What size should my Crochet Sun Granny Square be?
Typically, each square measures about 4 to 5 inches in diameter, but you can adjust the size by adding more rounds to make a larger square.
2. Can I use different yarn weights?
It’s best to use yarn of similar weight to keep the squares even. However, experimenting with different yarn weights can create interesting textures and effects.
3. How do I join the squares together?
You can join your squares using a slip stitch or whip stitch. The most common method is to use a whip stitch, which creates an invisible join between the squares.
4. Can I make the sun rays in different colors?
Absolutely! Feel free to mix and match colors for the sun’s rays to create a fun, vibrant effect. You can even use variegated yarn for a more dynamic look.
5. How can I make sure my squares are the same size?
Maintaining consistent tension is key. If your squares are coming out uneven, try adjusting your hook size or yarn tension to get uniform results.
Conclusion
The Crochet Sun Granny Square – Pattern is a fantastic and creative way to add a splash of color and warmth to your crochet projects. Whether you’re making a blanket, pillow, or scarf, these squares will bring a sunny, cheerful vibe to your creations. We hope this guide has inspired you to try this beautiful pattern and experiment with your own color combinations.
If you have any suggestions or feedback, feel free to leave a comment below! Happy crocheting!