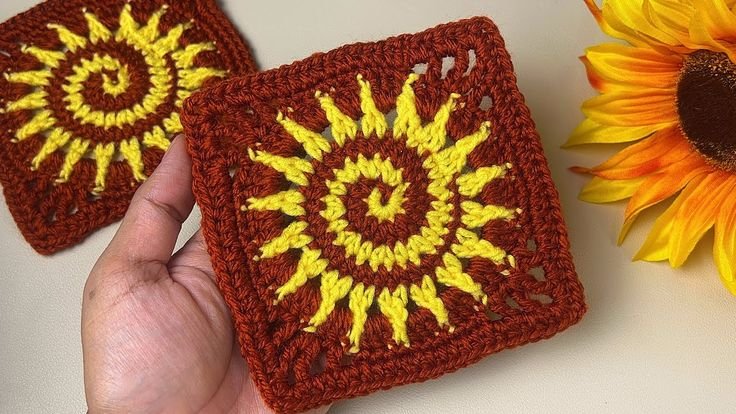
If you’re a fan of crochet and are looking for a project that combines beautiful design with the charm of classic crochet techniques, then the Crochet Sun Granny Square – Pattern is the perfect choice for you.
This pattern is not only simple to follow but also results in a stunning square that can be used for various projects, from blankets to accessories.
The vibrant sun motif within each granny square brings warmth and beauty to any crochet project.
This crochet pattern is a great way for beginners to practice their skills and for seasoned crocheters to experiment with different color combinations. As with most crochet patterns, the Crochet Sun Granny Square – Pattern allows you to customize it to fit your style, making it a versatile design that can be altered according to your preferences. Whether you’re creating a cheerful blanket or a vibrant scarf, this pattern offers endless possibilities.
In this article, we’ll explore the Crochet Sun Granny Square – Pattern in detail. We will discuss the materials you need, the basic steps to follow, and provide tips for making your squares even more unique. Additionally, we’ll answer some frequently asked questions to ensure you have all the information you need to create your perfect crochet sun granny square.
1. Materials Needed for the Crochet Sun Granny Square
Before diving into the actual process of crocheting a sun granny square, it’s important to gather the materials you’ll need. Having everything prepared ahead of time will make the process smoother and more enjoyable.
The first item you’ll need is yarn. You can choose a yarn that works well with your project, but make sure it’s suitable for crochet. Medium-weight yarn (like worsted weight) is often used for granny squares as it provides a good balance between thickness and ease of use. You can also use different yarn types, such as cotton or acrylic, depending on the look and feel you want to achieve.
Next, you will need a crochet hook. The size of the hook you use depends on the yarn thickness, but typically, a 4mm or 5mm hook is ideal for medium-weight yarn. Make sure to adjust the hook size if you’re using a thicker or thinner yarn.
A tapestry needle is essential for weaving in loose ends once you’ve completed your squares. This needle will help you secure the yarn and ensure a neat and polished look.
Lastly, you’ll need scissors for cutting the yarn and, optionally, a stitch marker to help keep track of the beginning of each round.
2. Basic Instructions for the Crochet Sun Granny Square
Now that you have your materials ready, let’s walk through the basic steps to create the Crochet Sun Granny Square – Pattern. The process involves crocheting in rounds and changing colors to create the sunburst effect.
- Begin with a slip knot on your crochet hook. This will be the starting point for your chain.
- Chain 4 to create a loop and join the first and last chain to form a ring using a slip stitch. This creates the center of the sun.
- Round 1:
- Chain 3 (counts as your first double crochet), then work 15 more double crochets into the ring. You should have a total of 16 double crochets.
- Join with a slip stitch into the top of the starting chain-3.
- Round 2 (Sun Rays):
- Change to your chosen color for the sun rays (e.g., yellow or orange).
- Chain 4 and work 1 double crochet into the next stitch.
- Repeat this for each stitch, creating a total of 8 sun rays. Each ray will be made of a chain-2 space followed by a double crochet.
- Join the round with a slip stitch to the top of the first chain-4.
- Round 3 (Building the Square):
- Switch back to the original color or choose a new one for the square border.
- In each chain-2 space of the sun rays, work 3 double crochets.
- Work 1 double crochet into each stitch around the sun. Continue until you’ve completed the round, joining with a slip stitch at the end.
- Repeat rounds until the square reaches the desired size. You can add additional rounds to increase the size of your square.
3. Tips for Perfecting Your Crochet Sun Granny Square
The Crochet Sun Granny Square – Pattern is relatively easy to master, but there are a few tips and tricks that can help elevate your work and make your squares even more beautiful.
- Use a consistent tension: When crocheting your squares, it’s important to maintain a consistent tension throughout. This will ensure that all your squares are uniform in size, making them easier to join together.
- Try different color combinations: Experiment with vibrant colors for the sun rays or use subtle tones for a more neutral look. The combination of the sunburst effect and a colorful border can make your granny square truly unique.
- Join squares neatly: If you’re planning to join multiple squares together to create a larger piece, consider using a whip stitch or slip stitch for a neat and strong join. Be sure to leave enough space between the stitches to avoid creating tight seams.
- Block your squares: After completing your squares, it’s a good idea to block them. This helps even out any uneven stitches and ensures your squares maintain their shape. Gently steam-blocking your squares can give them a polished finish.
- Experiment with different yarns: While acrylic yarn is often the go-to choice for granny squares, don’t be afraid to experiment with other types of yarn, such as cotton or bamboo. These materials can give your project a different texture and appearance.
- Add embellishments: To add more flair to your granny squares, consider adding small embellishments like beads, buttons, or embroidery. These details can make your Crochet Sun Granny Square – Pattern even more eye-catching.
4. How to Use Crochet Sun Granny Squares in Projects
Once you’ve mastered the Crochet Sun Granny Square – Pattern, you’ll want to know how to incorporate your beautiful squares into larger projects. The possibilities are endless!
- Blankets and Afghans: One of the most popular ways to use granny squares is by joining them together to create blankets or afghans. You can create a large, colorful piece by connecting many sun granny squares.
- Scarves and Shawls: Smaller squares can be used to create scarves, shawls, or wraps. The sunburst effect can add a playful and vibrant touch to these wearable pieces.
- Pillows and Cushions: You can sew multiple granny squares together to make decorative pillows and cushions for your home. This is a great way to add color and texture to your living space.
- Bags and Accessories: With a little creativity, you can use crochet squares to make stylish bags, purses, and even hats. These accessories will add a pop of sunshine to your wardrobe.
- Table Runners and Coasters: Create small granny squares and join them to make table runners, coasters, or placemats for your dining area. The sun motif can give your table decor a cheerful vibe.
- Wall Hangings: For a unique home decor item, consider arranging your crochet squares into a beautiful wall hanging. The sun granny square design can be a stunning focal point in any room.
FAQ – Frequently Asked Questions
1. What is the best yarn for the Crochet Sun Granny Square – Pattern?
The best yarn for this pattern is medium-weight yarn, such as worsted weight acrylic or cotton. These yarns are easy to work with and create a sturdy, durable square.
2. Can I make this pattern without changing colors?
Yes, you can make the crochet sun granny square using a single color. The sun motif will still be visible, and the square will have a beautiful, minimalist design.
3. How do I join multiple granny squares together?
You can join your squares using various methods, such as whip stitch, slip stitch, or the join-as-you-go method. Make sure the joins are tight and neat to avoid bulky seams.
4. How big will my square be?
The size of your square depends on your yarn weight and hook size. Typically, the finished square will be around 4-6 inches, but you can adjust the pattern for a larger or smaller square.
5. How do I block my crochet squares?
To block your squares, dampen them slightly with water, and then gently shape them into a square. Pin them to a flat surface and allow them to dry completely.
Conclusion
In this article, we explored the Crochet Sun Granny Square – Pattern, providing a detailed guide on how to create this beautiful crochet piece. From materials and basic instructions to tips for perfection and creative uses, you now have everything you need to create your own sun granny squares. Don’t forget to experiment with colors and styles to make your projects unique.
We hope this guide has inspired you to start crocheting your own sun granny squares. Please feel free to share your thoughts, experiences, and suggestions in the comments below! Your feedback helps us improve and provide even more helpful content. Happy crocheting!