
Crochet Sword Bookmark – Tutorial: If you are a book lover who also happens to harbor a deep passion for fantasy worlds, medieval lore, or epic gaming adventures, this creative project is absolutely perfect for you. There is nothing quite like marking your place in a favorite novel with a handmade item that looks like it was pulled straight out of an ancient legend. In this comprehensive guide, we are going to dive into everything you need to know to create a stunning, unique, and highly functional book accessory that will make your reading time feel like a grand quest.
Crafting your own crochet sword bookmark is not only an incredibly fun and rewarding project, but it also makes for a spectacular, thoughtful gift for friends, family, and fellow reading enthusiasts. Whether you want to channel your inner knight, mimic a classic video game blade, or simply add a touch of whimsical adventure to your bookshelf, this step-by-step crochet sword bookmark – tutorial will guide you through the process seamlessly. Best of all, it is an excellent way to use up those small scraps of yarn you have lying around your crafting space, turning leftovers into a magical and practical keepsake.
Engaging in this type of creative fiber art allows you to combine structural stitching with artistic flair, resulting in a finished piece that is both sturdy enough to hold your page and soft enough to protect your book’s spine. As we move through the detailed instructions, you will discover how easy it is to customize the colors, lengths, and guard styles to match your personal taste or a specific theme. Grab your hooks, select your favorite skeins of yarn, and let us embark on this wonderful crafting journey together as we explore the ultimate crochet sword bookmark – tutorial.
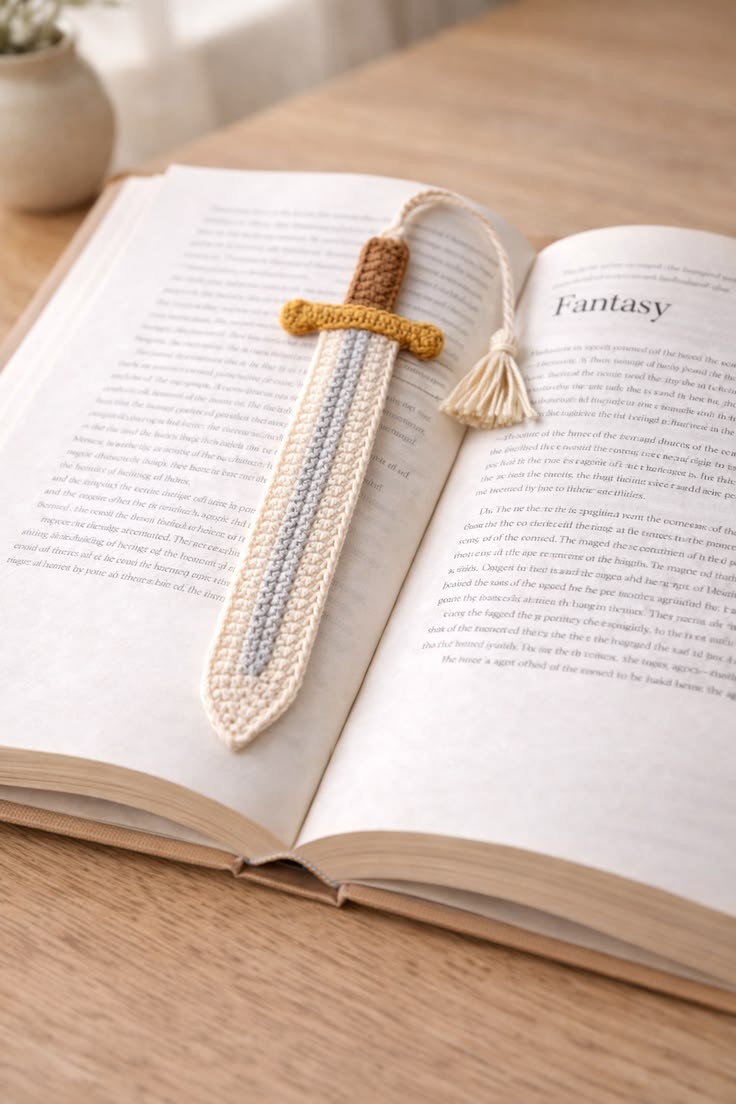
1. Choosing the Right Materials for Your Project
Selecting the proper yarn is the absolute foundation of creating a beautiful and durable crochet sword bookmark. For this specific project, a standard 100% cotton yarn in a sport weight or lightweight category works best because it provides excellent stitch definition and a crisp, flat finish. Cotton ensures that your medieval blade remains relatively stiff and does not stretch out of shape over time when placed inside heavy books.
The choice of your crochet hook size is equally vital to the overall structural integrity of the bookmark. It is highly recommended to use a slightly smaller hook than what the yarn label suggests, such as a 2.5mm or 3.0mm hook, to achieve tight, firm stitches. Tight tension is the secret key to keeping the bookmark flat and avoiding a floppy blade, ensuring it looks authentic and sharp.
You will also need to gather a few essential crafting notions before you begin making your crochet sword bookmark. Make sure you have a pair of sharp embroidery scissors, a sturdy tapestry needle for weaving in loose ends, and optionally, a bit of fabric stiffener if you prefer a rigid finish. Having these tools ready by your side will make the crafting experience smooth, enjoyable, and highly efficient.
Color selection is where you can truly let your personal creativity shine through. For a traditional, classic medieval aesthetic, you will want to select a bright silver or light gray for the main blade, a deep charcoal or brown for the hilt, and a shimmering gold or bronze for the crossguard. If you want a more magical, fantasy-inspired look, feel free to experiment with vibrant neon colors or pastel shades.
Another brilliant aspect of this crochet sword bookmark – tutorial is that it requires a minimal amount of material. You will only need a few yards of each color, making this the absolute ultimate stash-buster project for yarn lovers. It allows you to clean out your leftover yarn baskets while simultaneously producing high-quality, sellable items for craft fairs or online shops.
Lastly, consider the thickness of your finished piece as you plan your materials. If the yarn is too bulky, the bookmark might damage the binding of delicate paperbacks, so sticking to finer weights is always the safest route. By prioritizing thin, strong, and vibrant materials, you set yourself up for absolute success before you even make your very first slip knot.
2. Step-by-Step Guide to Crafting the Blade
To begin working on the main body of our crochet sword bookmark, you will start by chaining a long sequence with your silver or gray yarn to establish the length. The total number of chains will directly determine how long your finished bookmark will be, but a standard starting point is usually around 35 to 40 chains. This length ensures that the blade fits perfectly inside most standard novels and hardcover books.
Once your foundation chain is complete, you will work a series of single crochet and slip stitches around both sides of the chain to create a sleek, double-edged look. Working into the back loops and the opposite side of the chain gives the blade a symmetrical, pointed appearance that closely mimics a real steel weapon. Keep your tension even and firm as you move down the row to prevent any unwanted curling.
To achieve the iconic, sharp point at the very top of the weapon, you will utilize a clever combination of a half double crochet, a chain-one picot, and a slip stitch at the tip. This simple mathematical stitch combination creates a beautiful, tapered peak that looks incredibly sharp without being dangerous to your book pages. It gives the piece an authentic, finely crafted silhouette that stands out immediately.
As you progress through the middle section of the blade, you can choose to introduce a central ridge by working exclusively in the back ridges of the chain. This advanced texturing technique creates a beautiful visual illusion of a fuller, which is the groove running down the center of traditional swords. It adds an extra layer of professionalism and depth to your handmade creation.
When you reach the base of the blade, it is time to fasten off the silver yarn, leaving a short tail for weaving. Do not worry about loose ends just yet, as we will securely hide them later with our tapestry needle during the final assembly phase. Take a moment to gently pull and flatten the crocheted piece with your fingers to ensure it is straight.
Remember that practice makes perfect, and if your first attempt looks a bit wavy, block it with a steam iron or adjust your hook size down. The beauty of this crochet sword bookmark – tutorial is how quickly the blade comes together, allowing you to master the shape in just a few short minutes. Now, our blade is ready to receive its protective crossguard and decorative hilt.
3. Designing the Crossguard and Hilt
The crossguard is the horizontal element that sits directly between the blade and the handle, acting as a functional barrier and a major decorative feature. To attach the crossguard, join your gold or bronze yarn at the base of the silver blade using a secure slip stitch. You will then chain outward on both sides, creating a balanced, symmetrical T-shape that gives the bookmark its unmistakable warrior appearance.
Working back across the extended chains with single crochets will add the necessary thickness and sturdiness to the guard. You can customize this section by making the guard curved, straight, or even pointed by adjusting the stitch heights as you move along. A well-crafted crossguard not only looks amazing but also sits perfectly on top of the book pages when the book is closed.
Next, we move directly into crafting the handle, which is traditionally known as the hilt of the weapon. Switch your yarn color to a rich brown, black, or deep blue to represent wrapped leather or polished wood. You will work a small number of rows in tight single crochets extending downward from the center of the crossguard to form a solid grip.
To finish the hilt with a touch of elegance, we must create the pommel, which is the knob at the very end of the handle. The pommel can be formed by working a small cluster of stitches or a bobble stitch in your metallic gold yarn directly onto the last row of the handle. Historically, the pommel balances the weapon, and design-wise, it provides a gorgeous, polished finale to your piece.
As you finish these components, ensure that all color transitions are clean, tight, and seamless. Sudden color changes can look messy if not done correctly, so always pull the new color through the final loops of the previous stitch. This simple tip will elevate your work from a basic amateur craft to a high-quality boutique accessory.
Take a step back and admire the wonderful geometry of your newly formed weapon handle and guard. This section adds structural weight to the bottom of the bookmark, helping it stay securely anchored inside your reading material without slipping out. With the core construction fully complete, we can now move on to the final assembly and finishing touches.
4. Professional Finishing and Blocking Techniques
The secret difference between an amateur crochet project and a truly professional masterpiece always lies within the final finishing steps. Start by using your tapestry needle to meticulously weave all loose yarn tails into the matching color sections of the bookmark. Weaving them in securely ensures that your hard work will never unravel, even after years of daily use inside your favorite novels.
Because crochet stitches naturally tend to twist and curl, especially when working long, narrow designs, blocking your bookmark is an absolute necessity. To block your item, lightly dampen it with water or a spray bottle, lay it perfectly flat on a foam mat, and pin it into shape. Allow it to air dry completely for 24 hours to set the fibers into a permanent, crisp formation.
If you desire an extra level of stiffness so that your weapon feels firm and holds its shape rigidly, you can apply a commercial fabric stiffener. Alternatively, a simple DIY mixture of equal parts water and school glue works wonderfully when brushed lightly onto the back of the piece. This step prevents the bookmark from bunching up or wrinkling when tucked tightly between heavy book pages.
For an added touch of luxury and personalization, you can choose to embellish your finished piece with tiny metallic seed beads or embroidery thread. Sew small red or blue beads onto the crossguard to look like embedded magical gemstones, or add silver embroidery down the blade to mimic ancient runes. These tiny artistic details make your handmade item feel like a truly legendary artifact.
Once your bookmark is completely dry, stiffened, and fully embellished, give it a gentle final press with a warm iron using a protective pressing cloth. This final touch flattens any remaining imperfections and gives the cotton yarn a gorgeous, subtle sheen. Your stunning, custom accessory is now officially complete and ready to defend your place in any literary world.
Keep this crochet sword bookmark – tutorial handy for future reference, as you will surely want to make multiple versions in various mythical color schemes. They are incredibly addictive to make, highly satisfying to finish, and bring immense joy to anyone who receives them. Happy crocheting, and may your new bookmark protect your pages through many epic reading adventures!
FAQ
What is the best yarn weight for making a book marker?
The absolute best choice is a lightweight category 2 sport weight or a category 3 DK weight yarn, preferably made of 100% cotton. Heavy yarns will create a bulky bookmark that can potentially stretch or damage the binding of your books, while cotton provides the stiffness needed to keep the shape perfectly flat.
Do I need to use fabric stiffener on the finished piece?
While it is not strictly mandatory, using a fabric stiffener or a light starch is highly recommended for this specific design. Because the blade is long and narrow, it can naturally curl or soften over time, and stiffening helps it maintain its sharp, straight appearance permanently.
How long does it take to complete this project?
This is a wonderfully quick project that can easily be completed in about 45 minutes to an hour, making it perfect for quick crafting sessions. Because it works up so fast, it is a fantastic option for last-minute gifts, holiday stocking stuffers, or inventory for craft fairs.
Can beginners complete this sword tutorial easily?
Yes, this project is very beginner-friendly as it primarily utilizes foundational stitches like the chain, slip stitch, single crochet, and half double crochet. The only part that requires a bit of extra attention is the color switching and maintaining a tight, even tension throughout.
How do I wash and care for my handmade bookmark?
If your bookmark ever gets dirty, it is best to spot clean it gently by hand using a damp cloth and mild soap. Avoid soaking it completely in a washing machine, especially if you have applied fabric stiffener or added decorative beads, as this can cause it to lose its shape.
Conclusion
In this comprehensive crochet sword bookmark – tutorial, we have thoroughly explored how to create a whimsical, adventurous accessory that beautifully bridges the worlds of literature and textile art.
We covered everything from selecting the ultimate sturdy cotton yarns and mastering the geometry of the blade to constructing an authentic crossguard, hilt, and pommel. Finally, we discussed the vital importance of weaving in your ends, blocking, and stiffening your finished piece to ensure it remains a durable, flat, and professional-looking treasure for years to come.