The Crochet tissue box/ nose – Pattern is a whimsical, creative project that blends utility with a humorous twist.
If you’ve ever wanted to give your tissue dispenser a touch of personality, this is the perfect pattern to try.
Whether you’re a beginner in crochet or an advanced crafter looking for something amusing and practical, this design can bring charm and laughter to any room.
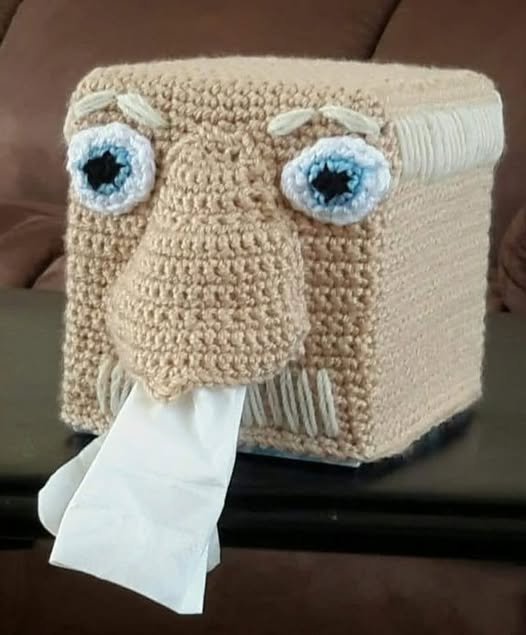
This crochet pattern involves creating a cover for a standard tissue box, with a twist—the tissues are pulled through a “nose” shaped opening, mimicking a sneeze. The result is both hilarious and surprisingly stylish, depending on your yarn colors and design choices. It’s ideal for bathrooms, kids’ rooms, offices, or as a quirky gift that always gets a laugh.
In this guide, we’ll walk through everything you need to create your own Crochet tissue box/ nose – Pattern, including materials, step-by-step instructions, custom ideas, and finishing touches. This project is not only practical but also a fun conversation starter that showcases your creativity and sense of humor.
1. Gathering Materials for the Crochet tissue box/ nose – Pattern
Before diving into the crochet process, assembling the right materials is key. The Crochet tissue box/ nose – Pattern doesn’t require many supplies, but choosing the right ones will ensure a clean, professional result and maximum durability.
Start by selecting your yarn. Most makers prefer worsted-weight yarn for this project, as it’s sturdy enough to hold shape but still flexible to crochet. Choose a skin-tone yarn for the nose (or go bold with fun colors), and a neutral or complementary shade for the rest of the box cover.
You’ll need a crochet hook suitable for your yarn weight—typically a 4.5 mm (US 7) or 5 mm (H-8) hook. Make sure your stitches are tight enough that the tissue box doesn’t peek through the gaps, but loose enough to keep the fabric soft and pliable.
A yarn needle is essential for weaving in ends and sewing the nose detail onto the front of the tissue box cover. Stitch markers may be helpful for keeping track of rounds or shaping if you’re working in the round.
If you’re using a rectangular tissue box, measure it first. Most boxes are around 9 x 4.5 x 3 inches, but sizes can vary. You’ll need to adjust the pattern accordingly to get a snug, custom fit.
Finally, keep scissors, a tape measure, and a pack of tissues nearby for testing fit and placement. Having everything ready ahead of time makes the crochet process smoother and more enjoyable.
2. Crocheting the Tissue Box Cover and Nose Feature
Now that you’ve gathered your materials, it’s time to start creating your Crochet tissue box/ nose – Pattern. This section will break down the process into easy-to-follow steps so that crocheters of all skill levels can follow along confidently.
Begin with the base of the tissue box cover. Crochet a rectangle using single or half-double crochet stitches to match the dimensions of the bottom of your tissue box. Work in rows, turning at the end of each row, until you reach the correct length and width.
Once the base is done, continue crocheting the sides upward. This is typically done by working in the round around the base’s edges, creating a seamless cover that hugs the box. Work even rows (no increases or decreases) until the sides are tall enough to reach the top of the box.
To make the top opening, crochet a rectangular frame with an opening in the center for the tissues to come through. Leave a centered hole approximately 3 x 1 inches in size (depending on the tissue box opening). This will be disguised by the nose later.
Next, crochet the nose separately. Use a skin-tone or humorous color, and shape the nose using increases and decreases. A popular approach is to make a cone shape for the tip, tapering down to a flat base that will attach to the tissue opening.
Sew the nose to the top of the cover so that the tissue can be pulled through the nostril area. This positioning is what gives the project its signature comic effect. Secure the nose with tight whipstitches so it doesn’t shift or loosen with use.
Once all pieces are assembled, weave in all ends, press the cover gently if needed, and slip it over your tissue box. You now have a fully functional, hilarious crochet tissue holder that’s sure to be a hit!
3. Customizing Your Crochet Tissue Box/Nose Pattern
The real charm of the Crochet tissue box/ nose – Pattern lies in its ability to be customized. While the basic version is fun and functional, adding your own flair makes it truly unique.
Start with color selection. Skin-tone noses are classic, but you can try rainbow noses, glitter yarns, or even glow-in-the-dark accents for a silly twist. Match the box color to your home décor or make it seasonal with holiday colors.
Add facial features to make the tissue box look like a full character. Crochet or embroider eyes, eyebrows, a mouth, and even ears. You could make a monster, a cartoon face, or a caricature of a family member or friend.
Consider turning the tissue box into a theme character, such as a clown, animal, or alien. You can crochet extra elements like hats, whiskers, or glasses to enhance the personality of your tissue box cover.
For younger audiences or themed rooms, use yarn in kid-friendly patterns—pastel colors, favorite TV characters, or animals like a dog or bear with a nose-shaped tissue outlet.
You could also incorporate texture into your design. Use bobble stitches, cables, or popcorn stitches for visual interest and a more complex look. This adds a tactile element, making the box not only funny but also stylish.
Finally, personalize your Crochet tissue box/ nose – Pattern with initials, dates, or custom messages. These are especially popular when giving the project as a handmade gift for holidays, birthdays, or housewarmings.
4. Care, Gifting, and Display Tips
Once your Crochet tissue box/ nose – Pattern is complete, you’ll want to ensure it looks great for a long time. Here are care and display ideas, as well as how to turn this fun craft into a thoughtful gift.
To clean your tissue box cover, remove it from the tissue box and gently hand wash with mild detergent. Avoid machine washing unless you’ve used durable acrylic yarn. Lay flat to dry and reshape as needed.
Keep your box in a cool, dry place to prevent stretching or yarn degradation. Avoid direct sunlight if possible, especially if you used bright colors, as some yarns may fade over time.
This project makes a great conversation starter in a home or office. Display it prominently in your bathroom, kitchen, or workspace for maximum visibility and humor.
The Crochet tissue box/ nose – Pattern also makes a memorable gift. Consider making several in different themes for friends, coworkers, or family members—especially during cold and flu season when tissues are in high demand.
For gifting, place the cover over a new tissue box, wrap it in clear cellophane, and add a handmade tag. People will love the creativity and personal touch involved in this one-of-a-kind item.
You can also use this pattern as a base for a small crochet business. If allowed by the pattern designer’s terms, these quirky covers can be sold at craft fairs or online stores, often becoming bestsellers thanks to their novelty and usefulness.
FAQ – Frequently Asked Questions
Q: What size tissue box fits the Crochet tissue box/ nose – Pattern?
A: The standard pattern is designed for rectangular tissue boxes (around 9 x 4.5 x 3 inches). You can adjust the dimensions based on your box by measuring and modifying your base rows.
Q: Is this a beginner-friendly crochet project?
A: Yes, it is! Basic stitches like single crochet and increases/decreases are all that’s required. The nose may require shaping, but it’s manageable even for confident beginners.
Q: What type of yarn is best for this project?
A: Worsted weight yarn is ideal. Acrylic yarn works well for durability, while cotton offers a soft and clean finish. Choose colors that match your décor or go bold with bright tones.
Q: How do you attach the nose securely?
A: Use a yarn needle and tight whipstitches or backstitches to sew the nose onto the cover. Be sure to position it over the tissue opening so the tissue can be pulled through.
Q: Can I make this pattern in different themes?
A: Absolutely! Add eyes, ears, and other features to make animals, characters, or seasonal designs. The pattern is highly customizable and fun to experiment with.
Q: Can I sell finished items made from this pattern?
A: That depends on the designer’s terms. If you’re following a commercial-use-friendly pattern or have written your own, you’re welcome to sell finished products. Always credit the original designer if applicable.
Conclusion
The Crochet tissue box/ nose – Pattern is a delightful blend of functionality and fun. With just some yarn, basic crochet skills, and a bit of imagination, you can transform an ordinary tissue box into a quirky piece of art that brings smiles wherever it’s placed.
Throughout this guide, we’ve covered how to choose materials, follow the pattern, customize your design, and care for your finished piece. Whether you’re crocheting for yourself, making a gift, or looking to sell your crafts, this project offers versatility and a ton of creative potential.
We’d love to hear your thoughts! Have you tried this pattern or made your own twist on it? Share your experience in the comments and let us know how it turned out. Don’t forget to leave suggestions for future projects or ideas you’d like to explore next!