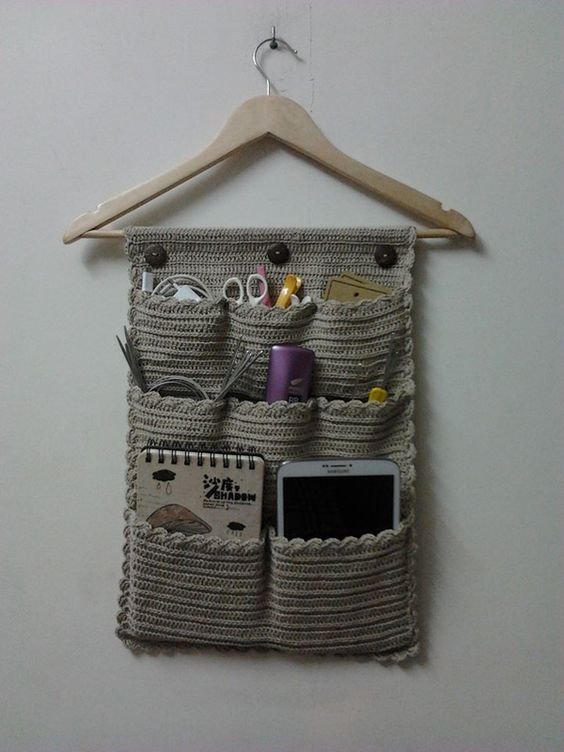
If you’re looking for a stylish, functional, and handmade way to tidy up your home or workspace, the Crochet Wall Organizer – Pattern is the perfect solution. With just a hook, some yarn, and a little time, you can create a beautiful organizer that brings both decor and purpose to your wall.
Whether you need storage for craft supplies, mail, or even your favorite pens and notepads, this project combines creativity with practicality.The beauty of a crochet wall organizer lies in its versatility. You can hang it in the kitchen, bathroom, office, or bedroom.
It makes use of vertical space, which is perfect for small rooms or anyone trying to declutter. Plus, crocheting your own means you get to customize the size, colors, and style to match your space exactly.
This article will guide you through everything you need to know about the Crochet Wall Organizer – Pattern, from materials and tools to helpful tips for customizing your design. You’ll also find ideas for beginners, detailed instructions, and answers to the most common questions people ask online. Let’s get started on creating a functional piece of yarn art for your wall.
1. Why You Should Make a Crochet Wall Organizer
The Crochet Wall Organizer – Pattern is more than just a crafty project—it’s a smart way to bring order and personality into your living space. Here’s why it’s such a popular choice among crafters and home organizers.
First, it offers practical wall storage. Instead of cluttering surfaces with small items, you can store essentials in the pockets of your handmade organizer. It’s especially helpful in craft rooms, home offices, or kids’ bedrooms.
Second, it gives your home a personalized touch. When you crochet your own wall organizer, you’re choosing the colors, textures, and style. That means every piece is a unique reflection of your personality and home aesthetic.
Third, it’s an ideal project for beginner and intermediate crocheters. The pattern generally involves basic stitches like single crochet or half double crochet, making it a great project to build skills without feeling overwhelmed.
Fourth, this organizer is a budget-friendly alternative to store-bought organizers. All you need is some yarn, a crochet hook, and maybe a wooden dowel for hanging. It’s a great way to use up yarn from your stash, especially if you’re into scrap yarn projects.
Fifth, the Crochet Wall Organizer – Pattern is highly customizable. You can choose to make two, three, or more pockets. You can also vary pocket sizes or use contrasting yarns for a striped look.
And finally, it makes for a thoughtful handmade gift. Whether for Mother’s Day, a baby shower, or a housewarming party, it’s a personal and functional gift that anyone can appreciate and use.
2. Materials and Tools You’ll Need
Creating your own Crochet Wall Organizer – Pattern doesn’t require expensive tools or special skills. You can likely start with materials you already have if you’ve crocheted before.
First and foremost, you’ll need yarn. Cotton yarn is an excellent choice because it holds its shape well and offers a clean, structured finish. Worsted weight yarn (medium weight) is often preferred for this project.
Next, you’ll need a crochet hook that matches your yarn weight. Typically, a 4.0mm to 5.5mm hook works great with worsted weight cotton. Check your yarn label for the recommended hook size to get the best results.
You’ll also need scissors and a yarn needle for weaving in ends. If you’re adding multiple pockets, you may need to sew pieces together with a yarn needle or crochet them together with a slip stitch.
A wooden dowel or branch serves as a sturdy base to hang your organizer from. You can also use a metal rod or even a simple hanger if you prefer. Just make sure it can hold the organizer without bending.
Some people like to add lining or interfacing for added strength, especially if the pockets will hold heavier items. This step is optional but can give your organizer more durability.
Optional items include buttons, tassels, labels, or tags to personalize your organizer. You can even crochet small motifs or appliqués to decorate the pockets and enhance the design.
3. How to Make a Basic Crochet Wall Organizer
Let’s walk through the basic construction of a Crochet Wall Organizer – Pattern. This version includes a simple rectangle base and several pocket panels stitched onto the front.
Start by crocheting the base panel. Use a foundation chain that matches your desired width (e.g., 35 chains for a 12″ wide panel), then continue with rows of single crochet or half double crochet until the panel reaches your desired height.
Next, create pocket panels. These are typically rectangles made with the same stitch as the base. For example, if your base is 12″ tall, make a pocket that’s 4″ or 6″ tall. You can make two or three pockets, depending on the height of the base panel.
Once your panels are ready, attach the pockets to the base. You can do this by sewing them with a yarn needle or crocheting around the sides and bottom with a slip stitch. Leave the top open to function as a pocket.
To prepare your organizer for hanging, crochet a row of single crochet along the top edge and add a few chain loops for slipping over your dowel or hanger. Alternatively, thread a string through the top to tie it up securely.
Now it’s time to block your work. This helps your crochet pieces stay flat and even. Lightly spray with water, shape it by hand, and let it dry completely. Blocking makes a big difference in the final look.
Finally, hang your organizer on the wall and fill the pockets with mail, glasses, notebooks, or whatever small items you want to keep tidy and accessible.
4. Creative Ways to Customize the Pattern
The Crochet Wall Organizer – Pattern is incredibly flexible, allowing you to let your imagination run wild. There are dozens of creative ways to make your wall organizer stand out.
One fun idea is to use multicolor yarn or color blocks. Create stripes or use gradient yarn to give your organizer a dynamic and colorful look. You can also assign different colors for each pocket.
Try adding textured stitches like bobble stitch, puff stitch, or front-post/back-post stitches. This not only adds visual interest but also gives the organizer a tactile, cozy feel.
Incorporate crochet appliqués or shapes like flowers, hearts, or stars on the pocket fronts. These can be sewn on for decoration or used to indicate what’s stored in each pocket (e.g., flowers for craft tools, stars for stationery).
Personalize it with name tags or embroidered labels. This is especially useful for kids’ rooms or shared family spaces, where everyone can have their own assigned pocket.
Add fringe, tassels, or pom-poms to the bottom of the organizer to give it a boho or whimsical touch. These small details can elevate a simple design and add personality.
If you’re more advanced, try creating shaped organizers, like hexagons, circles, or geometric patterns, instead of just rectangles. This can make your crochet wall organizer look like a piece of modern wall art.
FAQ – Crochet Wall Organizer – Pattern
Q1: Is the crochet wall organizer beginner-friendly?
Yes! Most patterns use basic stitches like single or half double crochet, making it a great project for beginners who want to make something functional and decorative.
Q2: What type of yarn is best for a wall organizer?
Cotton yarn is preferred because it’s durable and holds its shape well. Acrylic can be used too, but it may stretch more over time, especially with heavy items.
Q3: How do I hang the crochet wall organizer?
You can use a wooden dowel, stick, hanger, or even a curtain rod. Just make sure it’s strong enough to support the weight of your items.
Q4: Can I make different sized pockets?
Absolutely! That’s the beauty of this project. You can adjust pocket sizes to suit your needs—larger ones for mail, smaller ones for pens or craft tools.
Q5: Can I wash my crochet wall organizer?
Yes, if you use washable yarn like cotton. Remove contents, hand-wash gently in cool water, and reshape to dry. Avoid machine washing if you’ve added wooden or metal accessories.
Q6: Can I sell the crochet wall organizers I make?
Yes, handmade organizers are popular at craft fairs and online stores. Just be sure you’re using a pattern that allows for commercial use if it’s not your original design.
Conclusion
The Crochet Wall Organizer – Pattern is a fantastic way to combine creativity, function, and home decor into one fulfilling project. It’s simple enough for beginners but offers plenty of room for customization and flair, making it a must-try pattern for any crochet enthusiast.
In this article, we explored why the crochet wall organizer is worth making, what materials you’ll need, how to build it step-by-step, and how to customize it to fit your space and style. With endless options for colors, textures, and layouts, your handmade wall organizer can truly be one of a kind.
Have you tried making one yourself?
Leave a sincere comment or suggestion below—share your experience, tips, or photos! Let’s inspire each other and build a creative, organized, and beautifully handmade world, one stitch at a time. 🧶✨