Creating a crochet wallet – pattern is a fun and rewarding project that blends creativity with function. Whether you’re an experienced crocheter or just learning the craft, making your own crochet wallet offers a practical way to express personal style.
These handmade accessories are not only cute and customizable, but also make wonderful gifts or items to sell in your craft shop.Unlike mass-produced wallets, a crochet wallet stands out with its charm and uniqueness.
You have the freedom to pick your own colors, textures, and closure styles to create a wallet that reflects your personality or matches a specific need. From minimalist card holders to larger zippered pouches, crochet wallet designs range from simple to intricate, offering plenty of options for all skill levels.
In this guide, we’ll walk you through how to choose the perfect crochet wallet – pattern, select the right materials, assemble your wallet step-by-step, and personalize it with flair. You’ll also find answers to common questions and tips to help your handmade creation turn out both beautiful and durable.
1. Choosing the Right Crochet Wallet Pattern
The first step in any successful project is selecting a crochet wallet – pattern that suits your style and skill level. Wallets come in various shapes, sizes, and structures, so it’s important to decide how you plan to use it—whether as a coin pouch, a cardholder, or a multi-pocket organizer.
Beginners might prefer a basic envelope-style wallet. These typically involve simple stitches like single crochet and minimal shaping. They’re fast to make and perfect for practicing tension and consistency.
If you have intermediate experience, try a fold-over or clutch-style wallet. These often include flaps, buttons, or even small zippers. Some patterns may incorporate textured stitches like half double crochet or shell stitches for a more decorative look.
Advanced crocheters may enjoy wallet patterns with lining, zippers, snap closures, or separate compartments. These can resemble commercial wallets and offer excellent structure and functionality.
Pay attention to pattern format when choosing. Some crochet wallet – patterns are written in standard text form, while others include diagrams or video tutorials. Choose one that matches your preferred way of learning and following instructions.
It’s also helpful to read reviews and see photos of finished wallets from other users if the pattern is from a site like Etsy or Ravelry. Seeing real-world examples can help you understand how the final product will look and what challenges to expect.
Once you’ve selected your ideal pattern, you’ll be excited to gather your materials and start crocheting your very own handmade wallet.
2. Materials and Tools You Will Need
To begin your crochet wallet – pattern, you’ll need a few basic supplies—most of which are inexpensive and easy to find at any craft store or online. Having the right tools will help you create a wallet that is neat, functional, and durable.
Start with yarn. For wallets, you’ll want something sturdy that can hold its shape. Cotton yarn is a favorite choice because it’s strong, doesn’t stretch too much, and gives a clean finish. You can also try linen or acrylic blends for different textures.
Next, choose an appropriate crochet hook size. The pattern you select will suggest the best hook, usually somewhere between 2.5mm and 4mm. A tighter stitch is often preferred to ensure the wallet holds structure and contents securely.
You’ll also need scissors, a tapestry needle for weaving in ends and sewing pieces together, and stitch markers to keep track of rows or specific points in the pattern. These small tools make the process smoother, especially for beginners.
Many crochet wallet – patterns recommend adding a lining—typically fabric or felt—on the inside of the wallet. This gives it extra durability and prevents small items like coins or cards from slipping through the stitches. You can sew this by hand or with a sewing machine.
Depending on your design, you may also want to include closures such as buttons, zippers, snap fasteners, or magnetic clasps. These not only add function but also a polished, professional touch.
Optional but fun extras include decorative items like embroidery, beads, or even keychain attachments. Personal touches like these can turn a basic crochet wallet into a unique fashion accessory.
3. Step-by-Step: Crafting Your Crochet Wallet
Once you have your supplies ready, it’s time to follow your crochet wallet – pattern and start stitching. Even simple wallet patterns offer lots of creative opportunities and practical techniques.
Start by crocheting the base panel of your wallet. This may be a simple rectangle or a series of connected panels, depending on the style. Use tight stitches to ensure a firm structure and even edges.
Once the base is complete, you’ll fold or shape the piece according to the pattern. For envelope-style wallets, fold the bottom section up to create a pocket, and then fold the top section down as a flap. You’ll typically use slip stitches or single crochet to join the sides.
For patterns with pockets or compartments, crochet each section separately and then attach them to the base using whip stitch or slip stitch. Be careful to line up the edges to maintain a clean finish.
If your wallet includes a lining, cut your fabric to size and hand-sew or machine-sew it to the inside of the wallet. A lining not only improves durability but also adds a pop of color or pattern to the interior.
Add any closures next. This could mean sewing on a button and creating a loop, or attaching a zipper. Use strong thread and reinforce the closure points to ensure they last with regular use.
Once everything is assembled, weave in any loose yarn ends using a tapestry needle, press your wallet lightly with a warm iron if needed (avoiding acrylic yarns), and give it a quick inspection. Now you’ve completed your custom crochet wallet!
4. Personalizing Your Crochet Wallet
One of the best parts of using a crochet wallet – pattern is how easily you can personalize it. From colors to stitches to embellishments, your creativity can shine through with every detail.
Start with color selection. Choose colors that match your wardrobe, season, or mood. You can use stripes, solid colors, or color-blocking to add visual interest. Consider using variegated yarns for a dynamic, multicolored look.
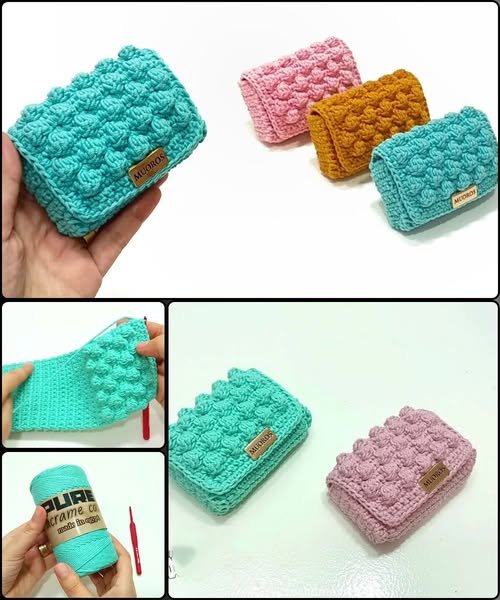
Experiment with different stitches. While most wallet patterns use simple stitches for firmness, you can add texture with bobble stitches, puff stitches, or front post stitches. These create a tactile and decorative element that’s both stylish and functional.
Add initials or symbols using surface crochet or embroidery. This is a great way to make your wallet truly one-of-a-kind, and it makes personalized gifts more meaningful.
You can also crochet appliqués to attach to your wallet—such as hearts, flowers, stars, or animal motifs. These give a playful and customized feel, especially for younger users or themed gifts.
Include contrasting linings or decorative buttons for a splash of surprise. A floral fabric inside a solid-colored wallet or a vintage button closure can elevate the entire design.
Lastly, think about packaging if you’re gifting or selling your wallet. Add a tag with care instructions, a label with your brand name, or wrap it in tissue paper for a professional touch. A handmade crochet wallet deserves presentation that matches its charm.
FAQ: Frequently Asked Questions
Q1: Is a crochet wallet durable enough for daily use?
Yes, especially when made with sturdy yarn like cotton and reinforced with fabric lining. Using tight stitches and secure closures also helps improve durability.
Q2: Do I need to line my crochet wallet?
While not required, lining is highly recommended. It prevents stretching, adds strength, and ensures that small items like coins or cards won’t slip through the stitches.
Q3: How long does it take to make a crochet wallet?
Most basic wallets can be completed in 2–4 hours, while more complex patterns with linings, pockets, or closures may take 6–8 hours depending on your skill level.
Q4: Can beginners make a crochet wallet?
Absolutely. Many simple crochet wallet – pattern options are beginner-friendly and require only basic stitches and minimal shaping.
Q5: What’s the best yarn for a crochet wallet?
Cotton yarn is the best choice for its strength and stitch definition. It holds its shape well and provides a polished look.
Q6: Can I sell wallets made from someone else’s pattern?
You can, but always check the copyright or licensing terms on the pattern. Many designers allow selling finished products with credit, but some restrict commercial use.
Conclusion
Creating your own crochet wallet – pattern is not just about making a stylish accessory—it’s about combining creativity with practicality. From selecting the perfect pattern to stitching and personalizing every detail, each step of the process is an opportunity to create something unique, useful, and beautiful.
Whether you’re crafting for yourself, gifting a friend, or starting a small handmade business, a crochet wallet offers the perfect blend of charm and utility. With endless ways to customize and express your style, it’s a rewarding project that you’ll be proud to carry or share.
We’d love to hear from you! If you enjoyed this article or created your own crochet wallet
using these tips, please leave your honest opinion and any suggestions in the comments. Your feedback helps us grow and inspire more makers around the world.