The Granny Square Crochet – pattern is one of the most beloved and iconic motifs in the world of crochet.
Recognized for its simplicity, versatility, and nostalgic charm, this timeless design has stood the test of time and remains a favorite for beginners and seasoned crafters alike.
From colorful afghans to trendy clothing pieces and stylish home decor, the granny square continues to evolve with modern tastes while staying true to its roots.
At its core, the Granny Square Crochet – pattern consists of a series of crocheted rounds worked outward from a central point, typically using double crochet stitches and chain spaces to form a square shape. Its modular nature makes it ideal for assembling larger projects, allowing crafters to mix and match colors, sizes, and textures in creative and unique ways. Whether you’re looking to create a handmade gift, refresh your home decor, or learn a relaxing new skill, the granny square is the perfect starting point.
In this article, we’ll explore the rich history of the Granny Square Crochet – pattern, teach you how to make your own, share creative ideas for using granny squares, and answer the most common questions from crochet enthusiasts around the world. Let’s dive into the magic of this enduring crochet tradition.
1. The History and Appeal of Granny Square Crochet – Pattern
The Granny Square Crochet – pattern traces its origins back to the early 19th century, although it gained significant popularity during the 1970s. During this era, the handmade aesthetic was celebrated, and people embraced crafts that reflected self-expression, individuality, and a return to traditional skills. The granny square became a symbol of creative freedom and colorful design.
Granny squares were often used to repurpose leftover yarn scraps, making them not only practical but environmentally friendly. Families would save small amounts of yarn from different projects and turn them into cheerful blankets, creating a patchwork of memories with each square. These blankets often became heirlooms, passed down through generations.
The simplicity of the Granny Square Crochet – pattern made it accessible to people of all ages. Because each square can be completed quickly and independently, it’s an excellent option for beginners who want to see fast results and for seasoned crocheters looking for a relaxing project. The repetitive nature of the pattern is also soothing, making it a mindful activity that many find therapeutic.
As crochet trends have evolved, so too has the granny square. Today, you’ll find variations that include intricate stitches, floral motifs, or unique color combinations. Designers incorporate granny squares into modern fashion, accessories, and even art installations, breathing new life into a traditional craft.
What makes the Granny Square Crochet – pattern truly special is its blend of structure and freedom. You can follow a standard formula or adapt the stitch count and color layout to suit your vision. This adaptability keeps the pattern exciting and fresh, no matter how many times you’ve made it.
From a vintage-inspired blanket to a bold statement cardigan, the possibilities are endless with the granny square. It’s no wonder that this humble square continues to hold such a special place in the hearts of crafters around the world.
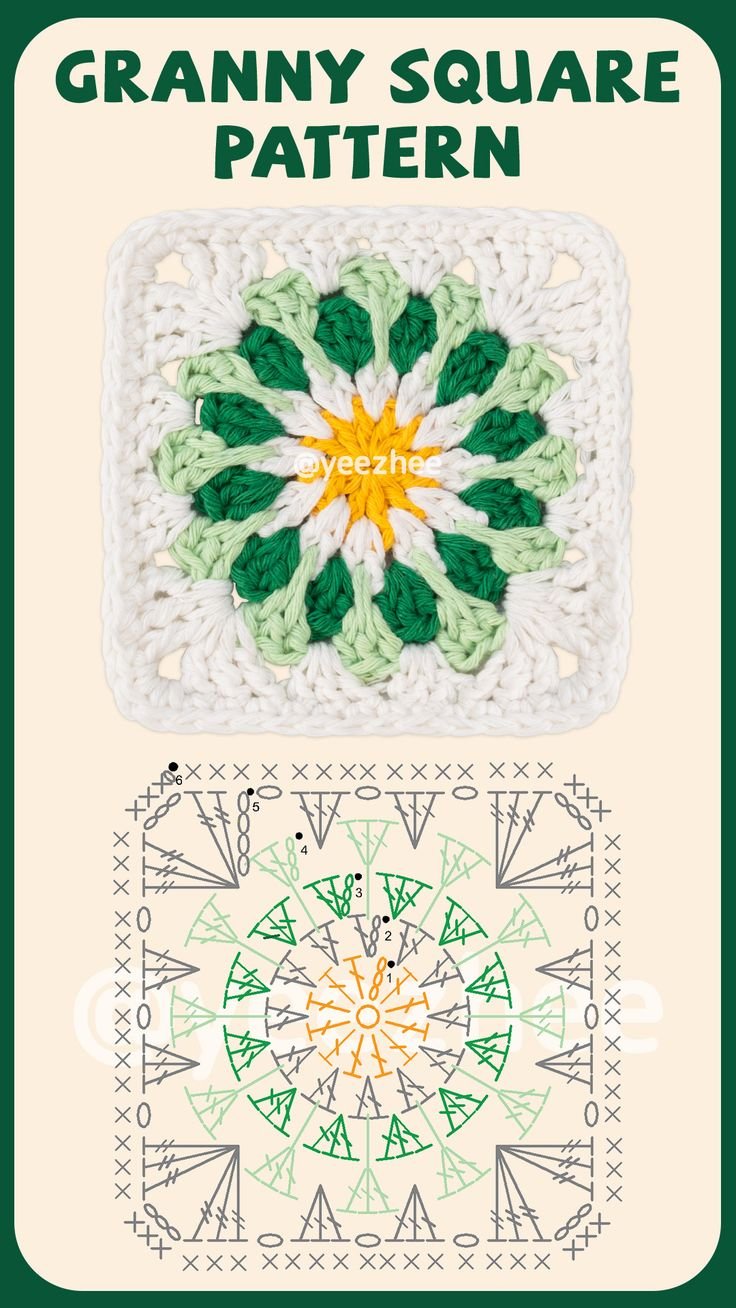
2. How to Make a Basic Granny Square Crochet – Pattern
Learning to create a Granny Square Crochet – pattern is both easy and enjoyable. The basic construction involves working in the round and repeating a series of stitches that build outward from the center. All you need is a crochet hook, yarn, and a little patience to get started.
Begin with a slip knot and chain four stitches. Join the chain with a slip stitch to form a ring. This ring will be the center of your granny square. The first round typically consists of chain spaces and clusters of double crochet stitches separated by chain spaces to create the corners.
The second and third rounds follow a predictable rhythm: three double crochets in each chain space, with chain stitches between each group and additional chains in the corners. As you build more rounds, your square will grow larger and more defined. It’s important to maintain even tension throughout for a uniform appearance.
One of the key techniques in mastering the Granny Square Crochet – pattern is learning how to properly turn the corners. Corners are usually formed by chaining two stitches between double crochet clusters. This creates a neat, square shape that expands evenly with each round.
You can experiment with colors by changing yarn at the beginning of any round. This technique allows for vibrant, multicolored designs that pop with personality. When changing colors, make sure to weave in your ends securely to avoid unraveling.
Finishing your square involves fastening off the yarn and weaving in all ends. You can then block your square using water or steam to ensure it lays flat and maintains its shape. Once you’ve mastered the basic square, you can start experimenting with different patterns and embellishments.
3. Creative Ways to Use the Granny Square Crochet – Pattern
The beauty of the Granny Square Crochet – pattern lies in its versatility. With just a handful of squares, you can create a wide variety of functional and decorative items that showcase your creativity and crochet skills.
One of the most traditional and beloved uses for granny squares is the blanket. By stitching multiple squares together, you can create throws, bedspreads, or baby blankets in any color combination. These projects are great for using up leftover yarn and can be made over time, one square at a time.
Fashion has embraced the granny square in recent years. Designers have introduced granny square cardigans, halter tops, skirts, and bags into their collections. By combining squares of different colors and sizes, you can create garments that are bold, trendy, and entirely unique.
Home decor items such as cushions, rugs, and wall hangings are also popular. A single large granny square makes an excellent base for a pillow, while smaller squares can be joined to form intricate designs. You can also make placemats, coasters, or table runners that add a handmade touch to any room.
Granny squares are ideal for accessories like tote bags, hats, and scarves. Use them as panels or decorative accents. The lightweight nature of the pattern makes it suitable for layering, which is especially useful in transitional seasons.
If you’re feeling particularly creative, consider using granny squares for non-traditional projects like stuffed animals, patchwork jackets, or even crochet jewelry. The modular nature of the design means you can adjust the size and shape to fit almost any project.
Finally, granny squares are perfect for collaborative or community projects. Groups can work together to create squares for charity blankets or community art. Each participant adds their own color, pattern, and creativity, resulting in a truly meaningful collective work.
4. Tips, Tricks, and Common Mistakes to Avoid
Mastering the Granny Square Crochet – pattern is easier when you know a few helpful tips and common pitfalls to watch out for. With these suggestions, you can ensure your granny squares are neat, consistent, and ready for any project.
Always check your yarn weight and hook size. Using the recommended tools helps maintain consistent tension and ensures your squares are uniform. A mismatch can result in uneven or misshapen blocks that are difficult to join later.
Counting stitches is crucial. One of the most common mistakes in granny square crochet is losing track of stitches, especially in the corners. Keep a stitch marker handy or count out loud to stay on track. Even a single missed stitch can throw off the symmetry.
Don’t skip blocking your squares. Blocking helps your pieces lay flat and match in size, which is especially important when joining multiple squares. Use a spray bottle and pins or a steam iron on a low setting, and allow your squares to dry completely before assembling.
Weaving in your ends securely is another must. Granny squares often involve multiple color changes, so loose ends can be a problem. Weave in at least 2 inches of yarn using a tapestry needle and go in more than one direction for security.
Join your squares with care. There are many methods—slip stitch, single crochet, or whipstitch, among others. Experiment with different joining techniques to find one that works best for your project’s look and feel.
Finally, embrace your mistakes. Every crocheter has made a lopsided square or miscounted a stitch. Use those “oops” moments as learning experiences, or turn them into creative design elements. The beauty of granny square crochet is its flexibility and forgiving nature.
FAQ: Granny Square Crochet – Pattern
Q1: What is the best yarn for granny squares?
A: Medium-weight cotton or acrylic yarn is ideal for beginners. It’s easy to handle, holds shape well, and comes in a wide variety of colors.
Q2: Can beginners make a granny square?
A: Yes! The basic granny square is perfect for beginners because it uses simple stitches and offers quick results.
Q3: How do I join granny squares together?
A: You can use several methods, including slip stitch, whipstitch, or join-as-you-go techniques, depending on the desired look and flexibility.
Q4: How many granny squares do I need for a blanket?
A: It depends on the size of your squares and the size of the blanket. For example, 49 squares of 6 inches each would make a 42″ x 42″ blanket.
Q5: Can I wash items made with granny squares?
A: Yes, but always check the yarn label. Most acrylic and cotton yarns are machine washable, though handwashing may preserve the shape longer.
Q6: What can I do with leftover yarn from granny squares?
A: Use it to make more squares, small accessories like bookmarks or coasters, or decorative borders for larger projects.
Conclusion
The Granny Square Crochet – pattern continues to charm crafters of all ages with its endless possibilities and deep-rooted history. From its humble beginnings as a scrap yarn project to its current place in high fashion and home design, this versatile pattern has proven itself to be much more than just a square.
In this article, we’ve explored the origins of the pattern, taught you how to make a basic granny square, offered creative project ideas, and shared essential tips to help you along the way. Whether you’re making your first square or your hundredth, we hope this guide inspires you to pick up your hook and start stitching.
If you found this article helpful or have any experiences to share with the Granny Square Crochet – pattern, please leave a sincere opinion in the comments below. We’d also love to hear your suggestions for future topics. Happy crocheting!