Have you ever wanted to learn how to make crochet beret designs that look like they came straight off a Parisian runway? If so, this comprehensive how to make crochet beret- tutorial is exactly what you need to elevate your wardrobe and expand your crafting skills. Crocheting your own accessories is not only a deeply fulfilling hobby, but it also allows you to express your unique personal style through custom colors, textures, and fits. A classic beret adds an instant touch of sophistication to any outfit, making it the perfect weekend project for yarn enthusiasts of all levels.
In this detailed how to make crochet beret- tutorial, we are going to break down every single step so that you can follow along with ease and confidence. The beauty of learning how to make crochet beret patterns lies in understanding the basic geometry of crochet increases, which allows you to create that iconic slouchy yet structured shape. Whether you are planning to make this beautiful hat as a thoughtful handmade gift for a loved one or as a cozy new addition to your own winter collection, this guide will provide you with all the essential tips and tricks.
By mastering the core techniques outlined in this how to make crochet beret- tutorial, you will gain the confidence to experiment with different yarn weights and stitch patterns in the future. We will focus on using clear language, actionable steps, and essential crochet techniques to ensure your finished project looks polished and professional. Grab your favorite yarn, find a comfortable spot to sit, and let us dive straight into the wonderful world of making your very own handmade headwear.
1. Choosing the Best Yarn and Tools for Your Crochet Beret
Selecting the right materials is the absolute first step in learning how to make crochet beret projects that drape beautifully and feel comfortable to wear. For a classic beret shape, you want a yarn that offers excellent stitch definition while remaining soft against the skin, such as a premium worsted weight yarn or a cozy wool blend. The material you choose will dictate how warm your hat is and how well it holds its iconic round shape after washing.
Along with your yarn, picking the correct crochet hook size is vital for achieving the perfect tension. For most standard worsted weight yarns, a 5.0 mm (H-8) or 5.5 mm (I-9) hook works wonderfully, but you should always check your yarn label for specific recommendations. If your stitches tend to be tight, opting for a slightly larger hook can help you achieve that coveted, relaxed slouch that makes a beret look so effortless.
In addition to your main hook and yarn, you will need a few essential crochet notions to keep your project organized and running smoothly. A reliable pair of scissors, a blunt tapestry needle for weaving in loose ends, and a few flexible stitch markers are absolutely indispensable for this project. Because we will be working in continuous rounds, markers will help you track the beginning of each row without losing your place.
Understanding how your tools interact is a key component of this how to make crochet beret- tutorial. If you choose a yarn that is too stiff, your beret might end up looking more like a structured bowl than a soft, stylish hat. On the other hand, using a yarn that is too thin without adjusting your hook size could result in a loose, floppy fabric that doesn’t hold its shape on your head.
Before you begin chaining your first stitches, take a moment to prepare your workspace and organize your supplies. Having everything within arm’s reach prevents interruptions and allows you to maintain a steady, even crochet tension throughout your work. Consistency in your tension ensures that your stitches look uniform, giving your final piece a clean, retail-quality appearance.
Lastly, do not be afraid to experiment with color choices when deciding how to make crochet beret designs for your wardrobe. Solid colors like deep burgundy, classic black, or mustard yellow highlight the intricate stitch patterns beautifully and match easily with autumn coats. If you feel adventurous, a subtle variegated or self-striping yarn can add a playful, modern twist to this timeless French-inspired accessory.
2. Step-by-Step Guide to Crating the Perfect Beret Shape
To begin the actual construction in this how to make crochet beret- tutorial, we start from the very top of the hat and work our way outward. You can begin either by creating a magic ring or by chaining four stitches and slipping stitching them together to form a small circle. The magic ring method is highly recommended because it allows you to pull the center completely tight, leaving no visible hole at the top.
Once your base ring is secure, you will work your first round of stitches—usually double crochet or half double crochet—into the center of the ring. The secret to learning how to make crochet beret shapes successfully lies entirely within a systematic method of mathematical increases. In each subsequent round, you will evenly distribute extra stitches around the circle to expand it into a large, flat disc.
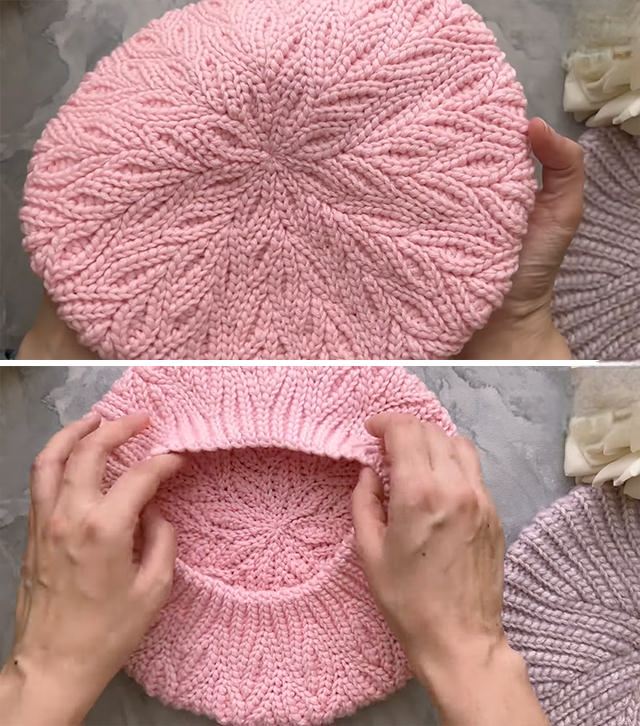
This flat circle forms the crown of your hat, and it needs to expand until it reaches a specific diameter, typically between 10 to 11 inches for an adult. During this expansion phase, it is crucial to count your stitches regularly to ensure you are meeting the requirements of the crochet pattern. Skipping an increase can cause the edges to curl inward too early, turning your beret into a regular beanie.
After achieving the maximum width for your crown, you will work a few rounds without any increases at all. This brief section of straight crocheting creates the subtle fold and drape along the sides, giving the hat its distinct, voluminous beret silhouette. It is during these rounds that you will really start to see your hard work transform from a flat circle into a recognizable piece of headwear.
The next phase of our how to make crochet beret- tutorial involves the decrease rounds, which quickly bring the wide edge back inward to fit your head. By working decreases—such as the double crochet two together method—you will gradually reduce the circumference of the opening. This section requires careful attention, as decreasing too quickly can make the opening too small, while decreasing too slowly can result in a loose fit.
Keep trying the hat on your head as you approach the end of the decrease rounds to check the overall fit. The opening should sit comfortably around the widest part of your forehead without feeling restrictive or slipping down over your eyes. Finding that perfect balance is the ultimate goal when mastering how to make crochet beret techniques for everyday wear.
3. Working the Band and Finishing Your Crochet Project
The band of your hat is what holds the entire structure securely on your head, making it a vital element of our how to make crochet beret- tutorial. To create a snug, stretchy band, you can switch to a slightly smaller hook size and utilize ribbed crochet stitches. Alternating front post and back post double crochet stitches is an excellent method for creating a thick, elastic texture that mimics traditional knitting.
Work the ribbed band for about an inch or two, depending on how wide you prefer your hat bands to be. A wider band provides a more secure grip and a sporty look, while a narrow band keeps the focus entirely on the slouchy body of the beret. Ensure your stitches in this section are firm, as the band will naturally stretch out slightly with regular use over time.
Once you have reached your desired band height, it is time to fasten off your yarn securely to prevent unravelling. Cut your working yarn, leaving a tail of about six to eight inches, and pull it completely through the final loop on your hook. Securely fastening off ensures that your hard work remains intact through daily wear, tear, and multiple trips through the washing machine.
Now, take your trusty tapestry needle and carefully weave in all the loose yarn tails along the inside of your work. Hide the yarn tails within the densest parts of your stitches, changing directions once or twice to lock the thread firmly into place. Cleanly finishing your project by hiding these loose ends instantly elevates the overall look of your custom handmade crochet hat.
To truly make your project shine, you might want to consider the optional step of blocking your crochet work. Wet blocking involves soaking your finished beret in lukewarm water with a gentle wool wash, squeezing out the excess moisture, and pinning it flat to dry. This process relaxes the yarn fibers, evens out your tension inconsistencies, and gives your beret a flawless, professional drape.
Congratulations, you have officially completed the practical portion of learning how to make crochet beret designs from scratch! Take a moment to admire your neat stitches, beautiful ribbing, and classic shape before showing it off to the world. With these skills in your crafting repertoire, you can easily whip up an endless variety of hats in multiple colors to match every outfit in your wardrobe.
4. Advanced Customization Tips and Styling Ideas
Now that you understand the core mechanics of our how to make crochet beret- tutorial, you can start exploring fun ways to customize your designs. One popular option is adding a traditional “stalk” or small loop, known as a cabillou, to the exact center top of your beret. This tiny detail is incredibly easy to make using a short chain of stitches, and it gives the hat an undeniably authentic French aesthetic.
You can also experiment with different crochet stitch textures to give your beret a completely unique look and feel. Substituting standard double crochets with puff stitches, popcorn stitches, or even shell stitches can create a beautifully intricate, vintage-inspired texture. Just remember that textured stitches often consume more yarn, so make sure you have an extra skein on hand before starting.
Adjusting the size of your beret is another fantastic skill you gain after mastering how to make crochet beret basics. To make a smaller version for children, simply stop working your increase rounds when the flat circle reaches roughly 8 to 9 inches in diameter. From there, follow the same decrease and banding principles to scale down the pattern perfectly while keeping the classic shape intact.
When it comes to styling your new accessory, the possibilities are virtually endless, making it a highly versatile addition to your closet. You can wear your beret tilted dramatically to one side for a chic, artistic look that frames your face beautifully. Alternatively, wearing it further back on the head allows the slouchy volume to drape down toward the neck, creating a relaxed, modern vibe.
Pairing your handmade creation with the right wardrobe pieces can make your DIY style look incredibly fashionable and cohesive. A classic crochet beret looks stunning when paired with a tailored trench coat, a cozy oversized sweater, or a simple denim jacket. Because you made it yourself, you can effortlessly coordinate the yarn color with your favorite autumn boots, scarves, or gloves.
Sharing your crafting journey online or gifting your finished pieces to friends is a wonderful way to celebrate your new skill. Crocheting is a beautiful art form that connects people across generations, and a handmade hat carries far more sentimental value than any store-bought item. Keep practicing, keep experimenting with new textures, and enjoy the endless creativity that comes with knowing how to make crochet beret masterpieces.
Frequently Asked Questions (FAQ)
What is the best yarn weight for making a crochet beret?
The most popular and beginner-friendly choice is worsted weight yarn (category 4). It provides an excellent balance of structure and drape, allowing the beret to hold its iconic shape without being too heavy or stiff on your head.
How many skeins of yarn do I need for this how to make crochet beret- tutorial?
For a standard adult-sized beret using worsted weight yarn, you will generally need between 150 to 200 yards of yarn. This usually translates to one standard skein, though having a second skein is recommended if you plan to add textured stitches or a larger pom-pom.
Can a complete beginner successfully crochet a beret?
Yes, absolutely! While it looks intricate, a beret is simply an exercise in basic circle expansion and reduction. If you know how to do a chain stitch, a single crochet, and a double crochet, you can easily complete this project by following the steps carefully.
How do I make sure the beret fits my head perfectly?
The best method is to measure your head circumference before starting and try the hat on during the decrease rounds. The final ribbed band should match your head measurement closely, keeping in mind that crochet fabric naturally stretches a bit during wear.
Is it necessary to block my finished crochet beret?
While it is not strictly mandatory, blocking is highly recommended for berets. Wet blocking helps relax the yarn fibers, opens up your stitch work, and ensures that the hat sits with that perfect, soft, slouchy Parisian drape rather than looking stiff.
How do I wash and care for my handmade crochet beret?
Care instructions depend entirely on the fiber content of your yarn. If you used acrylic, it can usually be machine washed on a gentle cycle, but if you used wool, hand washing in cold water and laying it flat to dry is essential to prevent shrinking or felting.
Conclusion
In this how to make crochet beret- tutorial, we have covered everything you need to create a stunning, fashionable headpiece from scratch. From selecting the perfect worsted weight yarn and hooks to mastering the increase and decrease rounds that give the beret its iconic slouchy shape, you now possess the essential tools to create your own custom accessories.
Finishing your project with a comfortable ribbed band and blocking your work ensures a beautiful, professional-looking result that you can wear proudly for years to come.