How to Make Crochet Fox Booties – Tutorial is the ultimate guide you need to create the most adorable, cozy, and charming footwear for the little ones in your life. Whether you are looking to craft a unique baby shower gift, stock up your online handmade shop, or simply try a delightful new project, learning how to make crochet fox booties is a rewarding experience. There is something truly magical about transforming a simple skein of yarn into a beautifully detailed, animal-themed masterpiece that brings smiles to everyone who sees it.
In this comprehensive crochet baby booties guide, we will walk you through every single step required to bring these woodland creatures to life. Working on handmade baby shoes allows you to control the quality of the materials, ensuring that only the softest, safest, and most breathable fibers touch sensitive infant skin. Crafting amigurumi-style footwear combines the practical utility of warm clothing with the whimsical joy of toy making, making it a favorite project among crochet enthusiasts worldwide.
As you dive into this step-by-step process, you will discover that mastering a fox crochet pattern is much easier than it looks, even if you are relatively new to the craft. By focusing on fundamental stitches and neat assembly techniques, you can achieve a professional finish that rivals high-end boutique items. Gather your supplies, clear your crafting table, and let’s explore the wonderful world of woodland crochet tutorials together so you can confidently complete your project.
1. Materials and Tools Needed for the Perfect Fox Booties
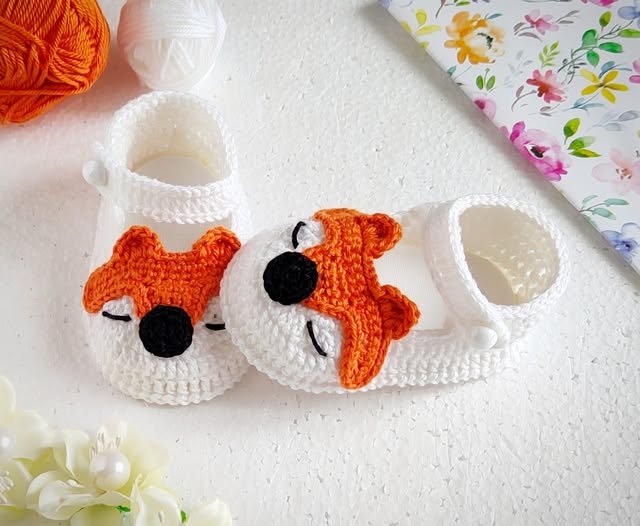
Selecting the right yarn is the foundation of success when learning how to make crochet fox booties. For these specific booties, you will want a vibrant orange yarn to represent the classic fox coat, a crisp white yarn for the cheeks and muzzle details, and a small amount of black yarn for the nose and eyes. Opting for a premium soft acrylic yarn or a gentle cotton blend ensures that the finished project is both machine-washable and incredibly soft against delicate skin.
The correct crochet hook size is vital for achieving the perfect gauge and structure for your crochet baby slippers. A smaller hook, such as a 3.5mm crochet hook (E/4), is generally recommended because it creates tight, neat stitches that help the bootie retain its shape. If your stitches are too loose, the booties might slip off easily or lose their structural integrity, which is why maintaining a consistent crochet gauge matters so much.
In addition to yarn and hooks, a few essential notions will make your crafting experience much smoother and more enjoyable. You will need a reliable pair of sharp crafting scissors for clean yarn cuts and a sturdy tapestry needle to weave in loose ends and sew components together. Locking stitch markers are also highly recommended to keep track of your rounds, preventing mistakes before they happen and saving you valuable time.
Safety should always be a top priority when manufacturing any type of handmade children’s clothing. While plastic safety eyes are incredibly popular in modern amigurumi, they can pose a choking hazard for babies who love to chew on their footwear. For this reason, we strongly advise using embroidered yarn eyes instead of plastic pieces to guarantee that your finished creation is entirely safe for infants of all ages.
Before starting, take a moment to organize your workspace and ensure you have enough lighting to clearly see your stitches. Having all your crochet notions within arm’s reach prevents interruptions and allows you to maintain a steady, relaxing rhythm as you work. This preparation stage sets the tone for a successful project, ensuring you enjoy every moment of your creative journey.
Ultimately, investing in high-quality materials will elevate the final presentation of your fox themed crochet items. Premium fibers hold their shape better over time, resist pilling, and maintain their vibrant colors even after multiple trips through the washing machine. Now that your crafting kit is completely ready and organized, it is time to master the foundational stitches required for this pattern.
2. Essential Stitches and Step-by-Step Sole Construction
To successfully follow along with this how to make crochet fox booties project, you need to be familiar with a few fundamental crochet techniques. You will primarily use the single crochet stitch (sc) for a tight texture, the half double crochet stitch (hdc) for smooth transitions, and the double crochet stitch (dc) to build height quickly. Mastering the slip stitch (sl st) is also crucial, as it allows you to join rounds seamlessly and create clean edges.
The construction always begins at the bottom, meaning you will start by creating a sturdy, oval-shaped crochet bootie sole. You will initiate the project by making a foundational slip knot and working a precise starting crochet chain of eleven stitches. Working along both sides of this initial chain allows you to expand the piece evenly, forming the classic oval base needed for comfortable footwear.
During the first few rounds of the sole, you will implement strategic crochet increases by placing multiple stitches into a single space. This technique expands the toe and heel areas gracefully without causing the fabric to buckle or ripple uncomfortably. Using your stitch markers during this phase is incredibly helpful to ensure your increases line up perfectly on both ends of the sole.
Once your sole reaches the desired measurements, you will transition to the sides of the bootie by working into the back loops only (blo). This brilliant technique creates a clean, ridges line around the perimeter, acting as a natural border between the bottom and the top of the shoe. It instantly forces your work to turn upward, establishing the dimensional walls of your infant crochet slippers.
As you build the sides using standard single crochets, you will notice the shoe shape naturally forming right in your hands. It is important not to pull your yarn too tightly during these rounds, as you want the sides to remain flexible enough to stretch over a baby’s foot. Consistency is key here to ensure that both the left and right booties turn out identical in size.
To wrap up the main body, you will perform a series of crochet decreases (sc2tog) across the front section to form the toe cap. This shaping narrows the opening of the bootie, ensuring it stays securely on an active baby’s moving foot without slipping off. Once the main shoe body is completed in bright orange, you are ready to move on to the character details.
3. Crafting the Fox Features and Detailed Assembly
The true magic of learning how to make crochet fox booties lies in creating the adorable facial features that give the character life. You will start by crocheting the white muzzle overlay, which is typically a small, triangular patch made using basic rows of single crochet. This contrast element mimics the distinctive facial markings of a wild fox and provides a beautiful backdrop for the face.
Next, you will craft two identical crochet fox ears using your primary orange yarn and a small touch of black yarn for the tips. The ears are formed by working a tiny magic ring and increasing gradually to create a pointed, conical shape that stands upright. Leaving a long yarn tail when you fasten off is an excellent trick, as it gives you the perfect thread for assembly later.
Once all the individual pieces are ready, use straight quilting pins to temporarily secure the white muzzle and ears onto the main bootie body. This step allows you to visually inspect the symmetry and positioning before committing to any permanent stitching. Taking your time during alignment ensures your fox has a cute, well-balanced expression rather than a lopsided appearance.
Using your tapestry needle and a secure whip stitch, carefully attach the white facial patches and ears to the orange body. Ensure your stitches penetrate through both layers securely, but be careful not to pull so hard that you distort the shape of the bootie. Threading your yarn tails neatly through the inside of the shoe hides them completely from view.
With the main elements attached, grab your black yarn to embroider the delicate nose and sleeping eyes onto the white muzzle area. A simple satin stitch works wonders for the nose, while a few curved lines create the illusion of sweet, peaceful closed eyes. This embroidered approach keeps the handmade baby booties completely safe and free from hard objects.
Inspect the interior of the shoe to confirm that no rough knots or loose threads are exposed to the baby’s feet. Softness inside the shoe is just as vital as appearance on the outside when designing comfortable crochet footwear. Once both booties are fully assembled, give them a gentle reshape with your hands, and they are officially ready to display or gift.
4. Tips for Sizing Adjustments and Advanced Customization
When exploring how to make crochet fox booties, understanding how to adapt sizes for growing infants is a fantastic skill to develop. The standard pattern typically fits infants from 0-3 months, but you can easily scale it up by altering your hook size or yarn weight. For instance, switching to a worsted weight yarn and a 4.0mm hook will naturally produce a larger bootie suitable for 3-6 months sizes.
Another clever way to alter the size without changing your yarn is by modifying the number of stitches in your initial foundation chain. Adding two extra chains to the base will increase the overall length of the sole, allowing you to accommodate older babies. Just remember to adjust your stitch counts proportionally across the toe and heel sections to maintain the correct oval shape.
If you want to customize your woodland creature booties for colder winter seasons, consider adding a stylish ribbed ankle cuff. By working alternating front post and back post double crochets around the top opening, you can create a stretchy, sock-like extension. This addition provides extra warmth and helps keep the booties firmly in place during energetic playtime.
For older babies who are beginning to stand or crawl, safety can be enhanced by applying a non-slip sole coating to the bottoms. You can use puff paint, clear silicone sealer, or specialized leather patches stitched directly onto the crochet sole to provide excellent grip. This simple customization transforms your decorative booties into practical, safe walking slippers for busy toddlers.
Don’t be afraid to experiment with alternative color palettes to create a unique, stylized look for your custom crochet projects. A soft pastel grey yarn transforms the design into a charming silver fox, while a muted beige offers a trendy, minimalist aesthetic. Customizing colors allows you to match specific nursery themes or fashionable baby outfits effortlessly.
Finally, keeping a detailed crochet project journal where you document your stitch counts, hook choices, and modifications is highly beneficial. This practice ensures you can replicate your successful designs in the future with total accuracy, making it easier to produce matching pairs. With these advanced tips in your crafting toolkit, you can confidently create an entire collection of custom footwear.
Frequently Asked Questions (FAQ)
What is the best yarn type for making crochet baby booties?
The best option is a premium, super-soft acrylic, bamboo, or superwash merino wool blend. These fibers are incredibly gentle on sensitive skin, lightweight, and can withstand frequent washing without shrinking or losing their shape.
How do I prevent the booties from falling off a baby’s feet?
You can ensure a secure fit by making sure your toe decreases are tight and accurate. Additionally, weaving a thin crochet chain or a matching ribbon around the ankle area allows parents to tie the booties securely.
Can a total beginner complete this fox booties tutorial?
Yes, this project is well-suited for an advanced beginner. If you know how to chain, single crochet, increase, and decrease, you have all the foundational skills necessary to follow along successfully.
How long does it typically take to make a pair of crochet booties?
For most intermediate crocheters, a single pair of baby booties takes approximately two to three hours to complete from start to finish, making it a fantastic weekend project.
Are these handmade booties safe for babies who put their feet in their mouths?
Yes, provided you embroider the facial features using yarn instead of using plastic safety eyes or buttons. Always ensure all yarn ends are woven in securely so they cannot unravel.
Conclusion
In this detailed tutorial, you have learned everything necessary on how to make crochet fox booties, starting from selecting the perfect soft yarn to constructing a sturdy sole and assembling the charming facial features.
We explored how choosing the right tools, maintaining an accurate gauge, and using embroidered details can result in a beautiful, safe, and professional piece of comfortable footwear. Crafting these booties is an excellent way to express your creativity while making a practical item that parents and babies alike will absolutely treasure.