This Crocheted Star- Tutorial will guide you through one of the most delightful and versatile projects in the crafting world. Whether you are looking to create festive holiday decor, unique embellishments for garments, or charming gifts for loved ones, learning how to shape yarn into a celestial beauty is a fantastic skill to master. Crochet is not just a hobby; it is a form of mindful relaxation that allows you to transform a simple strand of thread into a beautiful, tangible object that lasts for years.
In this comprehensive guide, we will break down the entire process from start to finish, ensuring that even beginners can follow along with ease. The beauty of a crochet star lies in its geometric simplicity, which relies on foundational stitches combined in a specific sequence to form those iconic crisp points. By mastering this specific design, you will gain a deeper understanding of stitch anatomy and how to manipulate stitch heights to create sharp angles and smooth transitions.
As you embark on this creative journey, remember that patience and consistent tension are your best friends. We have designed this How to Make Crochet Star – Tutorial to be highly structured, informative, and optimized to help you achieve the best results possible. Grab your favorite yarn, find a comfortable seat, and let us dive straight into the magical world of standard and unique crochet stitches.
1. Materials Needed for Your Crocheted Star- Tutorial
Choosing the right supplies is the foundational step to ensuring your handmade project turns out beautifully and holds its shape. For this Crocheted Star- Tutorial, you will want to select a yarn that matches the vibe of your intended project, whether that is a stiff cotton for ornaments or a soft acrylic for blankets. Beginners often find it easiest to work with a medium-weight yarn because the individual loops are highly visible.
Your choice of hook is equally vital when learning how to make crochet star designs that look tight and professional. If your stitches are too loose, the points of your star might sag or lose their definitions over time. A general rule of thumb is to use a hook size slightly smaller than what the yarn label recommends to achieve a firmer fabric structure.
Beyond yarn and hooks, a few essential notions will make your crafting experience much smoother and more enjoyable. You will need a pair of sharp embroidery scissors to snip your yarn cleanly without fraying the delicate fibers. A sturdy tapestry needle is also mandatory for weaving in those pesky loose ends securely so your hard work never unravels.
Stitch markers can be incredibly helpful during this crochet tutorial, especially when you are counting your initial center ring stitches. Missing even a single stitch in the foundation round can throw off the symmetry of the five distinct points later on. Keeping your workspace organized with these tools ensures a seamless, frustration-free crafting session.
Furthermore, consider the color palette you want to explore before you begin pulling loops through your hook. Traditional yellow, vibrant gold, crisp white, or even multi-colored variegated yarns can give your finished piece a completely different personality. Experimenting with different textures, like metallic threads carried alongside your yarn, can add a wonderful festive shimmer.
Ultimately, preparing your materials beforehand allows you to maintain a steady rhythm once you begin crocheting. Having everything within arm’s reach prevents interruptions, allowing you to focus entirely on your stitch placement and tension control. Now that your crafting station is fully prepped with the ideal gear, you are ready to loop your yarn and start.
2. Step-by-Step Instructions: Mastering the Center Ring
To kick off the actual crafting portion of our How to Make Crochet Star – Tutorial, we must first establish the central foundation. You can begin either with a traditional chain-four loop or by utilizing the highly popular magic ring technique. The magic ring is often preferred for a crochet star because it allows you to pull the center completely closed, leaving zero gaps.
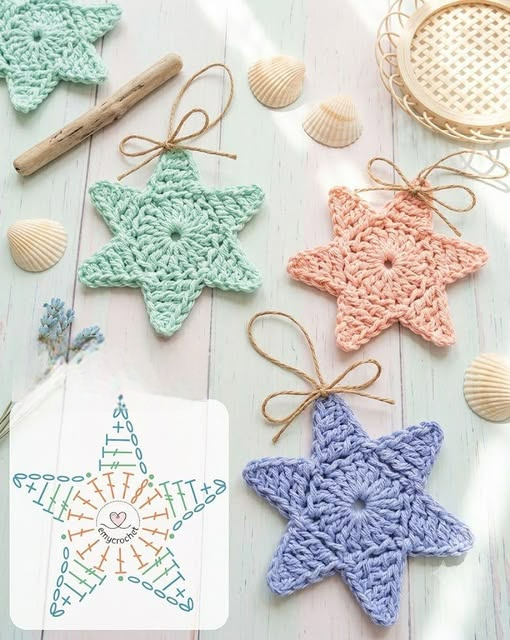
Once your loop is formed, you will secure it with a chain stitch and begin working your first official round directly into the center. For a standard five-point star, you typically want to work a total of ten or twelve single crochets into the ring. This base provides the perfect mathematical structure needed to divide your stitches evenly into five equal sections.
After completing the required number of base stitches, you will join the round using a precise slip stitch into the very first stitch. Pull the tail of your magic ring firmly to close the central hole, securing the foundational circle tightly. This neat, compact disc serves as the solid anchor from which all five beautiful points will soon expand outward.
As you transition into the next round, maintaining an accurate stitch count is absolutely critical for the success of your project. If you find yourself with too many or too few stitches at this stage, pause and recount them before moving forward. It is much easier to fix an error now than to realize your star is uneven later on.
This phase of the Crocheted Star- Tutorial emphasizes the importance of consistent tension across all your foundational stitches. If some loops are loose and others are tight, your central disc will warp or cup instead of laying perfectly flat. Keep your hands relaxed and let the hook do the work to maintain a uniform size.
With your flat central circle fully completed and verified, you have officially built the launchpad for your celestial design. This simple geometric base is the secret behind every perfectly symmetrical star ornament you see online. Now, we can move on to the most exciting part: shaping those iconic, sharp points.
3. Creating the Star Points with Precise Stitching
Now comes the core magic of our How to Make Crochet Star – Tutorial, where we transform a simple circle into a star. To create the points, you will work a specific sequence of varying stitch heights across your established foundation. You will typically start by chaining a small sequence outward from the base circle to create the length of the point.
To work your way back down the chain toward the center, you will utilize a gradient of stitches, starting small and getting larger. For instance, you might slip stitch in the second chain from the hook, followed by a single crochet in the next. This progressive increase in stitch height naturally creates a beautiful, sloping triangular shape.
Next in the sequence, you will often use a half double crochet followed by a full double crochet in the remaining chains. This gradual expansion from a tiny slip stitch to a tall double crochet builds the wide base of your star point. Once the chain is filled, you anchor the point back to the central ring using another slip stitch.
You will repeat this exact sequence of chaining and graduating your stitches all the way around the central circle. Because you calculated your base stitches perfectly in the previous step, you will find that you have just enough room for five points. Each repetition will mirror the last, resulting in an incredibly satisfying and symmetrical layout.
During this stage of the crochet tutorial, pay close attention to the very tip of each star point to ensure it looks sharp. Pulling your first slip stitch on the chain slightly tighter can help emphasize that crisp, pointed look we all love. Avoid pulling too hard on the taller stitches, as they need to retain their full height to keep the edges straight.
As your fifth and final point anchors back into the starting slip stitch, the classic stellar silhouette will vividly come to life. Take a moment to admire the geometric precision of your work as the yarn holds its shape beautifully. We are now ready to add those professional finishing touches that elevate handmade items to retail quality.
4. Finishes, Blocking, and Creative Variations for Stars
Completing the stitching is only part of the journey; proper finishing techniques are what truly make your work shine online. To finish your crochet star, fasten off your yarn, leaving a tail of about six inches for weaving. Thread this tail onto your tapestry needle and carefully weave it through the back of your stitches to hide it.
To make your handmade shapes look incredibly crisp, flat, and professional, you should definitely consider the process of wet blocking. Wet blocking involves misting your finished piece with water, gently shaping it on a foam mat, and pinning the points down. Once the yarn dries completely, it will retain its perfect, sharp shape permanently.
If you want your star to hang beautifully on a holiday tree without drooping, you can apply a fabric stiffener during blocking. Mixing equal parts of white craft glue and water creates an excellent, budget-friendly stiffening solution for cotton threads. Submerge your project in the mixture, squeeze out the excess, pin it flat, and let it dry.
Now that you know how to make crochet star motifs easily, you can explore an endless array of creative variations. You can join multiple motifs together to create a whimsical garland for a nursery or a festive mantle piece. Alternatively, you can use a bulky blanket yarn to create large, plush star pillows for your couch.
Another fantastic idea is to stitch a small loop of metallic thread through the top point to create an instant hanging ornament. You can also sew a safety pin to the back to turn your creation into a unique, handmade brooch. The versatility of this simple pattern makes it a go-to project for crafters throughout every season.
We hope this structured guide inspires you to experiment with different yarn weights, textures, and color combinations in your future projects. Crochet is a continuous learning experience, and every single motif you make refines your skills and muscle memory. Enjoy the process of creating handmade magic, one beautiful stitch at a time.
FAQ
What is the best yarn for a crochet star?
For crisp ornaments that hold their shape well, 100% mercerized cotton yarn is highly recommended. If you are making soft items like blankets or toys, a high-quality acrylic or wool blend works wonderfully.
How do I stop my star points from curling?
Curling is usually caused by tight tension or a hook size that is too small for the yarn. You can easily fix this by wet blocking your finished star with pins, or by switching to a slightly larger hook.
Can a total beginner complete this tutorial?
Yes! This project uses basic stitches like single, half double, and double crochet. If you know how to chain and slip stitch, you can absolutely master this pattern with a little patience.
How can I make my stars stiffer?
You can use commercial fabric stiffener or a homemade mix of white school glue and water. Dip the star, squeeze out the excess fluid, shape it, and let it dry completely on a blocked surface.
How long does it take to crochet one star?
Once you get used to the stitch sequence, a single star typically takes between 10 to 15 minutes to complete. This makes it an amazing project for quick gifts or stash-busting.
Conclusion
In this article, you have learned a complete and detailed step-by-step process through our Crocheted Star- Tutorial, understanding everything from the ideal choice of materials to the perfect execution of the center ring and geometric stitches.
We also explored how the blocking process and the use of fabric stiffeners can transform a simple design into a firm, professional decorative piece. Now that you master the techniques of how to make crochet star items, the creative possibilities are endless for garlands, ornaments, and personalized gifts.