
Kitten-shaped Crochet Coaster Pattern is the perfect combination of functionality, creativity, and adorable design for crochet lovers. If you enjoy making practical handmade accessories with a charming touch, this Kitten-shaped Crochet Coaster Pattern is an excellent project to add to your collection. Whether you are a beginner looking for a fun challenge or an experienced crocheter searching for a quick weekend project, this pattern offers an enjoyable experience while helping you improve your crochet skills.
Crocheted coasters have become increasingly popular because they protect furniture while adding personality to any room. A cat-inspired design brings warmth and playfulness to coffee tables, office desks, dining rooms, or even gift baskets. Handmade projects like this are also wonderful opportunities to use leftover yarn, experiment with different color palettes, and create thoughtful handmade gifts for family and friends. Every finished coaster becomes a small piece of art that reflects your creativity.
One of the best features of this Kitten-shaped Crochet Coaster Pattern is its simplicity. The base is worked in a circular shape using classic crochet stitches before the signature kitten ears are added. Small embroidered details complete the adorable appearance without making the project overly complicated. Throughout this tutorial, you’ll learn every important step, discover useful crochet tips, avoid common mistakes, and gain confidence in creating beautiful handmade coasters that are both decorative and practical.
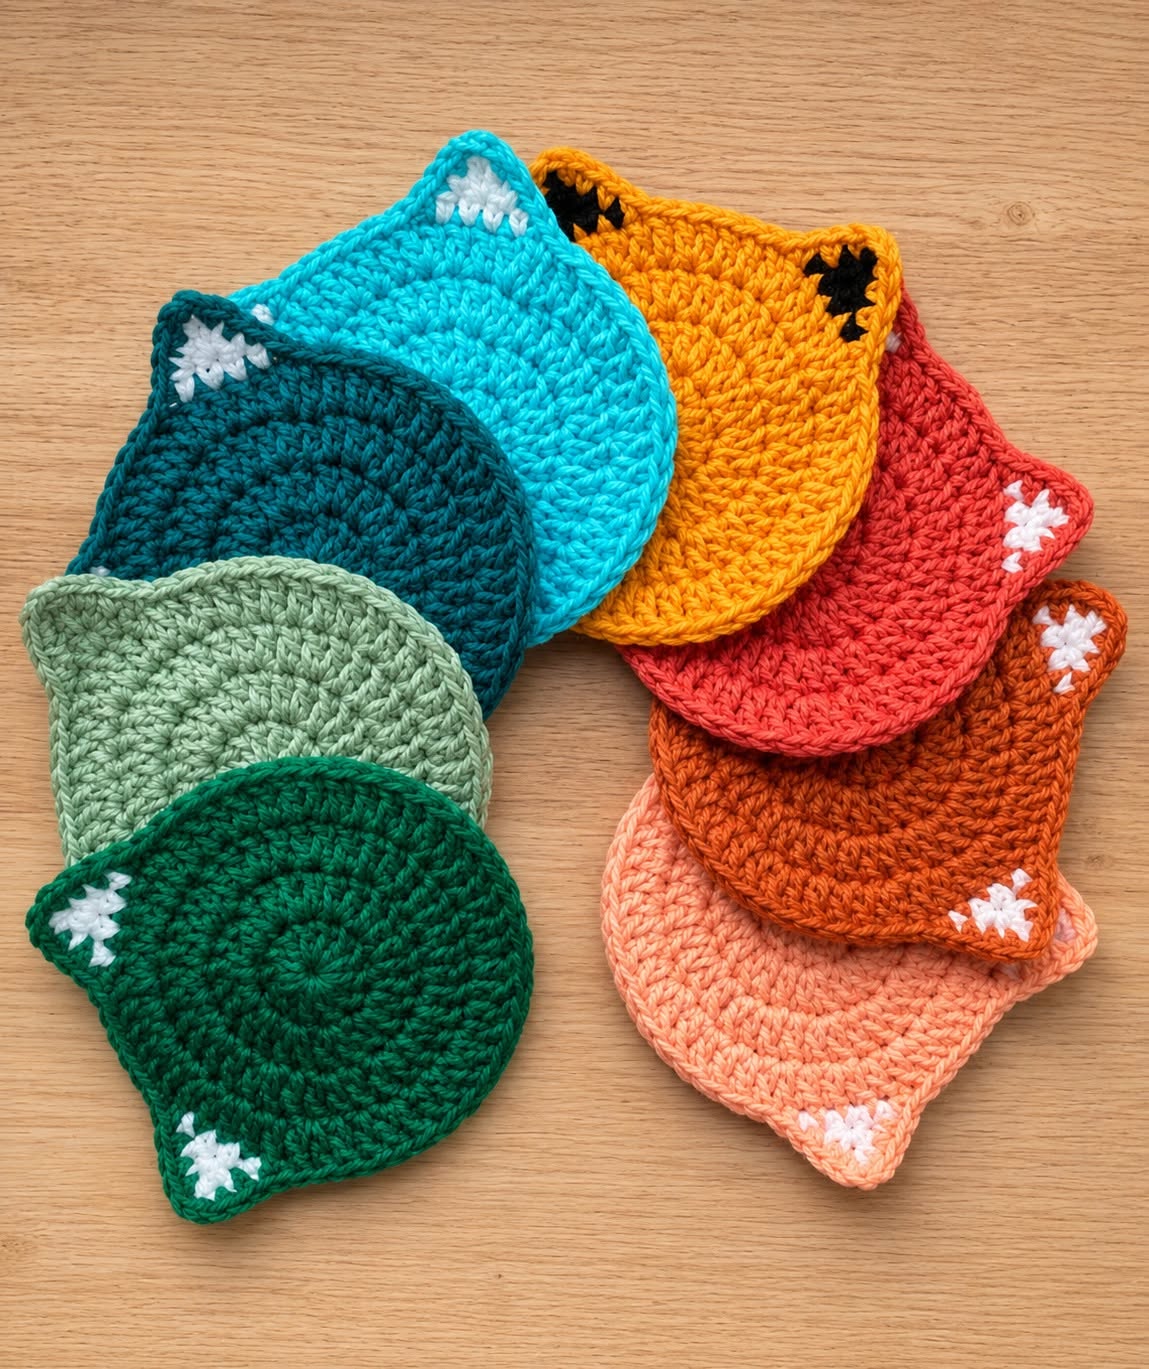
Materials and Crochet Basics for the Kitten-shaped Crochet Coaster Pattern
Before starting your Kitten-shaped Crochet Coaster Pattern, gather all your materials. A medium-weight cotton yarn is highly recommended because it absorbs moisture well, holds its shape, and creates durable coasters suitable for everyday use. Cotton also provides excellent stitch definition, making the circular design and ears stand out beautifully.
Use a crochet hook that matches your chosen yarn. For most medium cotton yarns, a 4.0 mm (G/6) or 4.5 mm hook works perfectly. You will also need scissors, a yarn needle for weaving in ends, stitch markers if desired, and white or contrasting yarn for the small decorative details on the ears.
The primary stitches used in this Kitten-shaped Crochet Coaster Pattern include the magic ring, chain (ch), slip stitch (sl st), single crochet (sc), half double crochet (hdc), and double crochet (dc). These stitches create a sturdy yet flexible fabric that lays flat while maintaining the coaster’s shape.
Begin by creating a magic ring. This technique forms a neat center without leaving a visible hole. Work the first round of double crochet stitches into the ring and gently pull the yarn tail to close the center completely.
Increase evenly during each round to maintain a perfectly flat circle. Place two stitches into selected stitches according to your increase pattern. Even spacing prevents the coaster from curling or becoming wavy.
After completing the circular base, lightly block the piece if necessary. Blocking helps the stitches relax and creates a professional finish before moving on to the kitten ears and decorative elements.
Step-by-Step Instructions to Crochet the Kitten-shaped Crochet Coaster Pattern
Start Round 1 by creating a magic ring and crocheting 12 double crochet stitches into the center. Join with a slip stitch to complete the first round while keeping the stitches evenly spaced.
For Round 2, chain two and work two double crochet stitches into every stitch around. This doubles the stitch count and begins forming the smooth circular base. Join the round carefully to keep the seam neat.
Continue increasing during Round 3 by working one double crochet in the first stitch and two double crochet stitches in the next. Repeat this sequence around the circle. Your coaster should remain completely flat without puckering.
Rounds 4 through 7 continue following a standard circular increase formula. Add one additional single stitch between each increase round to gradually enlarge the circle until it reaches your preferred coaster size, generally between 4.5 and 5 inches in diameter.
Once the circle is complete, finish the edge with one round of single crochet stitches. This border strengthens the coaster while creating a smooth edge that complements the kitten silhouette.
To create the ears, identify two equally spaced locations near the top edge. Attach yarn and work small triangular sections using single crochet, half double crochet, and double crochet stitches. Decrease as you work upward until each ear forms a soft triangle. Repeat on the opposite side, making sure both ears are symmetrical.
Adding the Cute Kitten Details and Finishing Techniques
The beauty of this Kitten-shaped Crochet Coaster Pattern lies in its charming details. After completing the ears, use white yarn to crochet or embroider small inner-ear accents. These tiny additions immediately give the coaster its recognizable kitten appearance.
Weave in every yarn end carefully using a tapestry needle. Hidden ends improve durability and ensure the coaster maintains a polished, professional look after repeated washing and daily use.
If desired, lightly steam block the finished coaster. Avoid pressing directly with a hot iron, especially when using cotton blends. Gentle blocking helps define the ears and smooths the circular body.
Experiment with different color combinations. Soft pastel shades create a delicate appearance, while bold jewel tones produce vibrant seasonal collections. Earth tones also complement rustic home décor beautifully.
For holiday gifts, create coordinated coaster sets using matching colors. Packaging several handmade kitten coasters with a decorative ribbon transforms them into thoughtful presents suitable for birthdays, housewarmings, Mother’s Day, or holiday celebrations.
You can also personalize every coaster by adding embroidered whiskers, tiny noses, sleepy eyes, or playful expressions. These optional details make each finished piece completely unique while maintaining the overall simplicity of the original pattern.
Tips, Common Mistakes, and Creative Ideas for the Kitten-shaped Crochet Coaster Pattern
Maintaining consistent yarn tension is one of the most important skills when making this Kitten-shaped Crochet Coaster Pattern. Even tension creates smooth stitches, balanced ears, and a coaster that lays flat on every surface.
Avoid adding too many increases in one round. Excessive increases cause ruffling, while too few increases make the coaster curl into a bowl shape. Count your stitches carefully after every round to maintain the correct shape.
Cotton yarn remains the preferred fiber because acrylic may soften excessively when exposed to hot mugs. Cotton also provides better absorbency, making it ideal for protecting furniture from condensation.
Practice creating identical ears before attaching them permanently. If one ear appears larger than the other, simply unravel and adjust the stitch count. Symmetry significantly improves the finished appearance.
Once you’ve mastered the basic design, explore creative variations. Add bows, tiny flowers, embroidered initials, seasonal colors, striped yarn, or textured stitch borders. Small modifications allow you to create entire themed collections using the same basic structure.
Finally, remember that every handmade project becomes better with practice. Your first coaster teaches the construction process, while each additional coaster becomes faster, neater, and even more enjoyable to complete. Soon you’ll have a beautiful handmade collection perfect for your own home or thoughtful handmade gifts.
FAQ About the Kitten-shaped Crochet Coaster Pattern
1. Is this Kitten-shaped Crochet Coaster Pattern suitable for beginners?
Yes. Beginners who already know basic crochet stitches such as chain, single crochet, and double crochet can successfully complete this project with patience.
2. What yarn works best?
Cotton yarn is highly recommended because it is durable, absorbent, washable, and maintains its shape after repeated use.
3. How long does it take to make one coaster?
Most crocheters can finish one coaster in approximately one to two hours, depending on experience and desired embellishments.
4. Can I use different yarn weights?
Absolutely. Simply adjust your hook size accordingly. Keep in mind that thicker yarn creates larger coasters, while finer yarn produces smaller ones.
5. How do I keep the coaster flat?
Follow the increase pattern carefully, maintain even tension, and lightly block the finished piece if necessary.
6. Are these coasters washable?
Yes. Cotton coasters can usually be hand washed or machine washed on a gentle cycle. Lay them flat to dry for best results.
7. Can I sell finished coasters?
Handmade finished coasters are commonly sold at craft fairs, online handmade marketplaces, and local artisan shops. Always ensure you respect any licensing terms if working from someone else’s copyrighted pattern.
8. Can I customize the design?
Certainly. You can experiment with different colors, ear shapes, embroidered faces, decorative borders, or seasonal themes to create personalized coaster collections.
Conclusion
This Kitten-shaped Crochet Coaster Pattern demonstrates how a simple circular crochet project can become an adorable and functional home accessory with just a few creative details. Throughout this guide, you learned how to choose the right materials, create a flat circular base, shape symmetrical kitten ears, add decorative finishing touches, avoid common crochet mistakes, and personalize each coaster with your own unique style. By practicing these techniques, you’ll gain confidence while producing beautiful handmade coasters that are perfect for everyday use, thoughtful gifts, craft fairs, or home décor collections.
I hope this tutorial has inspired you to start your own Kitten-shaped Crochet Coaster Pattern and enjoy every stitch along the way. If you found this guide helpful, please leave your honest opinion about the tutorial and share your suggestions or creative ideas.