Linked Hearts Bracelet Crochet – Tutorial is a fantastic way to express your love for handmade jewelry and master a unique technique that creates a stunning visual effect. This project is perfect for crocheters who want to move beyond simple rows and delve into the world of wearable art, resulting in a series of interconnected hearts that look much more complex than they actually are. By following this Linked Hearts Bracelet Crochet – Tutorial, you will learn how to maintain consistent tension while creating delicate shapes that maintain their integrity even with daily wear.
The beauty of the Linked Hearts Bracelet Crochet – Tutorial lies in its versatility, as you can easily customize the length and color palette to suit any style or occasion. Whether you are making a vibrant friendship bracelet or a sophisticated piece in metallic thread, the core logic remains the same: crafting a chain of love that literally links together. This Linked Hearts Bracelet Crochet – Tutorial focuses on clarity and rhythm, ensuring that you find your “flow” as the hearts begin to emerge from your hook one by one.
As we dive into this Linked Hearts Bracelet Crochet – Tutorial, remember that the quality of your yarn choice will significantly impact the final look of your crochet accessory. Using a mercerized cotton or a high-quality embroidery floss is often recommended for micro-crochet projects like this because it provides excellent stitch definition. Throughout this Linked Hearts Bracelet Crochet – Tutorial, we will explore the best crochet stitches for the job and how to finish your piece professionally so it lasts for years to come.
1. Choosing the Right Materials for Your Linked Hearts Bracelet
Selecting the perfect crochet hook size and yarn weight is the first essential step in any Linked Hearts Bracelet Crochet – Tutorial. For a delicate, jewelry-like finish, a 1.5mm to 2.25mm hook paired with lace weight yarn or size 10 crochet thread is ideal.
When you follow a Linked Hearts Bracelet Crochet – Tutorial, you’ll notice that the drape of the bracelet depends on the fiber content. Cotton yarn is the most popular choice because it isn’t stretchy, which helps the hearts keep their crisp shape.
Don’t forget the finishing touches like jewelry clasps, jump rings, and perhaps some small beads to add a bit of sparkle to your handmade crochet bracelet. Having these ready will make the assembly phase much smoother.
In this Linked Hearts Bracelet Crochet – Tutorial, we also emphasize the importance of high-quality embroidery needles for weaving in ends. Because the piece is small, messy ends can be very visible, so precision is key here.
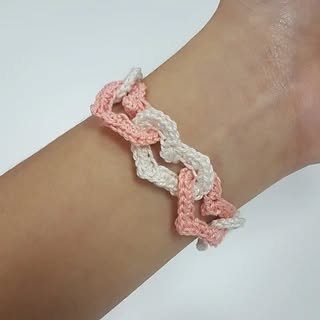
Color selection is where your creativity truly shines in this Linked Hearts Bracelet Crochet – Tutorial. You can opt for a classic ombre effect, alternating shades of pink and red, or go for a modern monochrome look.
Lastly, consider a stitch marker if you are a beginner. While the pattern repeats quickly, it is always helpful to mark the first “link” of each heart to ensure your stitch count remains accurate throughout the process.
2. Essential Stitches and the Interlinking Technique
The heart of this Linked Hearts Bracelet Crochet – Tutorial involves mastering the slip stitch, single crochet, and double crochet. These basic stitches are combined in a specific sequence to form the rounded “lobes” of the heart.
The “Linked” part of the Linked Hearts Bracelet Crochet – Tutorial title refers to the method of working the next heart directly into the previous one. This creates a seamless chain without the need for sewing individual motifs together later.
To start, you will typically create a small loop of chain stitches. This serves as the foundation for your first heart, where you will work multiple stitches into the same space to create volume and shape.
As you progress through the Linked Hearts Bracelet Crochet – Tutorial, you will learn how to join the yarn at the “dip” of the heart. This technique ensures that each link is sturdy and can withstand the movement of your wrist.
Many people following a Linked Hearts Bracelet Crochet – Tutorial find that half-double crochet stitches help transition between the heights of the heart’s lobes. This creates a smoother curve and a more professional crochet pattern look.
Focusing on the tension of your yarn is vital. If your stitches are too loose, the hearts will look floppy; if they are too tight, the bracelet might curl uncomfortably around your arm as you work.
3. Step-by-Step Construction of the Heart Chain
The first phase of the Linked Hearts Bracelet Crochet – Tutorial construction is creating the “base heart.” You will work a series of stitches into a foundation ring to create the bottom point and the two rounded tops.
Once the first heart is complete, the Linked Hearts Bracelet Crochet – Tutorial guides you to chain a specific number of stitches to move to the next position. This chain acts as the “bridge” between your romantic motifs.
Inserting your hook into the previous heart’s side while starting the new one is the secret sauce of this Linked Hearts Bracelet Crochet – Tutorial. This “joining as you go” method is a favorite among modern crocheters.
Continue repeating the heart sequence until the bracelet reaches your desired length. A standard adult wrist usually requires about 6 to 8 hearts, depending on the yarn gauge used in your Linked Hearts Bracelet Crochet – Tutorial.
Keep measuring against your wrist as you go. Remember that the jewelry hardware (like the lobster claw and ring) will add about half an inch to the final length of your DIY crochet project.
The final heart in your Linked Hearts Bracelet Crochet – Tutorial should be finished with a secure fasten off stitch. Leave a tail long enough to attach your metal clasp securely with a needle.
4. Professional Finishing and Styling Your Bracelet
The final stage of any Linked Hearts Bracelet Crochet – Tutorial is “blocking.” This involves lightly wetting the finished piece and pinning it into shape to dry, which opens up the stitches and defines the hearts.
Attaching the metal findings is what turns a crochet string into a piece of jewelry. Use your needle to sew the jump rings through the center of the end hearts for maximum stability.
If you want a more bohemian look for your Linked Hearts Bracelet Crochet – Tutorial project, you can skip the metal clasps and finish with a braided tie or a simple button loop.
Stiffening spray is a “pro-tip” often mentioned in a Linked Hearts Bracelet Crochet – Tutorial. A light misting can help the bracelet maintain its flat, crisp shape throughout a long day of wear.
These bracelets make incredible gifts. Because this Linked Hearts Bracelet Crochet – Tutorial is relatively quick to complete, you can whip up a whole set in various colors for birthdays or holidays.
Try stacking your finished piece with other metal watches or bangles. The soft texture of the crochet thread provides a beautiful contrast to hard metals, making your Linked Hearts Bracelet Crochet – Tutorial creation pop.
Frequently Asked Questions (FAQ)
What is the best yarn for a Linked Hearts Bracelet?
The best choice is 100% mercerized cotton. It offers the best stitch definition and has a slight sheen that looks like jewelry. It also prevents the hearts from stretching out over time.
Can a beginner finish this Linked Hearts Bracelet Crochet – Tutorial?
Yes! If you know how to do a chain, single crochet, and double crochet, you have all the skills needed. The most challenging part is the small hook size, which just takes a little practice.
How do I adjust the size for a child?
Simply reduce the number of hearts in the chain. Because this is a join-as-you-go pattern, you can stop whenever the length matches the child’s wrist measurement.
Will the hearts flip over while I wear it?
If you use the blocking technique and a light stiffening spray, the bracelet will stay flat. Ensuring your joining stitches are firm also helps the hearts stay aligned.
How do I wash my crochet bracelet?
Hand wash gently in cool water with a drop of mild soap. Lay it flat on a towel to air dry. Avoid machine washing, as it can damage the delicate crochet links and metal clasps.
Conclusion
This Linked Hearts Bracelet Crochet – Tutorial has provided you with all the steps necessary to create a beautiful, meaningful piece of jewelry. We covered everything from choosing the right cotton thread and hook size to the technical aspects of joining motifs and the importance of professional blocking.
By mastering the Linked Hearts Bracelet Crochet – Tutorial, you have added a versatile skill to your crafting repertoire that can be used for necklaces, bookmarks, or even decorative bunting. We hope you enjoyed this creative journey and feel inspired to experiment with different colors and textures. Please leave your sincere opinion below and share any suggestions or variations you discovered while making your own version!