If you’ve ever wanted to combine timeless style with handmade charm, a crochet square bucket hat – pattern is a perfect project to explore. This versatile accessory brings together classic square motifs and the modern bucket hat silhouette in a unique and fashionable way. Whether you’re a seasoned crocheter or a beginner looking for a fun and stylish project, making your own crochet square bucket hat – pattern can be both enjoyable and rewarding.
In this article, we’ll guide you through everything you need to know to design, assemble, and personalize your own crochet square bucket hat – pattern. We’ll break down the materials, the step-by-step construction process, tips for customization, and how to ensure your hat fits just right. Along the way, we’ll use recommended SEO techniques to make this guide helpful and easy to follow for those searching online for practical crochet ideas.
By the end of this tutorial, you’ll not only understand how to make a crochet square bucket hat – pattern but also feel confident in modifying it to match your personal style. This guide follows Google AdSense content policies and provides a family-friendly, ad-safe crafting resource that can be shared on blogs, social media, or with your crochet community.
1. Understanding the Crochet Square Bucket Hat Design
The beauty of a crochet square bucket hat – pattern lies in its modular design and flexibility. At its core, the pattern is built from individual crochet squares (often granny squares), which are joined together to form a fashionable and functional hat. Let’s explore how each element plays a role in the final design.
Crochet squares serve as the building blocks. These squares can vary in complexity, from simple two-color patterns to intricate floral or geometric designs. Choose a square style that fits your skill level and aesthetic preferences. They’re fun to make, and with just a few of them, you can create a completely wearable piece.
The bucket hat shape is universally flattering. It typically consists of three main sections: the crown (top), the sides (body), and the brim. In a crochet square bucket hat, these areas are formed by strategically joining squares and adding rounds or rows where needed for shaping and fit.
The combination of squares with the bucket hat style creates a bold, nostalgic look that is reminiscent of 90s fashion—yet with a handmade twist. The structured lines of the squares contrast beautifully with the soft curves of the hat’s shape, making it both edgy and chic.
An important aspect of the crochet square bucket hat – pattern is the ability to customize it endlessly. You can change yarn colors, textures, square styles, and even embellish with buttons, tassels, or embroidery. This allows every crafter to put their own signature on the piece.
When you use high-quality yarn and focus on even tension, the result is a durable, wearable accessory that’s perfect for sunny days, casual outings, or adding flair to your outfit. Lightweight cotton yarns work best for summer, while wool or acrylic versions are great for colder seasons.
Understanding this design means you’re ready to start gathering materials, choosing square patterns, and moving forward with construction. Let’s dive deeper into each part of the process so you can bring your vision to life.
2. Materials and Preparation for the Pattern
Before starting your crochet square bucket hat – pattern, it’s essential to gather the right materials and prepare properly. This ensures your project will be a success from the first stitch to the final seam.
Start with yarn selection. Cotton yarn is ideal for a breathable, summer-friendly bucket hat, while acrylic or blended yarns offer more structure and warmth. Choose colors that complement each other or go bold with bright, contrasting tones. The number of colors depends on your desired design.
Next is the hook size. Usually, a 4.0 mm to 5.0 mm crochet hook works well for standard DK or worsted weight yarn. Check the yarn label for the recommended size, and always make a test square to check tension and drape. A too-tight fabric will be stiff; too-loose may lack shape.
Stitch markers are helpful tools to keep track of square joins, shaping areas, and rounds, especially in the crown and brim sections. Scissors, a yarn needle, and a measuring tape are also must-haves for finishing and checking fit.
You’ll also want a pattern notebook or digital document where you can jot down stitch counts, square arrangements, or any modifications you make. This helps track progress and makes it easier to replicate or adjust later.
Consider blocking your squares before assembling. Blocking ensures that all pieces are the same size and shape, which is key for a professional-looking result. Use a steam iron, blocking board, and pins to gently shape and flatten each square.
Preparation may seem like a small step, but it sets the foundation for the entire crochet square bucket hat – pattern. With the right materials and a little planning, you’re well on your way to crafting a hat you’ll be proud to wear or gift.
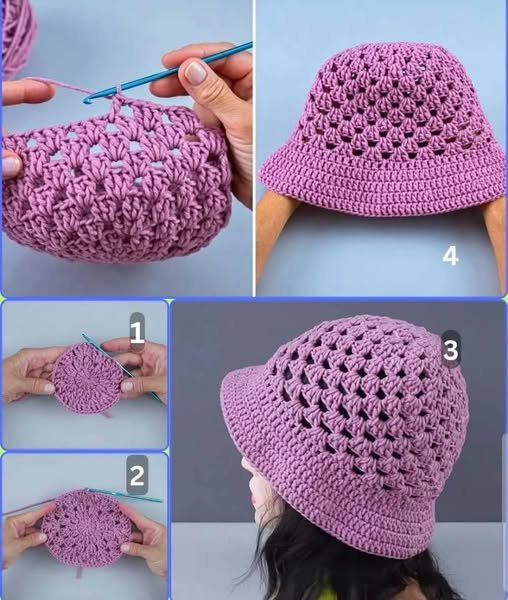
3. Assembling the Crochet Square Bucket Hat
Now that you have your materials and squares ready, it’s time to assemble your crochet square bucket hat – pattern. This part involves arranging the squares, joining them together, and shaping the hat to fit comfortably.
Start by deciding the layout of your squares. Typically, you’ll need four to five squares for the sides of the hat, one for the top (crown), and additional crochet rows or rounds to form the brim. Arrange the squares on a flat surface to visualize the pattern and colors.
Join the squares using your preferred method. Slip stitch and single crochet seams offer durability and a nice texture. For a seamless look, use the whip stitch or invisible join with a yarn needle. Always join squares with the right sides facing out for consistent appearance.
To form the crown, place one square flat and join four others around it to create a cube-like shape. This forms the top of the bucket hat. If you want a wider crown, use a few more squares or add rounds of single or double crochet around the edge.
For the body, join squares side-by-side in a ring. This creates the cylindrical section of the hat. Ensure your measurements align with average head circumferences (approx. 21-23 inches for adults). You can add extra stitches if needed to adjust sizing.
The brim is created by crocheting additional rounds directly onto the bottom edge of the hat. Start with one round of single crochet to form a base, then increase evenly around every few stitches in following rounds to create a gentle flare. Continue until desired brim length.
After assembly, weave in ends, check for loose stitches, and steam block the entire hat if needed. This helps the fabric relax and gives the hat a polished, finished look. You now have a fully formed crochet square bucket hat – pattern ready to wear!
4. Customizing and Styling Your Bucket Hat
One of the best things about following a crochet square bucket hat – pattern is the room for customization. This hat style allows for endless creativity, from yarn choices to decorative elements.
Change up the squares: You can use classic granny squares, floral motifs, or even textured stitches like bobbles or popcorns. Mixing different square patterns can create a playful, patchwork look that’s perfect for summer festivals or casual wear.
Color combinations offer another way to personalize your hat. Try ombré effects, rainbow themes, or minimalist monochrome styles. Use leftover yarns for a sustainable, scrap-friendly version. Contrasting borders can also define each square and give a modern touch.
Add decorative elements such as buttons, appliqués, or embroidery over the squares. These small additions can tell a story or reflect your personality. For example, embroider flowers, initials, or symbols that make the hat uniquely yours.
Consider lining the hat if you want extra comfort or warmth. Use lightweight fabric and hand-stitch it inside carefully. This is optional but gives your hat a more finished, store-bought quality—especially helpful if you plan to sell your creations.
Adjust the brim shape depending on your preference. A narrow brim gives a casual look, while a wider brim adds sun protection and drama. You can even stiffen the brim using starch or plastic canvas between layers for structure.
Lastly, match your outfit or season. Create hats in earthy tones for fall, neutrals for winter, pastels for spring, and bright shades for summer. Pair with a matching crochet tote bag or scarf for a complete handmade ensemble.
FAQ: Frequently Asked Questions About Crochet Square Bucket Hat – Pattern
Q1: How many squares do I need to make a crochet square bucket hat?
A: Generally, you’ll need 5–6 squares: one for the top, 4 for the sides, and possibly an extra one for custom sizing. Additional rounds are crocheted for the brim.
Q2: What size should each square be?
A: Each square should be about 4 to 5 inches (10 to 12.5 cm) wide. Measure your head circumference and divide by the number of squares to get the best fit.
Q3: Can beginners make this crochet square bucket hat pattern?
A: Yes! This is a beginner-friendly project, especially if you use simple granny squares. The joining and brim may require some basic shaping knowledge, but it’s very doable.
Q4: What type of yarn is best for this project?
A: Cotton or cotton blends are ideal for breathable, summer-friendly hats. Acrylic yarns work well for cooler seasons or a more structured hat.
Q5: How do I make the brim stiff so it holds shape?
A:
You can use tighter stitches, apply starch spray, or insert plastic canvas between two crocheted brim layers. Blocking the brim also helps maintain shape.
Q6: Can I sell hats made from this crochet square bucket hat – pattern?
A: Absolutely. Handmade crochet hats are popular on platforms like Etsy. Just be sure to credit pattern sources if using someone else’s design and follow copyright guidelines.
Conclusion
We’ve explored the full process of creating a crochet square bucket hat – pattern, from understanding the structure to assembling the squares and customizing your creation. With a handful of squares, the right yarn, and some imagination, you can create a hat that’s both stylish and personal.
This project is ideal for using up yarn scraps, experimenting with color, and learning new techniques. Whether you wear it to the beach, a picnic, or just out for errands, your handmade bucket hat is sure to turn heads.
If you’ve enjoyed this guide or have tried the pattern, we’d love to hear from you! Please leave a sincere opinion in the comments—what worked, what you’d change, and any suggestions for other hat styles or square combinations. Happy crocheting! 🧵🧢