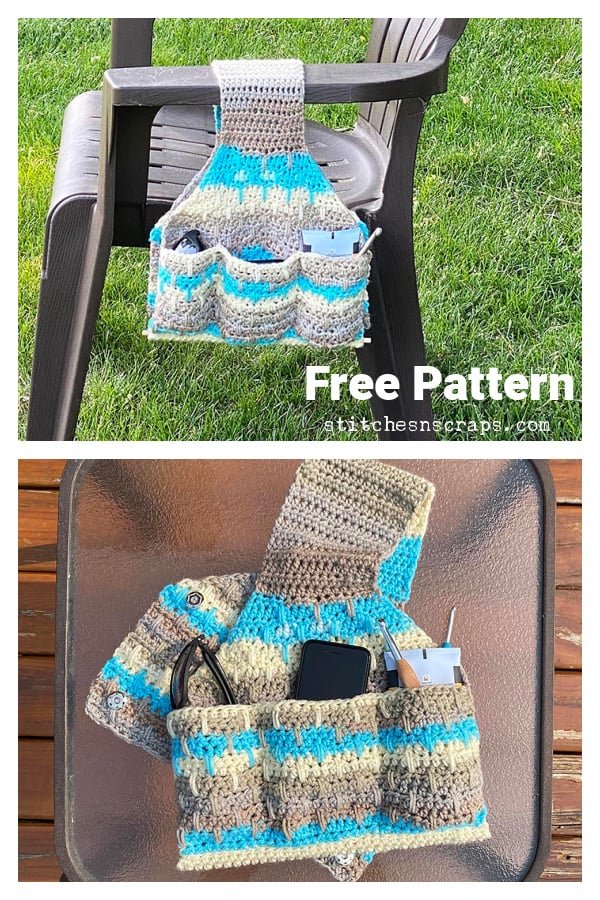
Enjoying a sunny afternoon outside is even more relaxing when you have your essentials close at hand. With the Patio Chair Caddy Crochet – Pattern, you can create a beautiful, functional storage solution that attaches right to your patio chair.
Whether it’s a place for your book, sunglasses, phone, or drink, a crochet caddy brings style and convenience to your outdoor setup.This pattern is ideal for anyone who enjoys crocheting and wants to make their outdoor space more organized.
Even if you’re new to the craft, the Patio Chair Caddy Crochet – Pattern is simple enough to follow while offering enough customization to suit your personal taste. It’s the perfect weekend project with both practical and aesthetic rewards.
In this article, you’ll discover the benefits of making your own crochet patio caddy, the tools and materials you need, a step-by-step guide to creating one, and creative ways to customize your project. We’ll also answer the most frequently asked questions about this popular crochet pattern so you can start your own project with confidence.
1. Why You Should Crochet a Patio Chair Caddy
A Patio Chair Caddy Crochet – Pattern offers a creative way to organize your outdoor essentials without adding bulky furniture or plastic organizers to your space. Crocheting your own caddy means you get both form and function—crafted exactly to your taste.
One of the best parts of using a crochet caddy is its portability. You can move it from one chair to another, take it to the park, or even pack it for a beach trip. Lightweight yet sturdy, it adapts well to various settings while holding your items securely.
Another advantage is sustainability. By using eco-friendly yarn or repurposed materials, you’re creating a reusable product that reduces reliance on synthetic storage solutions. It’s a smart way to reduce waste while practicing your favorite hobby.
A hand-crocheted caddy is also durable. With the right stitches and yarn, you can ensure that it stands up to sun exposure, moisture, and frequent use. Unlike fabric caddies that may fray or tear, a crochet version offers longer-lasting utility.
The personalization potential of this pattern is huge. You can choose colors to match your patio decor, add special pockets for different items, or even stitch names into the design. It’s also a wonderful handmade gift for someone who loves spending time outdoors.
Lastly, it’s an enjoyable and relaxing crochet project. The repetitive stitches, the satisfaction of creating a functional item, and the joy of seeing it in use on your patio make this a fulfilling experience for any crochet enthusiast.
2. Materials and Tools for the Patio Chair Caddy Crochet – Pattern
To get started with your Patio Chair Caddy Crochet – Pattern, you’ll need just a few simple materials. Many of them you may already have in your crafting space, especially if you’re an avid crocheter.
First and foremost, select your yarn. A cotton or cotton-blend yarn is ideal for this project. It’s strong, washable, and holds up well to outdoor use. Avoid yarns that stretch too much or degrade in sunlight, like some synthetic blends.
Next, you’ll need the right hook size. This will depend on your chosen yarn, but typically a 4.0mm to 5.5mm hook works well for worsted weight cotton yarn. Be sure to check your tension with a swatch before beginning the pattern.
You’ll also want stitch markers to help keep track of your pattern, especially when shaping pockets or sections that require increases or decreases. A tape measure will help you ensure everything is sized accurately for your chair.
For a more structured caddy, consider adding a fabric or plastic liner to the back panel. This helps prevent sagging and keeps the caddy from losing shape when filled. You can sew or glue this liner in after the crochet portion is complete.
Don’t forget the attachments. Velcro straps, buttons, or crocheted ties can help you secure the caddy to different styles of patio chairs. Choose a method that’s easy to install and remove but strong enough to hold the caddy in place.
Finally, make sure to download or sketch out your Patio Chair Caddy Crochet – Pattern. While many free or paid patterns are available online, you can also create your own based on your specific needs and the size of your chair armrest.
3. Step-by-Step Guide to Crochet Your Patio Chair Caddy
Once you have your materials gathered, it’s time to begin your project using the Patio Chair Caddy Crochet – Pattern. The steps are straightforward and can be customized depending on how many compartments or decorative elements you want to add.
Begin with the base panel, which typically hangs down the side of the chair. Use a tight stitch like single crochet (sc) to ensure stability. Work in rows until the panel reaches your desired length, usually between 14 and 20 inches depending on the chair size.
Next, create the pockets. You can crochet these separately and then attach them to the base panel with whip stitch or single crochet along the sides and bottom. Vary the sizes of the pockets to fit different items—one for a drink, another for a book, and smaller ones for keys or a phone.
For added reinforcement, double up on the yarn or use tighter tension around the upper edge of each pocket. This prevents the pocket from stretching out over time and keeps items secure, even when the chair is reclined.
Attach your securing mechanism at the top of the panel. If you’re using buttons, crochet buttonholes into the design. For ties, chain stitch several long cords and secure them at even intervals. Velcro can also be sewn onto crocheted straps and fastened tightly around the armrest.
You may want to add finishing touches like a decorative border, edging in a contrasting color, or even a small crochet flower or emblem. This personal flair makes your patio caddy not just functional, but visually pleasing as well.
Lastly, test the fit and balance. Place your caddy on the chair, fill it with items, and make sure it hangs straight and securely. Adjust the ties or fasteners if needed, and enjoy your handmade organization solution.
4. Creative Customizations for Your Crochet Chair Caddy
Once you’ve mastered the basic Patio Chair Caddy Crochet – Pattern, the sky’s the limit when it comes to customization. Here are some fun and practical ways to make your caddy truly your own.
Try experimenting with stitch patterns. Instead of plain single crochet, mix in shell stitches, bobble stitches, or mesh patterns. This not only adds texture but also gives your project a more intricate, handmade look.
Use color blocking or striping to match your outdoor décor. You can choose earth tones for a natural garden look, or bold brights for a summer party vibe. Just make sure to weave in your ends neatly for a polished result.
Add name tags or monograms using tapestry crochet or surface stitching. This is especially useful if you’re making multiple caddies for family or guests to distinguish their belongings.
Make your caddy seasonal or themed. Add patriotic colors for summer holidays, or use sunflower or palm tree motifs to give your caddy a tropical feel. You can even crochet themed appliqués and sew them onto the pockets.
Consider including hidden compartments or flaps. These can be useful for storing more delicate items like glasses or phones, especially if your caddy will be used near a pool or in a windy area.
If you’re gifting or selling these caddies, include a small care label with washing instructions. A quick note to hand wash or spot clean will help keep your handmade work looking great for seasons to come.
FAQ – Patio Chair Caddy Crochet – Pattern
Q1: What kind of yarn should I use for outdoor crochet projects like this caddy?
Use cotton or cotton-blend yarn. These fibers are breathable, durable, and handle exposure to sun and moisture better than most acrylics.
Q2: Is this project beginner-friendly?
Yes! The Patio Chair Caddy Crochet – Pattern mainly uses basic stitches like single crochet and half double crochet. It’s a great project for beginners wanting to make something practical.
Q3: Can I machine wash the chair caddy?
It depends on the yarn and whether you’ve added a liner. Cotton caddies can usually be machine washed on a gentle cycle and air-dried.
Q4: How do I attach the caddy to my patio chair?
You can use crocheted ties, Velcro straps, or buttons. Choose a method that works with the armrest or side of your specific chair design.
Q5: Can I sell the caddies I make from this pattern?
Yes, as long as the pattern allows for commercial use. Many crafters sell handmade crochet items, especially functional ones like this at craft fairs and online shops.
Q6: How long does it take to complete a chair caddy?
Depending on complexity and your skill level, it typically takes 4–6 hours. Simple versions may be done in one afternoon, while detailed ones may take a weekend.
Conclusion
The Patio Chair Caddy Crochet – Pattern is a wonderfully practical and creative project that adds charm and organization to your
outdoor living area. It combines simple crochet techniques with endless customization possibilities, making it ideal for beginners and advanced crafters alike.
We’ve explored the benefits of crocheting your own patio caddy, reviewed the tools and materials needed, guided you through the step-by-step process, and shared ideas for adding your personal touch. With this knowledge, you’re ready to bring comfort and convenience to your outdoor space—one stitch at a time.
If you’ve enjoyed making this project or plan to try it soon, we’d love to hear from you. Please leave your sincere opinion in the comments below and share any questions or suggestions you have. Your feedback helps inspire the crafting community and keeps the creativity flowing. Happy crocheting!