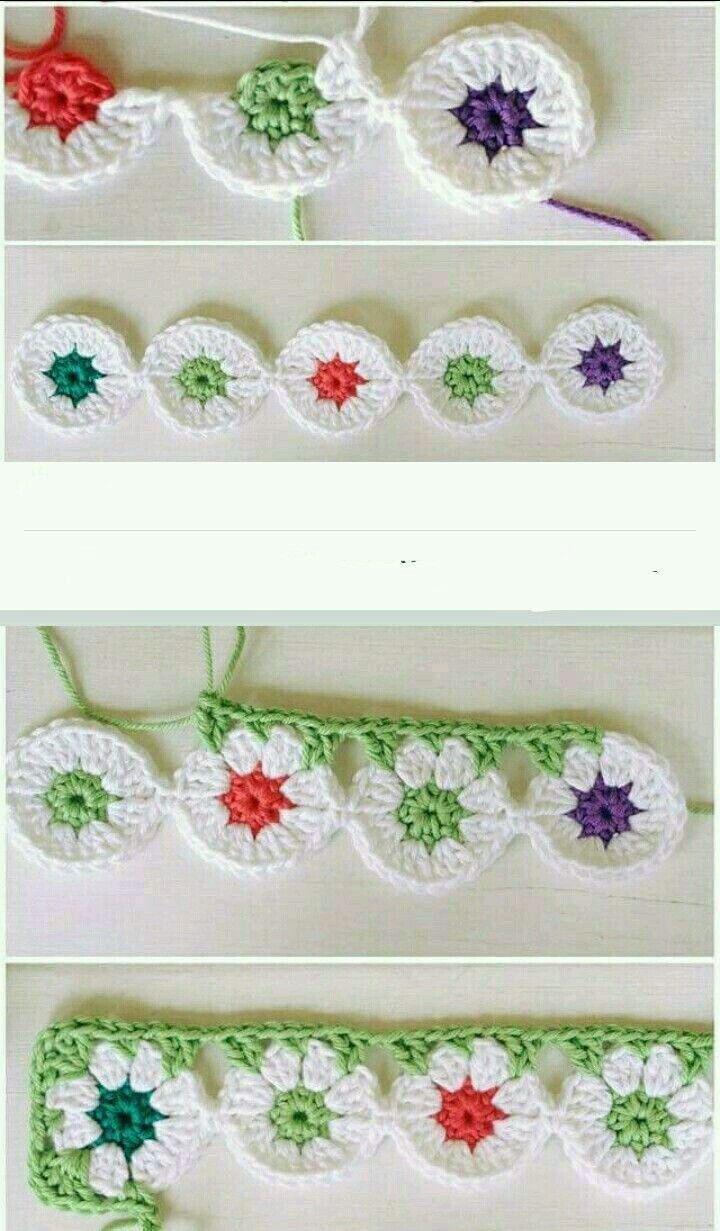
Pretty Daisies – Crochet Pattern is a delightful project that captures the simplicity and beauty of nature.
With their charming petals and cheerful design, these daisy crochet flowers can add a touch of brightness to any project.
Whether you’re making a crochet blanket, a scarf, or even a decorative piece, learning how to crochet Pretty Daisies can elevate your crafting game. In this article, we’ll walk you through a simple and effective pattern to create these beautiful crochet daisies, perfect for any skill level.
Crocheting flowers is an enjoyable and rewarding experience, and the Pretty Daisies – Crochet Pattern is an ideal place to start if you’re looking for a project that’s both easy and versatile. These daisy motifs can be used as embellishments, appliques, or even as stand-alone pieces to make a lovely bouquet of crocheted flowers. Once you master the pattern, you’ll find many ways to incorporate them into various projects.
The beauty of Pretty Daisies lies not only in their simplicity but also in their adaptability. You can experiment with different yarn colors, sizes, and arrangements to create a unique design every time. Plus, this crochet pattern uses basic stitches that are easy to follow, making it a perfect project for beginners. Let’s dive into the materials and steps you’ll need to start crocheting your own Pretty Daisies!
1. Materials Needed for Pretty Daisies – Crochet Pattern
Before you can start crocheting your Pretty Daisies, it’s essential to gather all the necessary materials. Thankfully, this project doesn’t require too many supplies, making it an affordable and accessible crochet project for anyone. Here’s a list of what you’ll need:
- Yarn: For the Pretty Daisies, you can use any type of yarn, but cotton yarn is highly recommended because it provides structure and holds up well over time. Choose a bright white or cream color for the petals, and pick a yellow or any color of your choice for the center of the flower.
- Crochet Hook: A 3.5mm (E) or 4mm (G) crochet hook is perfect for working with worsted weight yarn. However, feel free to adjust the hook size depending on the thickness of the yarn you’re using.
- Scissors: Scissors are essential for cutting your yarn at the end of each section and when you finish the flower.
- Tapestry Needle: This tool is needed for weaving in the loose ends of your yarn after you’ve finished crocheting your Pretty Daisies.
- Stitch Markers: Although optional, stitch markers can be helpful in keeping track of your stitches as you work in rounds.
- Button or Bead (Optional): Some crafters like to add a decorative touch to their daisy center by attaching a small button or bead to give it some extra flair.
Once you have these materials ready, you’ll be well on your way to creating Pretty Daisies that will brighten up any crochet project!
2. Step-by-Step Guide to Crocheting Pretty Daisies
Now that you have your materials, it’s time to begin crocheting your Pretty Daisies. Follow these simple steps to create your first flower:
- Start with a Magic Ring: Begin by creating a magic ring. If you’re unfamiliar with this technique, a magic ring allows you to start crocheting in the round, which helps create a neat center for your daisy. If you prefer, you can also chain 4 and join to form a loop.
- Crochet the Center: Into the magic ring, work 6 single crochet (sc) stitches. Pull the magic ring tight and join with a slip stitch (sl st) to close the round. You should now have a small circle, which will form the center of your daisy.
- Create the Petals: To form the petals, you’ll need to work into the stitches from the center. For each petal, chain 4 and then work a half double crochet (hdc) into the next stitch. Repeat this process until you have 8 petals around the center. You can make more or fewer petals depending on your desired look.
- Finish the First Round: Once you’ve completed the petals, join the last petal with a slip stitch to the first petal to form a full circle. This will secure your petals in place.
- Weave in the Ends: Cut the yarn, leaving a small tail, and use your tapestry needle to weave in the ends to secure them. You can trim any excess yarn for a neat finish.
- Add the Center (Optional): To give your Pretty Daisy an extra pop, you can attach a button, bead, or any small decorative element to the center of the flower. Simply stitch it securely in the middle of the flower and weave in any loose threads.
Now that you know how to make a Pretty Daisy, you can repeat this process as many times as needed for your project. Feel free to experiment with different yarn colors to create a variety of flowers!
3. Tips for Perfecting Your Pretty Daisies – Crochet Pattern
While making Pretty Daisies is a straightforward process, there are a few tips that can help you perfect your flowers and make your crochet project even more enjoyable:
- Choose the Right Yarn: As mentioned earlier, cotton yarn works best for Pretty Daisies because of its durability and crispness. However, you can also experiment with different yarn types, such as acrylic or wool, depending on the texture and feel you want for your flowers.
- Adjust Petal Size: If you prefer larger or smaller petals, you can adjust the number of chains you use for each petal. Experiment with different numbers of chains (such as chaining 5 or 6) to achieve different petal sizes.
- Make the Center Pop: To make the daisy’s center stand out, use contrasting colors or even add texture. For example, you could crochet the center in a bright yellow, orange, or even a deep red to make it more eye-catching.
- Vary the Petal Colors: While traditional daisies are often white with yellow centers, you can get creative with the colors of your petals. Try using shades of pink, purple, or even rainbow-colored petals for a fun twist on the classic daisy.
- Create Daisy Clusters: Once you have several Pretty Daisies, you can arrange them in clusters to create beautiful floral designs for blankets, scarves, or even wall hangings. You can attach the flowers by sewing them together or crocheting them directly into your project.
- Experiment with Other Flower Patterns: Once you master the Pretty Daisies, consider branching out and trying other flower patterns, such as roses, sunflowers, or tulips. All of these flowers can be used in similar ways to daisies and can add even more variety to your crochet projects.
With these tips in mind, you’ll be able to create a variety of Pretty Daisies that fit your style and needs.
4. Using Pretty Daisies in Your Crochet Projects
Once you’ve mastered the Pretty Daisies – Crochet Pattern, you’ll want to know how to incorporate them into different projects. The possibilities are endless! Here are a few ideas for using these beautiful flowers:
- Crochet Blankets: Add Pretty Daisies to your crochet blanket as appliques, scattered across the design. This will give your blanket a fresh, cheerful vibe, perfect for spring or summer.
- Scarves and Shawls: Embellish scarves and shawls with a few daisies sewn on the edges or scattered throughout the fabric. This can add a personal touch and elevate a simple garment into something special.
- Headbands and Hair Accessories: Attach Pretty Daisies to headbands, hair ties, or even brooches for a stylish and fun accessory. They’re especially perfect for adding a touch of spring or summer to any outfit.
- Home Décor: Use daisies to decorate pillows, table runners, or even wall hangings. They can brighten up your living space and bring a bit of nature indoors.
- Gift Tags and Cards: Add a crochet daisy to handmade gift tags or greeting cards for a unique touch. Your friends and family will love the thoughtfulness behind these personal touches.
- Jewelry: Make small, delicate daisy earrings or a daisy chain necklace. These crochet flowers are the perfect size for creating lightweight, floral-themed jewelry pieces.
The beauty of Pretty Daisies is that they can be used in nearly any crochet project, and their simplicity means they’re easy to incorporate into designs.
FAQ: Common Questions About Pretty Daisies – Crochet Pattern
1. Can I use different yarn weights for the daisy pattern? Yes! While worsted weight yarn is recommended, you can use lighter or heavier yarns for different effects. Just be sure to adjust your hook size accordingly.
2. How do I make the petals longer or shorter? To make the petals longer, increase the number of chains in each petal. For shorter petals, reduce the number of chains.
3. Can I make larger daisies? Absolutely! You can increase the number of stitches in the center and petals to make larger daisies. Experiment with different sizes to match your project’s needs.
4. How do I attach the daisies to my project? You can attach your daisies by sewing them with a needle and thread or crocheting them directly into your project.
5. What are some other ways to use crochet flowers? Crochet flowers can be used as embellishments for bags, hats, or shoes, as well as for scrapbooking or cardmaking projects.
6. Can I use the daisy pattern for other types of flowers? Yes! You can adapt the basic daisy pattern to create other flowers by changing the number of petals or modifying the shape of the petals.
Conclusion
The Pretty Daisies – Crochet Pattern is a delightful and versatile project that can add a touch of charm and cheer to any crochet creation. Whether you’re a beginner or an experienced crocheter, this pattern is easy to follow and offers endless possibilities for customization. From adding daisies to blankets and scarves to creating unique accessories and home décor items, the Pretty Daisies are a perfect way to brighten up your crochet projects. We’d love to hear about your experience with this pattern—please leave a comment with your feedback, and feel free to share any suggestions or ideas for future crochet projects!