The Rainbow Puff Hexagon is a delightful and vibrant design that adds a pop of color and texture to any crochet or knitting project.
This eye-catching pattern combines the classic hexagonal shape with a puff stitch, creating a dimensional effect that’s both fun to make and visually appealing.
Whether you’re a beginner or an experienced crafter, the Rainbow Puff Hexagon offers a wonderful way to bring color and creativity into your work.
In this article, we’ll dive deep into how to create this stunning pattern, explore its various applications, and offer tips for perfecting your technique.
Crochet and knitting are two of the most popular crafts where you can explore endless patterns and designs. The Rainbow Puff Hexagon combines the best of both worlds: it incorporates the geometric beauty of a hexagon with the texture of the puff stitch. As a versatile pattern, the Rainbow Puff Hexagon can be used for everything from blankets and pillows to shawls and wall hangings. This guide will help you get started on your crafting journey by breaking down the steps and providing expert advice on how to make the most of this design.
Before we jump into the specifics of the Rainbow Puff Hexagon, it’s important to note that this pattern is ideal for those looking to add depth and dimension to their projects. The puff stitch creates a raised effect, which gives the hexagon its unique appearance. Additionally, the rainbow color scheme allows you to play with vibrant hues, creating a design that is both lively and stunning. Now, let’s explore the materials you’ll need and the steps to create this beautiful design.
1. Materials Needed for the Rainbow Puff Hexagon
Before you can start creating your Rainbow Puff Hexagon, it’s essential to gather all the necessary materials. The right tools and supplies will make your crafting experience smoother and help ensure a high-quality result. Here are the key materials you’ll need.
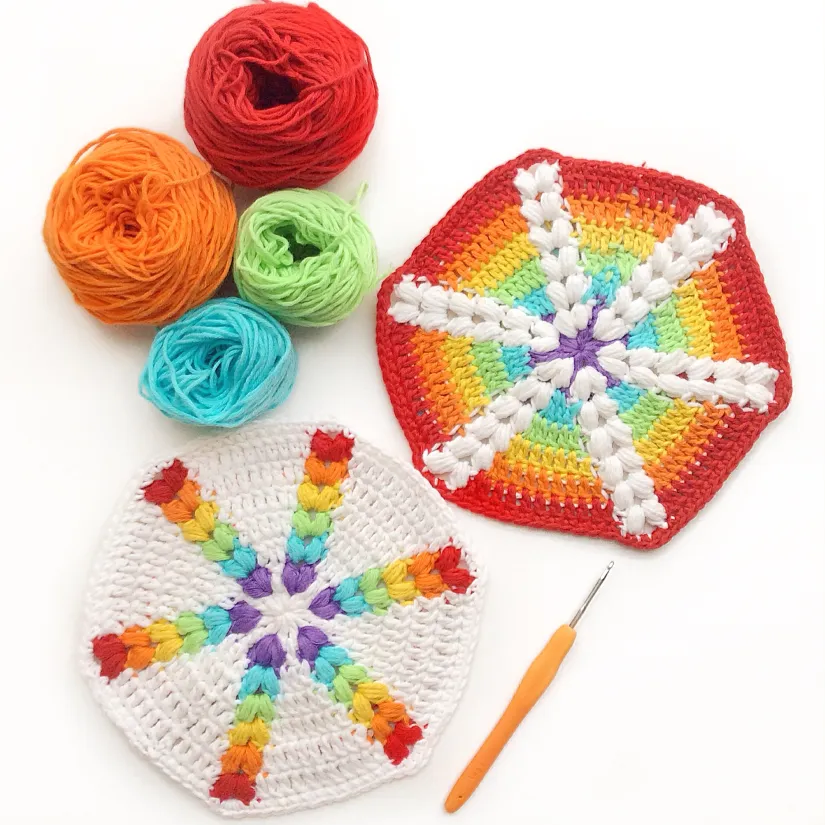
First, choose your yarn. For the Rainbow Puff Hexagon, you’ll want to select yarns in a variety of colors to create the rainbow effect. Worsted weight yarns are ideal because they’re easy to work with and provide enough texture to show off the puff stitch. Consider using a soft, durable yarn like acrylic or cotton, which will allow your hexagons to hold their shape and maintain vibrant colors.
Next, you’ll need a crochet hook that matches the yarn thickness. A size H (5mm) hook is typically a good choice for worsted weight yarn, but feel free to adjust according to your yarn’s weight and the look you want to achieve. The hook should be comfortable to hold for long periods of time, as you’ll be working with several stitches in each round.
To help with the assembly process, you’ll also need stitch markers. These will allow you to keep track of your rounds and prevent any confusion. Stitch markers are particularly useful when working with intricate designs like the Rainbow Puff Hexagon, as they help you follow the pattern without losing your place.
Lastly, you’ll need scissors to trim your yarn ends, and a yarn needle for weaving in the loose ends after you complete your hexagons. A yarn needle with a large eye is recommended for easy threading and finishing touches.
2. Step-by-Step Guide to Creating the Rainbow Puff Hexagon
Now that you have your materials ready, it’s time to start working on the Rainbow Puff Hexagon. This section will guide you through the process, breaking down each step for you to follow.
Start by creating a magic ring, which will serve as the foundation for your hexagon. This is done by looping your yarn around your fingers and pulling the working yarn through the loop to form a ring. Secure the ring with a slip stitch, leaving a small opening in the center.
Next, begin the first round of the hexagon by working puff stitches into the magic ring. A puff stitch is created by yarn over and pulling up a loop, repeating this step several times (usually three times) before pulling the loops together through the final loop. This stitch creates a puff or bobble effect, which gives the Rainbow Puff Hexagon its signature texture.
Once you’ve completed the first round, you’ll want to work into the chain spaces that were created by the puff stitches. Each side of the hexagon will have a series of chain spaces where you’ll place your puff stitches. As you continue working, be sure to place a puff stitch into each chain space, ensuring that the shape of the hexagon remains intact.
Continue with each round, gradually increasing the number of puff stitches to maintain the hexagonal shape. You’ll want to work in a consistent pattern, ensuring that each side of the hexagon has the same number of stitches. The magic of the Rainbow Puff Hexagon lies in the colors – feel free to experiment with different rainbow hues as you move through each round.
As you work through the rounds, remember to mark the beginning of each round with a stitch marker to keep track of your progress. Once you’ve reached your desired size for the hexagon, you can fasten off your yarn and weave in any loose ends with a yarn needle.
3. Tips for Perfecting Your Rainbow Puff Hexagon
Creating the perfect Rainbow Puff Hexagon requires some practice and patience, but there are a few tips and tricks that can help you improve your technique and achieve a polished result.
One of the most important things to focus on is maintaining consistent tension. If your tension is too tight, the puff stitches won’t puff up as expected, and the hexagon may become distorted. Conversely, if your tension is too loose, the stitches may appear sloppy. Aim for a medium tension that allows your puff stitches to have their desired dimension while still keeping the overall shape of the hexagon intact.
Another tip is to experiment with different color combinations for the rainbow effect. You don’t have to follow the traditional red, orange, yellow, green, blue, indigo, and violet pattern. Feel free to mix and match colors based on your personal preference or the theme of your project. The beauty of the Rainbow Puff Hexagon is that it offers endless possibilities for color coordination.
It’s also important to work with high-quality yarn. Cheap yarns may fray or lose their shape, which can affect the final look of your hexagons. Choose a yarn that is soft yet sturdy enough to hold its structure when worked into the puff stitch.
If you’re making a large project like a blanket, consider joining the hexagons together using a whip stitch or slip stitch method. This will help keep your seams neat and ensure that the hexagons stay securely connected. Another method for joining is the flat braid join, which creates a smooth and decorative seam between hexagons.
To add texture and depth to your design, try varying the sizes of your hexagons. You can create a mix of large and small hexagons to form an interesting pattern. This will also make your project more visually engaging and add variety to your finished piece.
Lastly, if you’re working with multiple hexagons, consider blocking them after they’re finished. Blocking helps the stitches and shapes settle into place, giving your Rainbow Puff Hexagon project a crisp, professional finish.
4. Creative Uses for the Rainbow Puff Hexagon
The Rainbow Puff Hexagon is an incredibly versatile pattern that can be used in a variety of ways. Whether you’re looking to make a cozy throw or an artistic wall hanging, the possibilities are endless.
One of the most popular uses for the Rainbow Puff Hexagon is creating blankets or afghans. By joining multiple hexagons together, you can design a colorful and textured blanket that’s perfect for snuggling up on chilly nights. Whether you go for a rainbow gradient or a more random assortment of colors, a Rainbow Puff Hexagon blanket will add warmth and charm to any room.
In addition to blankets, you can use the Rainbow Puff Hexagon to create decorative items like pillows or cushion covers. These can be made in a similar way to the blanket but with fewer hexagons for a more compact design. The dimensional puff stitches give these items a soft, squishy texture that’s perfect for home décor.
For those who love to crochet clothing items, the Rainbow Puff Hexagon can also be used to make shawls, scarves, or even dresses. By connecting multiple hexagons together in creative ways, you can craft a stunning and unique garment. The colorful design will certainly catch the eye and make your project a conversation piece.
If you’re into wall art or home décor, the Rainbow Puff Hexagon can be arranged in a beautiful tapestry or wall hanging. This allows you to showcase your work as a decorative piece that adds color and personality to your living space. You can even experiment with different shapes and layouts to create an abstract design.
Lastly, small projects like coasters, bags, or pouches can be made using individual Rainbow Puff Hexagons. These projects require just a few hexagons and can be completed quickly, making them perfect for a weekend crafting session. They also make thoughtful handmade gifts for friends and family.
FAQ: Frequently Asked Questions about the Rainbow Puff Hexagon
1. What is a Rainbow Puff Hexagon?
The Rainbow Puff Hexagon is a crochet or knitting pattern that features a hexagonal shape combined with puff stitches, creating a textured, dimensional effect. It is often worked in vibrant rainbow colors.
2. Can I use any type of yarn for the Rainbow Puff Hexagon?
While you can use different types of yarn, it’s best to choose a medium-weight yarn such as worsted weight. This allows the puff stitches to show up clearly and helps maintain the structure of the hexagon.
3. How do I join the hexagons together?
You can join Rainbow Puff Hexagons using various methods such as the whip stitch, slip stitch, or flat braid
join. Each method creates a different seam effect, so choose the one that best suits your project.
4. What are some creative uses for the Rainbow Puff Hexagon?
The Rainbow Puff Hexagon can be used for a variety of projects, including blankets, pillows, shawls, bags, and wall hangings. It’s a versatile pattern that can be adapted to suit any crafting need.
5. How do I maintain tension when working with puff stitches?
To achieve consistent puff stitches, aim for a medium tension. Too tight, and the puffs won’t form properly; too loose, and the hexagon may lose its shape. Practice is key to mastering tension.
6. Can I make a smaller version of the Rainbow Puff Hexagon?
Yes, you can create smaller hexagons by reducing the number of rounds or adjusting the stitch count. This is a great way to make accessories like coasters or small decorations.
Conclusion
In this article, we’ve explored the Rainbow Puff Hexagon, from gathering materials to perfecting your technique and applying it to various creative projects. This pattern allows you to add color and texture to your crochet or knitting creations, making it an exciting and fun design to incorporate into your crafting repertoire. Whether you’re making a blanket, pillow, or garment, the Rainbow Puff Hexagon offers endless possibilities for creative expression. Don’t forget to share your feedback and any suggestions you might have in the comments—we would love to hear about your crafting experiences!