Creating your own rectangular bag – crochet pattern is one of the most rewarding crochet projects you can take on—whether you’re a beginner or a seasoned crocheter. With its clean lines, practical shape, and customizable features, a rectangular crochet bag offers the perfect blend of function and fashion.
This type of bag is incredibly versatile. It can be styled as a tote, clutch, crossbody, or shoulder bag depending on the handles and straps you add. And since the rectangular bag – crochet pattern usually starts with simple shapes and stitches, it’s approachable for crocheters at all levels. It’s also a great stash-busting project if you have leftover yarn waiting to be used.
In this article, we’ll explore everything you need to know to create your own rectangular bag – crochet pattern, from choosing the right materials to finishing and styling. Whether you’re crocheting for yourself, creating gifts, or designing for your handmade shop, this project is a practical and stylish option.
1. Why Choose a Rectangular Bag – Crochet Pattern?
One of the top reasons to choose a rectangular bag – crochet pattern is its simplicity in construction. Unlike more complex shapes, a rectangle is straightforward to make and easy to scale up or down based on your size preference.
This shape also provides structure and stability. With a flat base and straight sides, your bag won’t slump or lose its shape easily, especially if you use the right yarn and stitches. It’s a great choice for carrying books, groceries, or daily essentials.
From a design perspective, rectangular bags offer a modern, minimalist aesthetic. You can keep it simple with neutral tones or elevate the look with color blocks, texture, or embellishments like tassels, buttons, or embroidery.
Another major benefit is versatility. A rectangular bag can be used as a clutch for an evening out, a tote for errands, or even a laptop sleeve. By adjusting the handle style or closure, you can make it match any function or fashion trend.
If you’re selling handmade goods, rectangular crochet bags are a bestseller. They’re practical, stylish, and appeal to a wide range of customers. Their simplicity also means you can produce them faster than more intricate projects, increasing your profit margin.
Lastly, these bags are ideal for learning new techniques. You can practice color changes, tapestry crochet, surface slip stitching, or even filet crochet in a single panel. The rectangular bag – crochet pattern is a great foundation for skill-building.
2. Materials and Tools for a Rectangular Crochet Bag
Before you dive into your rectangular bag – crochet pattern, it’s important to gather the right materials. Choosing quality tools and yarn ensures your final product is both beautiful and functional.
Start with yarn selection. Cotton or cotton-blend yarn is typically best for bags. It’s strong, holds its shape well, and is easy to clean. Acrylic yarn can work too, especially if you want vibrant colors, but it may stretch more over time.
Hook size matters! Most patterns use a hook between 3.5mm and 5.5mm depending on the yarn weight. A smaller hook creates a tighter stitch, which is ideal for bags that need to hold weight or keep items secure.
You’ll also want to use stitch markers, especially when working in the round or creating side panels. These help you maintain even stitch counts and ensure your sides line up perfectly when assembling the bag.
Handles are key. You can crochet your own straps, use leather handles for a polished look, or even add metal chains for a high-fashion touch. Just be sure to securely attach whatever you choose, especially if the bag will carry heavier items.
Closures help with security and style. Magnetic snaps, zippers, or button flaps all work well. Choose one that fits the bag’s intended use—zippers offer more security, while buttons or toggles are easier to install and style.
Optional extras include lining fabric, interfacing for structure, metal rings for attaching handles, and decorative touches like appliqués or tassels. Lining your bag will help it last longer and keep its shape better over time.
3. How to Follow the Rectangular Bag – Crochet Pattern
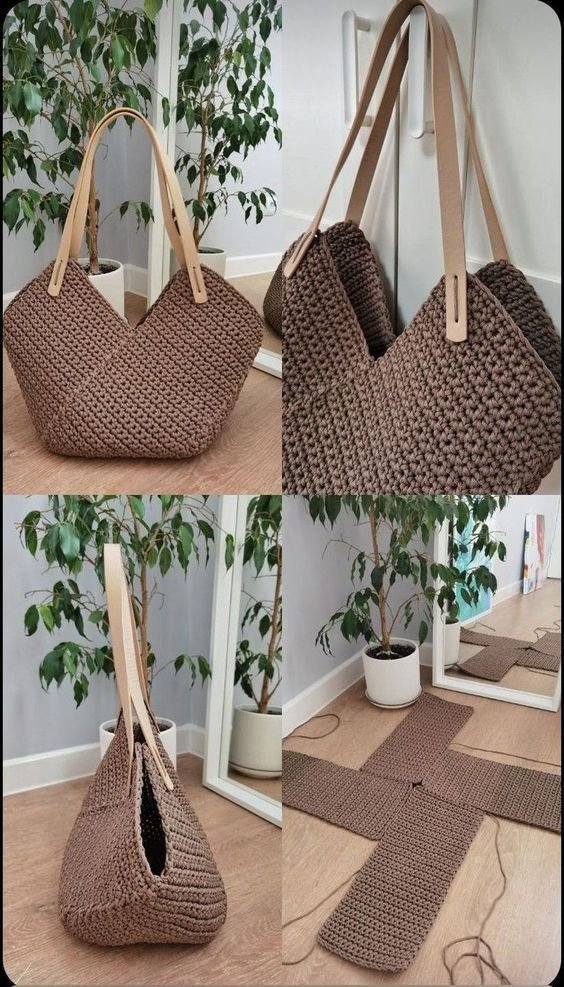
Most rectangular bag – crochet patterns begin with a flat rectangle—usually worked in rows. This will form the front and back panels of the bag. Depending on the size, this might be as few as 20 stitches wide or as many as 60.
Choose your stitch wisely. Single crochet creates a dense, solid fabric, while half-double or double crochet works up faster and offers a little flexibility. If you want added texture, try the lemon peel stitch, moss stitch, or the grit stitch.
After completing two panels, you’ll usually crochet a side strip or bottom panel. This is sewn or crocheted around the outer edges of the front and back panels to form the body of the bag. It helps the bag hold its shape and provides extra depth.
Joining the pieces can be done in a few ways. You can whip stitch them together, slip stitch through both panels, or use single crochet for a visible join. A contrasting color yarn can add a nice design touch if you want your seams to pop.
Once the body is assembled, it’s time to add handles or straps. These can be crocheted separately and sewn on or made directly as part of the bag’s construction. Reinforce the attachment points to prevent stretching or tearing during use.
Finally, attach your chosen closure and, if desired, add a lining. The lining helps prevent small items from falling through stitch gaps and keeps the bag looking neat. Now your rectangular bag – crochet pattern is complete and ready to use or gift!
4. Customizing and Styling Your Rectangular Crochet Bag
The beauty of the rectangular bag – crochet pattern is how easy it is to personalize. Whether you want a chic minimalist design or a colorful boho accessory, this pattern can be adapted to suit your style.
Start with color. You can use solid colors for a sleek look or incorporate stripes, ombré gradients, or color blocking for added interest. Self-striping yarn is also a fun and easy way to get a multi-color effect without extra work.
Incorporate texture by choosing stitches that create raised or patterned effects. Bobbles, cables, or popcorn stitches can turn a simple bag into a statement piece. You can even mix and match textures across the front and back panels.
Add embellishments like fringe, pom-poms, appliqués, or iron-on patches to give your bag extra flair. These additions are especially fun for bags designed for kids or festivals.
If you want a more polished or modern look, consider using metal hardware—like grommets, D-rings, or even a clasp closure. These touches make your bag feel more like something you’d find in a boutique.
Lining your bag with colorful or patterned fabric is a great way to personalize the inside as well. You can even add interior pockets for extra functionality—perfect for holding your phone, keys, or pens.
Lastly, don’t be afraid to experiment with size. A small rectangular bag makes a great clutch or makeup pouch, while a larger version can serve as a tote or laptop bag. The same base pattern can yield multiple bag types with just a few tweaks.
FAQ: Rectangular Bag – Crochet Pattern
Q1: Is a rectangular bag a good beginner project?
Yes! The basic shape and construction make it ideal for beginners. As long as you can crochet rows evenly and sew pieces together, you can make this bag.
Q2: What yarn works best for a crochet bag?
Cotton or cotton-blend yarn is recommended for structure and durability. Avoid overly soft or fluffy yarns, which can lose shape over time.
Q3: Do I need to line my crochet bag?
It’s optional, but lining adds structure and helps prevent small items from falling through gaps in the stitches. It also adds a clean, professional finish.
Q4: How long does it take to complete a rectangular crochet bag?
It depends on the size and complexity, but most bags can be completed in 6 to 12 hours. More detailed patterns may take longer.
Q5: Can I make this bag without a sewing machine?
Yes, you can hand-sew any fabric lining or components. The bag body itself is entirely crochet-based and doesn’t require a sewing machine.
Q6: Can I sell bags made from this pattern?
Absolutely—just make sure the pattern allows for commercial use if it’s not your original design. Always credit the designer when required.
Conclusion
The rectangular bag – crochet pattern is a fantastic project for anyone looking to combine style, function, and creativity. Its simple shape offers a perfect canvas for endless customization, making it a timeless and useful accessory.
In this guide, we explored why rectangular bags are a great choice, what materials and tools you’ll need, how to construct your bag step-by-step, and creative ways to style and personalize your finished piece. The FAQ section covered common concerns to help you move forward with confidence.
We’d love to hear from you! If this article helped you start your own rectangular bag – crochet pattern, please leave your honest opinion and suggestions below. Your feedback inspires better content and supports the crochet community. Happy stitching! 🧶👜