If you’re looking to add a soft, elegant, and textured edge to your crochet projects, then this Triple Puff Stitch Border Tutorial – Crochet pattern is just what you need. This decorative stitch gives a beautiful, three-dimensional effect that works wonderfully on baby blankets, scarves, shawls, dishcloths, or even larger afghans. Whether you’re a beginner looking for something new or a seasoned crocheter exploring edging techniques, this guide is tailored for you.
The triple puff stitch is not only visually stunning, but also adds a plush and luxurious feel to any finished item. It frames your crochet piece beautifully and gives it a professional look — as if it’s straight out of a boutique. What makes this stitch even better is how beginner-friendly it is once you understand the basics of puff stitch construction.
In this step-by-step Triple Puff Stitch Border Tutorial – Crochet pattern, we’ll explore how to create the stitch, what tools and yarns work best, how to apply it to different projects, and even how to adapt it creatively. With SEO-optimized tips, clear instructions, and helpful insights, you’ll be confident using this border to elevate your crochet work.
1. What Is the Triple Puff Stitch Border?
The triple puff stitch border is a decorative crochet edging that uses multiple yarn overs and loops pulled through the same stitch to create a raised, cushioned texture. Unlike a simple single crochet border, this stitch adds noticeable depth and dimension.
The key element in a Triple Puff Stitch Border Tutorial – Crochet pattern is repetition — each puff is made by pulling yarn through a stitch multiple times (usually three times) before pulling through all loops on the hook. This “triple” element gives the stitch its fullness and soft volume.
It’s especially popular for edging soft and delicate items like baby blankets or shawls, where you want a cozy and elegant finish. The stitch holds up well with both cotton and acrylic yarns, though lighter and fluffier yarns can give an even more cloud-like effect.
One of the benefits of using the triple puff stitch as a border is that it allows you to add a touch of flair without needing complex patterns or colorwork. It brings texture and movement while remaining neutral and versatile.
Additionally, the stitch can be used in both straight and rounded projects, making it adaptable for squares, circles, and irregular shapes alike. It’s also easy to combine with other stitches like scallops or shells for more elaborate designs.
The puff stitch is often confused with bobble or popcorn stitches, but it’s unique in that it remains softer and less bulky, while still adding that raised, puffed look. This makes it perfect for borders that you want to look plush but not too heavy.
2. Materials and Preparations
To begin your Triple Puff Stitch Border Tutorial – Crochet pattern, you’ll need a few simple materials. These are usually items most crocheters already have on hand, making this project accessible and low-cost.
Start with yarn that matches or complements your main project. The triple puff stitch works well with most yarn weights, but worsted weight or DK yarn tends to show the texture most effectively. Softer fibers like cotton, bamboo, or baby yarn are perfect for delicate projects.
Next, choose an appropriate hook size. It’s typically best to use the same size you used in your main project, or one size larger if you want a looser, fluffier puff. The key is maintaining consistency in your stitch tension.
You’ll also want a pair of sharp scissors and a yarn needle for weaving in your ends once your border is complete. Optional items like stitch markers can help keep track of corner stitches or even spacing.
Before starting the border, ensure that your project has a neat and even edge. You can add a round of single crochet first to level out any uneven parts. This foundation makes your triple puff stitches more uniform.
It’s helpful to make a small swatch before applying the border to your full project. Practice a few puff stitches to get used to the rhythm and to test your tension. This prevents puckering or tightness around your edge.
Lastly, refer back to your Triple Puff Stitch Border Tutorial – Crochet pattern to check spacing instructions. The key to a great border is even distribution of stitches, especially at the corners where turning needs to be smooth and symmetrical.
3. Step-by-Step Instructions
Now, let’s break down the actual Triple Puff Stitch Border Tutorial – Crochet pattern into simple, clear steps. Once you understand the structure, you’ll be able to repeat it easily and even adapt it for different projects.
Begin by joining your yarn to the edge of your project with a slip stitch. It’s often best to start at the corner if you’re working on a square or rectangular piece. Chain one or two, depending on your desired height.
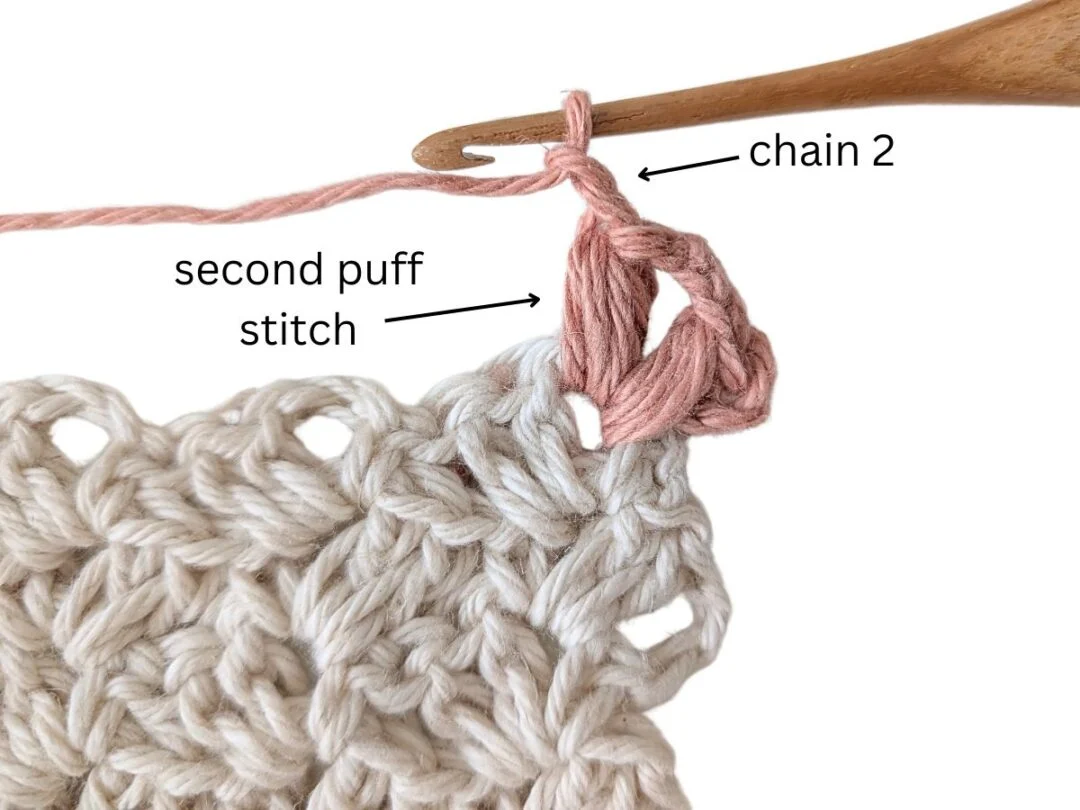
To make the triple puff stitch, yarn over, insert your hook into the stitch or space, yarn over and pull up a loop. Do this two more times, for a total of three yarn overs and three loops pulled through the same space. You should now have seven loops on your hook.
Yarn over again and pull through all seven loops. This completes one puff. Chain one to close and secure the puff. This chain helps separate the puffs and creates even spacing.
Continue making triple puff stitches around the edge of your project. If you’re working along straight sides, you may want to skip a stitch between each puff, depending on your pattern. At the corners, you can work 2 or 3 puffs into the same stitch to create a rounded turn.
Take your time as you move around the border. Make sure your stitches are consistent in height and spacing. Don’t pull too tightly — the puff needs room to expand and create that plush effect.
Finish by slip stitching into your starting stitch or chain. Fasten off and weave in the ends securely. Admire your beautifully puffed border — it’s sure to become a favorite technique in your crochet toolkit.
4. Styling Ideas and Customizations
The beauty of the Triple Puff Stitch Border Tutorial – Crochet pattern is its flexibility. You can adapt this border to suit a wide variety of projects, styles, and purposes with just a few creative changes.
For a baby blanket, use soft pastel colors and fine yarns to create a gentle, cloud-like trim. The triple puff stitch adds charm and comfort, making it ideal for newborn gifts.
If you’re working on dishcloths or hand towels, try using cotton yarn and making the puffs slightly tighter for a denser, more durable edge. It gives your everyday items a stylish upgrade while maintaining function.
For throws or afghans, you can play with color changes. Try alternating yarn colors every few puffs for a striped effect. You can even create a rainbow edge using variegated yarn for a whimsical look.
You can also combine the triple puff with other crochet border stitches. Add a row of shell stitch before the puff for a double-layered effect, or finish with picots for extra detail.
The stitch isn’t limited to borders either. Some crocheters use it within blocks or granny squares to create raised, tactile surfaces. It works great in sensory blankets or decorative panels.
Finally, don’t forget to block your project after finishing the border. This helps the puffs lie evenly and showcases their texture, especially if you’re entering your piece in a craft fair or displaying it as a handmade gift.
FAQ – Triple Puff Stitch Border Tutorial – Crochet Pattern
Q1: Is the triple puff stitch suitable for beginners?
Yes, it is beginner-friendly once you understand how to yarn over and pull loops through. It may take a few tries to get comfortable, but it’s a simple and rewarding stitch.
Q2: What type of yarn works best for this border?
Soft yarns like cotton, acrylic, and bamboo work well. Choose DK or worsted weight for defined puffs, though you can use lighter yarn for delicate pieces.
Q3: Do I need a foundation round before starting the puff stitch border?
It’s recommended to work a round of single crochet first, especially if your edges are uneven. This provides a clean base for even puff placement.
Q4: How many loops should I pull for a triple puff stitch?
You yarn over and pull through the stitch three times, ending with seven loops on the hook before completing the puff.
Q5: Can I add the triple puff stitch to circular projects?
Yes! It works beautifully around circular motifs. Just ensure you increase evenly to prevent puckering or curling at the edges.
Q6: Will blocking change the look of the puff stitches?
Blocking helps set the shape of your border without flattening the puffs too much. Light steam or wet blocking works well with most fibers.
Conclusion
The Triple Puff Stitch Border Tutorial – Crochet pattern opens up a world of texture, beauty, and customization for your crochet projects. Whether you’re edging a baby blanket, enhancing a dishcloth, or finishing a large afghan, this stitch provides an elegant and plush border that elevates the entire piece.
You’ve learned what materials to use, how to execute the stitch step-by-step, ways to adapt it creatively, and even how to care for and finish your project properly. Now it’s your turn to grab your hook and bring your borders to life with soft, eye-catching puff stitches.
**We’d love
to hear your thoughts!** Have you tried the triple puff stitch before? Leave a sincere opinion or suggestion in the comments. Your feedback helps us create even better crochet content for makers like you. Happy crocheting!