If you’re searching for a fun and spooky project, look no further than the Zombie Hat – Pattern. Whether you’re preparing for Halloween, a costume party, or simply want to express your love for the creepy and creative, this pattern is perfect for crafters who enjoy unique handmade items.
The beauty of the Zombie Hat – Pattern lies in its versatility—it can be scary, cute, humorous, or downright terrifying depending on how you customize it. With some basic materials and a little creativity, you can bring the undead to life right on your head. It’s also a great conversation starter, a hit with kids and adults alike, and even works as a quirky gift.
In this guide, we’ll explore how to make your own zombie hat, what tools and yarn you’ll need, creative ways to customize it, and tips to help it fit perfectly. Let’s dive into the undead world of yarn and horror to bring your creepy creation to life.
1. Getting Started with the Zombie Hat – Pattern
Before you begin stitching brains and fake blood into your project, it’s important to understand the basics of the Zombie Hat – Pattern. This pattern can range from beginner-friendly to more advanced depending on how detailed you want to make it.
At its core, the zombie hat starts like any beanie-style hat, usually crocheted or knitted in the round. Most designs use a medium-weight yarn (like worsted) and a hook or needle size that matches the yarn label. It’s best to start with neutral or grayish tones for the base, mimicking zombie skin tones.
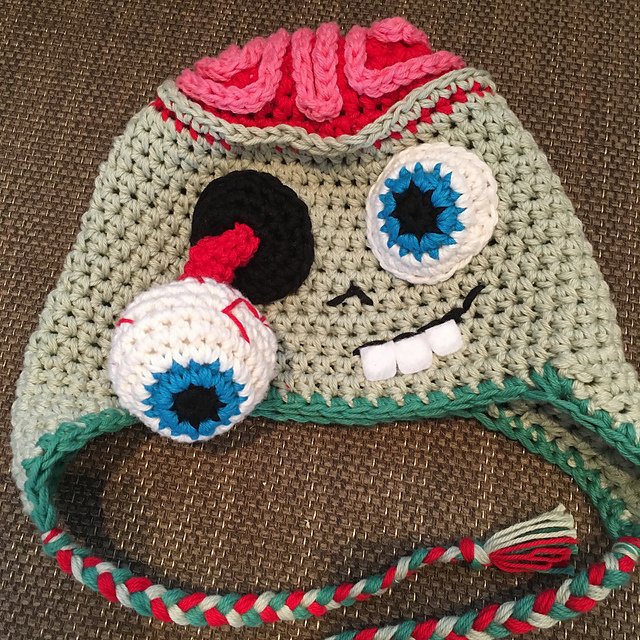
Adding features like eyes, scars, brains, and stitches is where the fun begins. These are often created separately and then sewn onto the hat. You can use different textures of yarn, felt, or even buttons to build these gruesome details.
The Zombie Hat – Pattern often includes safety eyes or googly eyes to bring your character to life. Alternatively, you can embroider the eyes or use crochet to make bulging, bloodshot or cartoony eyes.
Some patterns include brain-like textures made using puff stitches or bobble stitches, usually in pink yarn. Fake blood details can be made using red yarn and loose chains or embroidery techniques to simulate dripping.
Reading the pattern carefully is important, especially if you’re working from a written or charted guide. Be sure to keep your gauge consistent so the hat fits properly when finished. A snug but comfortable fit will keep your zombie head cozy and terrifying.
2. Materials and Tools You’ll Need
To successfully follow a Zombie Hat – Pattern, you’ll need a set of basic tools, along with a few optional items that can take your project to the next level.
First, choose the right yarn. Most zombie hats are made with worsted weight yarn, as it provides enough structure and warmth. Choose grays, greens, browns, and blacks for the base, and reds, pinks, and whites for details like wounds and brains.
You’ll need a crochet hook or knitting needles in the size recommended on the yarn label, usually between 4.5 mm and 5.5 mm for worsted yarn. Make sure your hook or needles are comfortable to use for extended periods.
Scissors and a yarn needle are essential. You’ll use the scissors to trim yarn ends, and the needle to sew on details like eyes, scars, and appliqué brains. A stitch marker is also handy to keep track of your rounds.
Optional materials include safety eyes, felt sheets for extra detailing, and stuffing if you want to make parts like the eyes or brains more 3D. Some crafters also like to use a hot glue gun for securing decorative elements.
If you’re making the hat for a child or someone with sensitive skin, be sure to choose a soft, washable yarn. Cotton blends or acrylic yarns are usually good options.
Finally, having a good workspace with good lighting will make your crafting process more enjoyable and less stressful—especially when dealing with small details and dark yarns.
3. Customizing Your Zombie Hat
One of the best parts about working with a Zombie Hat – Pattern is the ability to get creative and add your personal style. Customization allows you to make your zombie hat truly one-of-a-kind.
Start by deciding on the level of gore or cuteness you want. A spooky hat can have exposed brains and dripping blood, while a silly version might have a cartoonish face or exaggerated features.
Eyes are a focal point. Consider using one large eye and one small eye to give your zombie an asymmetrical, unsettling look. Try layering felt circles or crocheting mini eyeballs for an eerie effect.
Add scars, stitches, or bite marks using a contrasting yarn color. Embroidering X-shaped stitches across the hat can create the illusion of sutures. These details are easy to add and can dramatically change the look.
For the brain effect, use puff stitches or bobble stitches to create a raised, textured area. You can place this on top or to the side of the hat to mimic a zombie’s exposed brain. Use pink or light red yarn for the most realistic result.
Another fun option is to add fringe or dangling pieces to mimic torn skin or hanging tissue. You can crochet these in random lengths and attach them around the edges or under decorative holes.
If you’re gifting or selling the hat, consider adding a humorous or themed tag, such as “Eat brains, not yarn!” This extra touch makes your zombie hat even more memorable.
4. Tips for Sizing and Fitting
No matter how cool your design is, if the hat doesn’t fit well, it won’t be comfortable or wearable. When working with a Zombie Hat – Pattern, it’s important to ensure it fits your head or the intended wearer.
Always check the pattern’s gauge before you start. Gauge refers to how many stitches and rows you get in a 4-inch square. Matching the gauge ensures your hat turns out the right size.
Measure the head circumference of the wearer before choosing a pattern size. Most adult heads are around 21–23 inches, while children’s sizes vary depending on age.
If you’re unsure, go slightly larger rather than smaller. You can always add elastic or ribbing for a snugger fit, but a hat that’s too small can be uncomfortable.
Use stretchier stitches like half-double crochet or double crochet for more flexibility. Ribbing made with front-post and back-post stitches can also help your hat stretch to fit.
Make sure to try the hat on during the making process, especially if you’re unsure about size. If it feels tight or loose, you can adjust before adding detailed embellishments.
Finally, always finish your hat by weaving in ends securely and blocking if needed. This helps the hat maintain its shape and makes it more durable for wear and washing.
FAQ – Frequently Asked Questions about Zombie Hat – Pattern
Q1: Can beginners make a zombie hat?
Yes! Many Zombie Hat – Pattern designs are beginner-friendly. Start with a basic beanie pattern and add simple decorations like felt eyes or yarn stitches.
Q2: What type of yarn is best for zombie hats?
Worsted weight acrylic yarn is ideal. It’s affordable, washable, and comes in many colors suitable for zombie-themed designs.
Q3: How long does it take to complete a zombie hat?
It depends on the complexity of the design. A simple version might take 2–4 hours, while a more detailed one could take a full day.
Q4: Are there free zombie hat patterns online?
Yes, several crafting websites and YouTube channels offer free Zombie Hat – Pattern tutorials. Always check the skill level and materials required.
Q5: Can I sell hats made from these patterns?
If the pattern allows for commercial use, yes. Always read the pattern’s terms and give credit to the designer if requested.
Q6: How do I wash a zombie hat with decorations?
Hand wash in cold water and air dry. Be gentle with areas that have sewn-on details like eyes or brains. Use washable yarns to make care easier.
Conclusion
The Zombie Hat – Pattern is the perfect mix of creativity, craft, and creepy fun. Whether you’re a beginner or an experienced yarn artist, this project allows you to explore textures, colors, and storytelling through crochet or knitting. From basic beanie shapes to advanced 3D designs with brains and eyes, there’s no limit to what you can create.
We’ve walked through everything you need—from materials and construction to sizing and customization. Now it’s your turn to grab your yarn and hooks and bring your zombie creation to life.
If you enjoyed this article or have ideas for future patterns or topics, leave your honest opinion and suggestions below. Your feedback helps us create better content for fellow crafters around the world. Happy haunting!