If you’re looking for a beautifully textured stitch that adds elegance and softness to any crochet project, the Crochet Shell Stitch – Pattern and – Pattern is a must-know technique.
This timeless stitch creates a lacy, scalloped effect that’s perfect for blankets, scarves, shawls, and more.
Whether you’re a beginner aiming to expand your skills or an experienced crocheter in search of decorative stitches, shell stitch brings charm and versatility to your work.
The Crochet Shell Stitch – Pattern and – Pattern involves working multiple stitches into a single space, creating a “shell” or fan shape. With countless variations—open shells, solid shells, v-stitch shells—you can adapt this stitch to suit any style or project. The rhythm of repeating shells also makes it a soothing and meditative stitch once you get the hang of it.
In this guide, you’ll learn how to crochet the classic shell stitch step by step, discover helpful variations, explore project ideas, and troubleshoot common mistakes. Whether you want to add texture to a border or create an entire piece using this stitch, the Crochet Shell Stitch – Pattern and – Pattern will open new creative doors in your crochet journey.
1. Getting Started with the Shell Stitch
Before diving into the Crochet Shell Stitch – Pattern and – Pattern, it’s important to prepare the right materials and understand the stitch mechanics. The good news is that this stitch doesn’t require any special tools—just a hook, yarn, and a little practice.
Begin with medium-weight yarn and a recommended crochet hook size, usually 4.0 mm to 5.5 mm. Smooth, light-colored yarns help you see your stitches clearly, making it easier to count and maintain consistency.
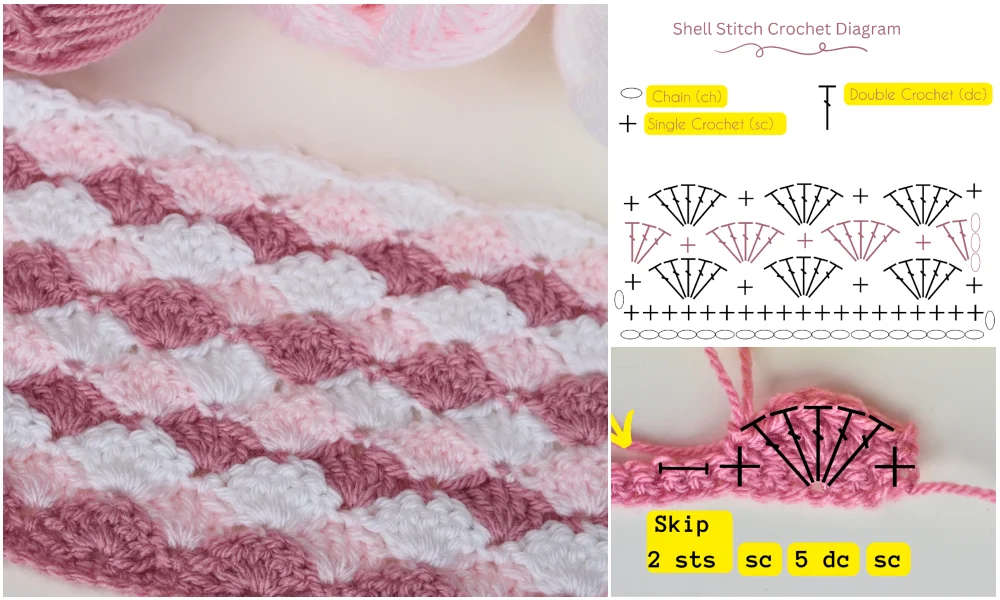
To create a shell, you typically work five double crochets into one stitch. This fan-shaped group of stitches expands outward, creating a scalloped look. Most patterns alternate shells with single crochets or skipped stitches to maintain spacing.
Your foundation chain should be a multiple of the stitch repeat (often a multiple of 6, plus 1 for turning). This allows for even shell placement across each row or round. Always double-check your pattern’s stitch multiple before starting.
Use stitch markers if needed to keep track of shell placement. This is especially helpful for larger projects like shawls or afghans, where a missed shell can disrupt the entire pattern.
Practice a few rows of shells on a swatch before starting your actual project. This will help you get used to the flow and adjust your tension accordingly. Shell stitch tends to stretch a little, so aim for a light but steady hand.
2. Step-by-Step: How to Crochet the Classic Shell Stitch
Now let’s walk through a basic version of the Crochet Shell Stitch – Pattern and – Pattern. Once you understand the mechanics, you can easily adapt it to fit different patterns or design your own.
Start with a foundation chain in a multiple of 6 + 1. For a small swatch, chain 25. This gives you four shells across with an extra stitch for turning.
In Row 1, skip the first two chains and work 1 single crochet into the third chain from the hook. Skip two chains, work 5 double crochets into the next chain (this forms your first shell), skip two chains, single crochet into the next. Repeat from * to the end.
Row 2 typically starts with chaining 3 (counts as your first double crochet), then working shells over the previous row’s single crochets and single crochets over the previous shells. This alternating structure is key to the stitch’s elegant, wavy look.
Always make sure you’re aligning your shells and singles properly. The shell should go into a single crochet from the row below, and vice versa. This alternating base gives the stitch structure and helps maintain the spacing.
Continue repeating Row 2 for your desired length. You’ll start to see the wavy, textured pattern emerge after just a few rows. It’s satisfying and quite pretty, even for practice pieces.
Don’t forget to count your shells and check spacing every few rows. A missed stitch or extra shell can throw off the entire rhythm. It’s easier to fix errors early before they multiply.
3. Variations and Creative Uses of Shell Stitch
The beauty of the Crochet Shell Stitch – Pattern and – Pattern is its adaptability. Once you’ve mastered the basics, you can start playing with different versions and incorporating it into a range of projects.
One popular variation is the open shell stitch, where you replace double crochets with chains or use fewer stitches per shell. This creates a lacy, airy texture ideal for lightweight wraps or baby blankets.
You can also try the solid shell stitch, where there are no skipped stitches between shells. This forms a denser, more connected fabric, perfect for cozy throws or winter scarves.
Using color changes within the rows is another creative twist. Alternate colors with each shell or row to create stripes, gradients, or even floral effects. Self-striping yarns work beautifully here and save time on switching colors manually.
For edgings or borders, shell stitches make an elegant finish. Work a row of shells along the edge of a blanket, sweater, or table runner for a soft, decorative touch that frames the project.
Shell stitch is also great for round projects, like coasters, doilies, or even bags. Simply adapt the shell spacing as you increase your rounds, ensuring the curve remains smooth and even.
And don’t be afraid to combine shell stitch with other stitches—such as granny stitch or v-stitch—for visually dynamic pieces. The Crochet Shell Stitch – Pattern and – Pattern blends well with other motifs due to its clean structure.
4. Common Mistakes and How to Avoid Them
Even though the Crochet Shell Stitch – Pattern and – Pattern is relatively simple, there are a few pitfalls to watch out for. Understanding them can save you time, frustration, and frogging (undoing rows).
One common issue is losing count of your stitch placements. If your shell lands in the wrong stitch or the spacing is off, the entire pattern can shift. Use markers or highlight your pattern to stay on track.
Another mistake is inconsistent tension, which can cause your shells to look uneven or your project to ripple. Practice keeping your hand steady and relaxed, and block your finished piece to smooth out minor tension issues.
Skipping turning chains at the beginning of rows can affect the shape of your edges. Always follow the pattern’s instruction for turning, usually a chain 3 or chain 1, depending on the stitch you start with.
Using incompatible yarn can also be a problem. Yarns that are too fuzzy or textured can hide the shell design. Smooth, medium-weight yarns typically show the stitch definition best.
Don’t forget to check the stitch multiple before starting. Miscounting the foundation chain leads to awkward leftover stitches at the end of the row. Take the time to plan it out first.
Lastly, avoid being overly critical. The shell stitch has a soft, organic shape, so minor imperfections are often invisible in the finished piece. Embrace the handmade look—it’s what makes your work special.
FAQ – Crochet Shell Stitch – Pattern and – Pattern
Q1: Is the shell stitch good for beginners?
Yes! The Crochet Shell Stitch – Pattern and – Pattern is an excellent stitch for beginners who know the basics of single and double crochet. It’s repetitive and easy to memorize after a few rows.
Q2: What’s the difference between shell stitch and fan stitch?
They’re very similar—both involve placing multiple stitches into one spot—but shell stitch usually uses double crochets and is often more compact, while fan stitch can be larger and more open.
Q3: Can I use shell stitch in a round pattern?
Absolutely. Shell stitch works beautifully in round motifs like doilies, rugs, or circular shawls. You just need to adjust increases to keep the piece flat.
Q4: How do I prevent curling edges when using shell stitch?
Make sure to use the correct foundation chain multiple, maintain even tension, and block the finished piece. Curling is usually caused by tight stitches or missed turning chains.
Q5: What types of yarn are best for this stitch?
Medium-weight cotton or acrylic yarns work best, especially if you want the shells to be clearly visible. Avoid overly textured or bulky yarns for detailed work.
Q6: Can shell stitch be used for garments?
Yes! It’s commonly used for lacy cardigans, baby dresses, and shawls. Just make sure to swatch first and measure gauge if following a sizing pattern.
Conclusion
The Crochet Shell Stitch – Pattern and – Pattern is a beautiful, adaptable technique that every crocheter should learn. Whether you’re adding texture to a scarf, edging a blanket, or creating an entire project with shells, this stitch adds elegance and structure. With the step-by-step instructions, variations, and tips in this guide, you’re well on your way to mastering one of crochet’s most timeless stitches.
We’d love to hear from you! Please share your honest opinion in the comments below, and let us know if you have suggestions for other stitch tutorials or creative projects.
Your feedback helps the crochet community grow and flourish—just like the shells in your next masterpiece.
