
Boxy Pouch Pattern is one of the most practical and rewarding sewing projects for beginners and experienced crafters alike. This timeless Boxy Pouch Pattern combines functionality, durability, and style, making it perfect for organizing cosmetics, sewing supplies, travel essentials, stationery, or everyday accessories. With just a few fabric pieces, a zipper, interfacing, and basic sewing techniques, you can create a professional-looking pouch that is both attractive and highly useful.
One of the reasons the Boxy Pouch Pattern has become so popular is its simple geometric construction. Unlike many complicated bags that require numerous pattern pieces, this project uses a single main rectangle combined with boxed corners that instantly create volume. The finished pouch stands upright, opens wide, and offers generous storage space while maintaining a compact footprint. This makes it an ideal gift for family members, friends, or even as a handmade product for craft fairs.
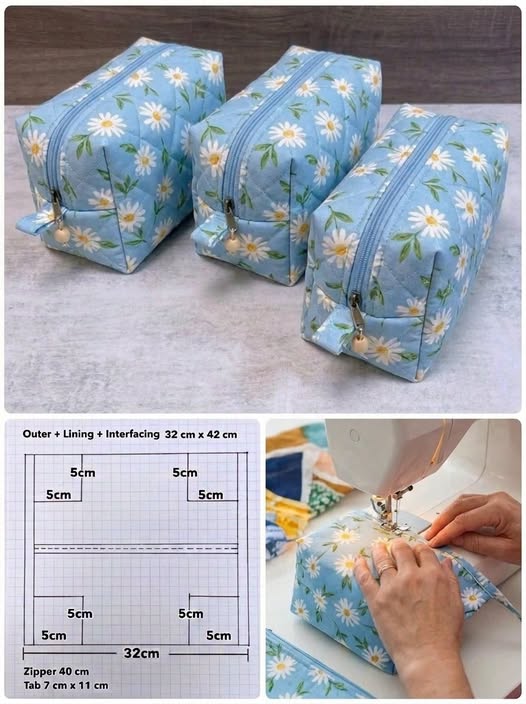
Whether you are learning to sew or looking for a relaxing weekend project, this Boxy Pouch Pattern is an excellent choice. The project shown features a beautiful floral cotton fabric paired with a matching zipper, quilted texture, and neatly boxed corners. Throughout this tutorial, you will learn every step required to recreate a similar pouch while improving your sewing skills and building confidence with zipper installation, interfacing, quilting, and professional finishing techniques.
Materials and Preparing Your Boxy Pouch Pattern
Before beginning your Boxy Pouch Pattern, gather all the necessary supplies. Choosing quality materials will make sewing easier and improve the final appearance of your pouch.
For the exterior, select a medium-weight quilting cotton. Floral prints, modern geometric fabrics, solid colors, or seasonal prints all work beautifully. Cotton is easy to sew and provides excellent structure when paired with interfacing.
Prepare one matching lining fabric. Using a contrasting print can create a beautiful surprise every time the pouch is opened, while matching fabrics provide a clean, elegant appearance.
Use fusible interfacing to strengthen both the exterior and lining pieces. Medium-weight interfacing provides enough stability while keeping the pouch soft enough to fold and shape during construction.
The sample project uses one rectangle measuring approximately 32 cm × 42 cm for both the outer fabric and lining. A 40 cm zipper fits perfectly across the center opening, creating a wide opening for easy access.
The boxed corners are created by marking and cutting 5 cm squares from each corner. These cut-outs transform the flat fabric into a spacious three-dimensional pouch after sewing.
Additional tools include fabric scissors, rotary cutter, quilting ruler, sewing clips or pins, matching thread, fabric marker, iron, ironing board, zipper foot, and a sewing machine capable of straight stitching.
Cutting, Quilting, and Constructing the Main Body
Begin by cutting one exterior rectangle measuring 32 cm × 42 cm. Cut an identical rectangle for the lining and one piece of interfacing the same size.
Fuse the interfacing to the wrong side of the exterior fabric according to the manufacturer’s instructions. Press carefully with steam to achieve a smooth finish without bubbles or wrinkles.
If you prefer a quilted appearance like the sample, layer the exterior fabric, batting, and interfacing before quilting. Stitch evenly spaced diagonal or straight quilting lines across the entire rectangle to create texture and improve durability.
Measure and mark 5 cm squares on each of the four corners. These squares will later become the boxed corners that give the pouch its signature shape.
Cut away each marked square accurately. Precise measurements ensure symmetrical corners and a balanced finished pouch.
Fold the rectangle in half to visualize how the pouch will come together. At this stage, everything should align neatly, with the zipper placement centered between the upper edges.
Installing the Zipper and Sewing the Boxed Corners
Open the zipper completely before sewing. Position the zipper right side down along one long edge of the exterior fabric.
Place the lining fabric on top, right side facing the exterior, sandwiching the zipper between both layers. Secure everything with clips before stitching.
Using a zipper foot, sew slowly along the zipper tape with a consistent seam allowance. Repeat the same process on the opposite side, attaching the remaining zipper tape to the opposite fabric edges.
After sewing both zipper seams, press the fabric away from the zipper. Topstitch close to each zipper edge to create a professional appearance while preventing the lining from catching in the zipper.
Fold the project so that exterior fabrics face each other and lining fabrics face each other. Match all seams carefully and pin around the edges, leaving a turning opening in the lining.
Sew around the entire perimeter. Next, create each boxed corner by matching the side seam with the bottom fold, forming a straight line. Stitch across every corner opening, then trim excess seam allowances if necessary.
Finishing Techniques and Creative Customization Ideas
Turn the pouch right side out through the opening left in the lining. Carefully push out each corner using a blunt turning tool to achieve crisp edges without damaging the fabric.
Hand stitch or machine stitch the lining opening closed. Push the lining inside the pouch and gently press the finished project with an iron to remove wrinkles.
Add decorative zipper pulls, tassels, charms, fabric tabs, or handmade labels to personalize your Boxy Pouch Pattern. Small details often make handmade projects look professionally finished.
Experiment with different fabric combinations throughout the year. Floral cotton works beautifully for spring, gingham creates a farmhouse look, linen offers timeless elegance, while holiday fabrics transform the pouch into seasonal gifts.
The size can easily be adjusted by increasing or decreasing the original rectangle while maintaining the same construction method. Larger versions become travel organizers, while smaller versions are perfect for makeup, jewelry, cables, coins, or sewing notions.
Once you’ve mastered the basic Boxy Pouch Pattern, consider adding interior pockets, waterproof lining, divided compartments, vinyl windows, embroidered names, or decorative quilting designs. Each variation helps develop new sewing techniques while creating practical accessories for everyday life.
FAQ
What is a Boxy Pouch Pattern?
A Boxy Pouch Pattern is a sewing pattern that creates a three-dimensional zippered pouch using boxed corners. The finished pouch stands upright and provides generous storage space.
Is this project suitable for beginners?
Yes. This project is beginner-friendly because it uses straight seams, simple measurements, and basic zipper installation techniques while introducing useful sewing skills.
What fabric works best?
Quilting cotton is one of the best choices because it is easy to sew, durable, and available in countless colors and prints. Linen blends, canvas, and lightweight home décor fabrics also work well.
Why is interfacing important?
Interfacing adds structure, improves durability, prevents sagging, and helps the pouch maintain its shape after repeated use.
Can I change the pouch size?
Absolutely. You can enlarge or reduce the rectangle dimensions while keeping the same construction process. Simply adjust the zipper length accordingly.
Do I need quilting?
No. Quilting is optional. It adds texture, strength, and a professional appearance, but the pouch can also be made using only interfacing.
What zipper should I use?
A nylon coil zipper is highly recommended because it is flexible, easy to sew over, and available in many colors.
Can I wash the finished pouch?
Yes. Most cotton versions can be machine washed on a gentle cycle and air dried. Always prewash your fabrics before sewing to minimize shrinkage.
What can I store inside?
The pouch is perfect for cosmetics, toiletries, sewing supplies, crochet hooks, knitting accessories, chargers, cables, pencils, travel essentials, medications, jewelry, and countless everyday items.
How can I make the pouch look more professional?
Use accurate measurements, press every seam carefully, sew slowly around the zipper, topstitch neatly, trim seam allowances evenly, and finish with decorative zipper pulls or personalized labels.
Conclusion
This Boxy Pouch Pattern demonstrates how a simple rectangle of fabric can be transformed into an elegant and practical organizer using straightforward sewing techniques. Throughout this tutorial, you learned how to choose the right materials, prepare and quilt the fabric, cut the boxed corners, install a zipper with confidence, assemble the pouch, and finish it with clean professional details. You also discovered several customization ideas that allow you to adapt the project for gifts, travel, home organization, or everyday use while expressing your own creative style.
With patience, careful measuring, and consistent pressing, this Boxy Pouch Pattern can become one of your favorite sewing projects to make again and again. Every completed pouch helps improve your sewing accuracy, zipper installation skills, and confidence while producing a beautiful handmade accessory that is both functional and stylish.