
Car Trash Bag Sewing Pattern is one of the most practical sewing projects for anyone who wants to keep their vehicle clean while adding a handmade touch to the interior. Whether you are a beginner looking for a functional project or an experienced sewist searching for a quick and satisfying make, this Car Trash Bag Sewing Pattern is an excellent choice. With a few pieces of fabric, basic sewing supplies, and a little creativity, you can create a durable hanging trash bag that is both attractive and easy to use.
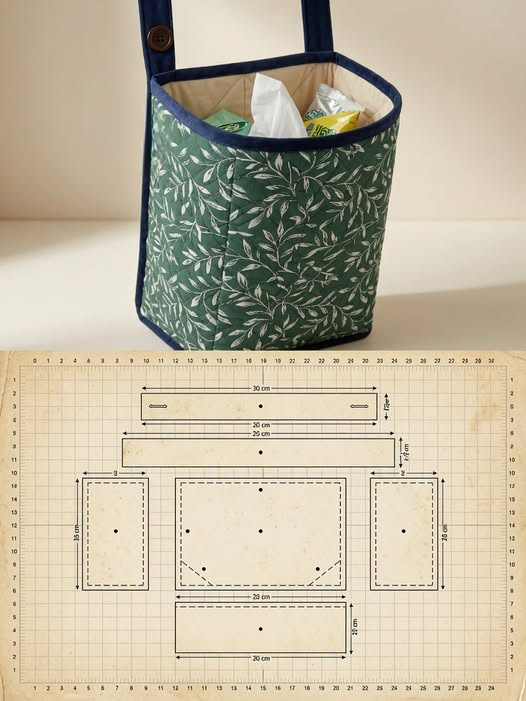
A handmade Car Trash Bag Sewing Pattern combines organization, sustainability, and style in one project. Instead of relying on disposable plastic bags or leaving trash scattered throughout the car, this fabric organizer provides a reusable solution that looks much more elegant. The design shown in the project features quilted fabric, boxed corners for extra capacity, a sturdy hanging strap with a button closure, and a lined interior that helps the bag keep its shape while making it easier to clean.
One of the best aspects of this Car Trash Bag Sewing Pattern is its versatility. You can customize the size, fabric prints, colors, and finishing details to perfectly match your vehicle or personal style. Floral cotton prints, neutral linen fabrics, modern geometric designs, or seasonal themes all work beautifully. Since this project uses relatively small fabric pieces, it is also an excellent way to use leftover quilting cotton from previous sewing projects while reducing fabric waste.
Materials and Preparing the Pattern
Before cutting any fabric, gather all the necessary supplies to make the sewing process smooth and enjoyable.
For this project you will need quilting cotton for the exterior, coordinating cotton for the lining, lightweight fusible interfacing, cotton batting for structure, matching thread, sewing clips or pins, scissors or rotary cutter, quilting ruler, measuring tape, fabric marking pen, ironing board, and a sewing machine.
Based on the pattern shown in the image, prepare the following fabric pieces. Cut one front panel measuring approximately 9 x 7.5 inches (23 x 19 cm), one back panel of the same size, two side panels measuring approximately 5 x 7.5 inches (13 x 19 cm), one bottom panel measuring approximately 9 x 3 inches (23 x 8 cm), and one hanging strap measuring approximately 12 x 1.75 inches (30 x 4.5 cm). These measurements may be adjusted depending on your preferred finished size.
Fuse lightweight interfacing to all exterior fabric pieces. This additional layer improves durability and helps the finished trash bag maintain its shape over time.
Cut batting pieces matching each exterior panel. The batting creates a soft quilted appearance while adding stability to the finished project.
Choose a lining fabric that coordinates with the exterior. Light-colored linings make it easier to see the contents inside the bag, while darker fabrics hide stains more effectively.
Press every fabric piece carefully before sewing. Accurate pressing ensures clean seams, precise measurements, and professional-looking results throughout the project.
Sewing the Exterior Panels
Start by placing each exterior fabric piece on top of its corresponding batting layer. Quilt each panel using straight lines, diagonal stitching, or a simple grid design according to your personal preference.
Trim the quilted panels if necessary to restore the original measurements after quilting.
Position the side panels with the front panel, right sides together. Sew using a ¼-inch seam allowance, creating a neat rectangular body.
Attach the remaining side panel to the opposite edge, followed by sewing the back panel in place. Press every seam open or toward one side to reduce bulk.
Next, attach the bottom panel to complete the body of the bag. Sew slowly around each corner, ensuring that every edge aligns evenly.
To create the boxed corners shown in the pattern, fold each lower corner so the side seam aligns with the bottom seam. Measure approximately 1 inch (2.5 cm) across the corner, sew a straight line, and trim away the excess fabric. Repeat for every corner. This technique gives the Car Trash Bag Sewing Pattern its roomy three-dimensional shape.
Creating the Lining and Hanging Strap
Assemble the lining pieces using exactly the same sequence as the exterior. Unlike the exterior, there is usually no need to quilt the lining unless extra stability is desired.
Leave a small opening of approximately 4 inches (10 cm) along one bottom seam of the lining. This opening will later be used to turn the entire project right side out.
Prepare the hanging strap by folding the long strip lengthwise with right sides together. Stitch along the long edge and one short end.
Turn the strap right side out using a turning tool or safety pin. Press carefully so the seam runs neatly along one edge.
Topstitch both long sides of the strap for additional strength and a polished appearance. This reinforcement is important because the strap supports the weight of the filled trash bag.
Fold the finished strap in half and attach it temporarily to the center back of the exterior panel. If desired, sew a buttonhole into one end of the strap and prepare a coordinating button that will allow the bag to wrap securely around a vehicle headrest.
Final Assembly and Finishing Touches
Place the exterior bag inside the lining with right sides facing each other. Align all side seams and top edges carefully before pinning or clipping them together.
Sew completely around the upper edge using a consistent seam allowance. Remove excess bulk from the curved corners if needed without cutting through the stitching.
Turn the entire project right side out through the opening left in the lining. Take your time pushing every corner outward until the shape becomes crisp and symmetrical.
Close the lining opening using either a hand ladder stitch or a narrow machine stitch placed close to the folded edge.
Push the lining neatly inside the exterior and press the upper edge thoroughly. A well-pressed edge immediately gives the project a more professional appearance.
Finish by sewing a topstitch around the entire upper opening. This secures the lining, strengthens the opening, and helps the Car Trash Bag Sewing Pattern maintain its shape during everyday use. Finally, sew the button onto the front of the bag so the hanging strap can be fastened securely around a car headrest.
FAQ
Is this Car Trash Bag Sewing Pattern suitable for beginners?
Yes. The project uses straight seams, simple boxed corners, and basic quilting techniques, making it an excellent project for beginners with basic sewing experience.
What fabric works best?
Quilting cotton combined with lightweight interfacing and cotton batting creates a sturdy yet flexible trash bag. Canvas, linen blends, or home décor cotton also work well.
Can I make the bag waterproof?
Yes. You can use laminated cotton, waterproof canvas, or wipe-clean lining fabric for the interior. These materials make cleaning much easier.
How do I clean the finished bag?
Most cotton versions can be machine washed on a gentle cycle and air dried. Always test specialty fabrics before washing.
Can I change the size?
Absolutely. Simply increase or decrease the panel measurements while keeping all proportions consistent. Larger versions work well for family vehicles.
Can this project be used for storage instead of trash?
Yes. Many people use this same Car Trash Bag Sewing Pattern to store toys, tissues, snacks, wipes, umbrellas, reusable shopping bags, or travel accessories.
What batting should I choose?
Lightweight cotton batting is ideal because it adds structure without making the seams too bulky.
How can I personalize the design?
Add embroidery, decorative quilting, personalized labels, contrasting binding, colorful buttons, or themed fabrics to create a unique handmade accessory.
Conclusion
This Car Trash Bag Sewing Pattern is a practical, attractive, and rewarding sewing project that combines organization with creativity. Throughout this tutorial, you learned how to select the right materials, prepare and quilt the fabric panels, sew the exterior body, construct the lining, create a durable hanging strap, form boxed corners for extra capacity, and complete the final assembly with professional finishing techniques.
The finished bag is sturdy, reusable, easy to customize, and perfect for keeping any vehicle clean while adding a handmade decorative touch. Whether you sew one for yourself or make several as thoughtful gifts for family and friends, this project offers endless opportunities for personalization through fabric choices, quilting designs, and finishing details. If you enjoyed this tutorial, please leave your honest opinion about the project and share any suggestions or creative ideas you have for improving or customizing this Car Trash Bag Sewing Pattern.