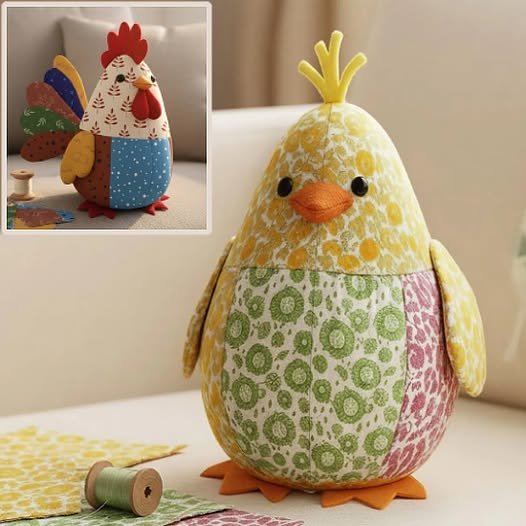
Chichi, the Little Spot Fabric – Tutorial is a delightful journey into the world of character-based sewing and textile art, perfect for those who love creating charming, handmade companions. This project focuses on “Chichi,” a lovable little character characterized by its unique “Little Spot” pattern, which brings a touch of whimsy and personality to any sewing room. Whether you are a seasoned quilter looking to use up your favorite scraps or a beginner eager to complete your first softie, this guide will provide the inspiration and technical details needed to succeed.
Working on a Chichi, the Little Spot Fabric – Tutorial allows you to explore the intersection of precision patchwork and expressive toy making. The “Little Spot” aspect isn’t just a design choice; it represents the meticulous process of selecting the right polka dot fabrics or creating your own “spots” through appliqué techniques. By focusing on these small details, you transform simple fabric remnants into a high-quality, professional-looking collectible that carries a “humanized” touch and a story within every stitch.
In this comprehensive Chichi, the Little Spot Fabric – Tutorial, we will walk through the entire lifecycle of the project, from the initial selection of your cotton prints to the final hidden seam. We have structured this guide to be highly informative and optimized for creators who value both aesthetic beauty and structural durability. Prepare your sewing machine, sharpen your fabric shears, and let’s dive into the creative process of bringing Chichi to life using the most effective sewing techniques and creative layouts.
1. Selecting the Perfect Materials for Chichi, the Little Spot Fabric – Tutorial
The foundation of a successful Chichi, the Little Spot Fabric – Tutorial begins with your textile choices, specifically finding that iconic “Little Spot” pattern. Look for high-quality 100% cotton quilting fabric because it offers the stability needed for the small curves and tight corners of Chichi’s body. A variety of spot sizes—from tiny pin-dots to larger coin-sized circles—can add wonderful visual depth to your character.
When sourcing for your Chichi, the Little Spot Fabric – Tutorial, consider the color theory behind your “Little Spot” selection. Warm tones like mustard yellow or soft coral with white spots create a vintage, cozy feel, while high-contrast black and white spots offer a modern, graphic look. Don’t be afraid to mix and match different polka dot patterns within the same project to give Chichi a quirky, eclectic personality.
Beyond the main body fabric, you will need high-grade polyester fiberfill to ensure Chichi is soft yet firm enough to stand or sit. In this Chichi, the Little Spot Fabric – Tutorial, we recommend using a premium stuffing that doesn’t “clump” over time, maintaining the character’s smooth silhouette. The internal structure is just as important as the external “Little Spot” beauty for long-lasting enjoyment.
Small details require specific tools, so make sure your sewing kit includes fine-tipped embroidery scissors and a reliable fabric marker. For the “Little Spot” theme, you might also want to gather some felt scraps in coordinating colors for Chichi’s facial features or paw pads. These small additions provide a tactile contrast to the smooth cotton fabric used in the main construction of the character.
Thread choice is a technical detail often overlooked in a Chichi, the Little Spot Fabric – Tutorial. Use a strong, 50-weight cotton thread that matches the primary color of your “Little Spot” fabric to make your seams nearly invisible. If you are planning on doing decorative topstitching, a slightly thicker embroidery thread in a contrasting color can make the “spots” pop even more.
Finally, preparation involves washing and pressing your fabric to prevent any future shrinkage. In this Chichi, the Little Spot Fabric – Tutorial, we advocate for a crisp, flat start; an ironed fabric is much easier to mark and cut accurately. Once your “Little Spot” materials are prepped and your workspace is organized, you are ready to move on to the actual pattern layout and cutting.
2. Masterful Cutting and Layout of Your Little Spot Patterns
The next phase of our Chichi, the Little Spot Fabric – Tutorial involves the strategic layout of your pattern pieces onto the “Little Spot” fabric. This is where “fussy cutting” comes into play—a technique where you intentionally position the pattern to highlight a specific spot or cluster of spots. For Chichi, placing a prominent spot right on the belly or the tip of an ear can create a very intentional and professional look.
When laying out the pieces for your Chichi, the Little Spot Fabric – Tutorial, always pay attention to the fabric grainline. Cutting your pieces on the straight grain ensures that Chichi won’t twist or warp once stuffed. Even though the “Little Spot” pattern might look the same from all angles, the underlying weave of the fabric dictates how it will stretch and hold the character’s shape.
Marking your seam allowances clearly is a vital step in this Chichi, the Little Spot Fabric – Tutorial. Use a washable fabric pen to trace your pattern pieces on the wrong side of the “Little Spot” fabric. Since Chichi is a “Little” character, accuracy within a few millimeters is crucial; a seam that is slightly too wide can drastically change the expression and proportions of the final softie.
Safety is paramount, especially if you are making Chichi for a child. During the cutting phase of this Chichi, the Little Spot Fabric – Tutorial, ensure that any small “spot” appliqués are cut with enough margin to be sewn down securely. If you are using safety eyes, mark their placement precisely on the fabric before you begin sewing the body pieces together to ensure a symmetrical face.
Many crafters following this Chichi, the Little Spot Fabric – Tutorial find that using a rotary cutter and a self-healing mat provides the cleanest edges. This is particularly helpful when working with “Little Spot” fabrics that have a lot of visual detail, as it prevents the fabric from shifting during the cut. Clean edges lead to flatter seams and a much more polished “Chichi” character.
Once all your pieces are cut, do a “dry fit” by laying them out on your table. This allows you to see how the “Little Spot” patterns interact with each other across the different parts of Chichi’s body. This visual check is a key part of the Chichi, the Little Spot Fabric – Tutorial, ensuring that the distribution of spots looks balanced and aesthetically pleasing before the first stitch is even made.
3. Precision Sewing and Construction of Chichi
Construction in the Chichi, the Little Spot Fabric – Tutorial begins with the smaller appendages, such as the ears and limbs. Using a short stitch length on your machine will provide extra strength for the tight curves often found in “Little Spot” character designs. Always remember to backstitch at the beginning and end of every seam to prevent the fabric from pulling apart during the stuffing process.
As you join the main body sections of your Chichi, the Little Spot Fabric – Tutorial, pay close attention to the intersection of the “Little Spot” patterns. Pinning or clipping the fabric edges every half-inch will prevent the layers from sliding. For those working on a DIY fabric project, slow and steady sewing is the secret to maintaining the delicate proportions that make Chichi so adorable.
Clipping the curves is a technical necessity in any Chichi, the Little Spot Fabric – Tutorial. Once a seam is sewn, take your scissors and make small snips into the seam allowance around every curve, being careful not to cut the thread. This allows the “Little Spot” fabric to spread out smoothly when turned right-side out, eliminating those awkward “puckers” that can ruin the look of a handmade toy.
Turning Chichi right-side out is a magical moment in the Chichi, the Little Spot Fabric – Tutorial. Use a blunt tool like a chopstick or a specialized turning tool to gently push out the seams. Be extra careful around the “Little Spot” areas to ensure the fabric remains crisp. At this stage, you should see the character’s personality finally starting to emerge from the flat pieces of cotton.
The stuffing process in the Chichi, the Little Spot Fabric – Tutorial requires a “bit by bit” approach. Start with small clumps of fiberfill, pushing them into the furthest extremities like the toes or ear tips. By taking your time, you ensure that Chichi has a smooth, firm surface that showcases the “Little Spot” print perfectly, without any unsightly lumps or empty pockets.
The final closure of the body is done with a ladder stitch (also known as an invisible stitch). This hand-sewing technique is a hallmark of a high-quality Chichi, the Little Spot Fabric – Tutorial, as it hides the opening used for stuffing. When done correctly, the “Little Spot” pattern will appear continuous across the seam, making Chichi look like a professionally manufactured designer plush.
4. Finishing Touches and Embellishing Your Chichi Character
The final section of our Chichi, the Little Spot Fabric – Tutorial focuses on personalization and “humanized” details. Adding a face is what truly brings Chichi to life. You can use embroidery floss to stitch a tiny nose and mouth, or even add a few “extra spots” using fabric paint or small felt circles. These details should complement the “Little Spot” fabric, not overwhelm it.
Consider giving Chichi a small accessory to match its “Little Spot” theme. A tiny bow tie or a simple felt vest made from upcycled fabric scraps can add a layer of narrative to your creation. In this Chichi, the Little Spot Fabric – Tutorial, we encourage you to use your imagination to create a backstory for your Chichi—is it a forest explorer or a sleepy homebody?
For those following this Chichi, the Little Spot Fabric – Tutorial for commercial purposes, adding a small “handmade” ribbon or a custom fabric label is a great way to build your brand. These professional touches increase the perceived value of your “Little Spot” creations. A well-finished Chichi makes for a stunning addition to an online shop or a high-end craft fair display.
Texture can be another form of embellishment. While the “Little Spot” fabric is usually smooth cotton, you could give Chichi a “fuzzy” tail or velvet ears to provide a multi-sensory experience. This Chichi, the Little Spot Fabric – Tutorial is just a template; the real magic happens when you start breaking the rules and adding your own unique flair to the “Little Spot” aesthetic.
Photography is the final “finish” if you plan to share your work online. When showcasing your results from this Chichi, the Little Spot Fabric – Tutorial, use natural lighting to capture the true colors of your “Little Spot” prints. A clean, simple background will ensure that Chichi remains the star of the show, allowing the intricate details of your sewing to shine through for your audience.
We hope this Chichi, the Little Spot Fabric – Tutorial has inspired you to explore the endless possibilities of character-driven sewing. Whether you make one Chichi or a whole family of “Little Spot” friends, the skills you’ve practiced here—precision cutting, curved sewing, and invisible finishing—will serve you in all your future fiber arts endeavors. Your Chichi is now ready to find its forever home or a prominent place on your shelf!
FAQ – Frequently Asked Questions
1. What is the ideal size for the spots in Chichi, the Little Spot Fabric – Tutorial?
The best size for the “Little Spot” pattern usually ranges from 1mm (pin-dots) to 5mm. Since Chichi is a small character, spots larger than 10mm can sometimes overwhelm the facial features and make it harder to see the character’s shape. Scale is key to a successful tutorial outcome.
2. Can I use a sewing machine for the whole Chichi, the Little Spot Fabric – Tutorial?
You can use a machine for about 90% of the project. However, the final closure (after stuffing) and some of the delicate facial details are much better suited for hand-sewing. Using a machine for everything can sometimes lead to jagged edges on such a small-scale character.
3. Is “Chichi, the Little Spot Fabric – Tutorial” suitable for children to sew?
Yes, with adult supervision! The straight seams are great practice for young sewists. The most challenging parts are the small curves and the stuffing, so a child might need help with those “humanized” steps to ensure Chichi looks the way they imagined.
4. How do I prevent the “Little Spot” fabric from fraying?
Using a high-quality quilting cotton is the best defense against fraying. Additionally, using a pinking shears to trim the seam allowances after sewing can help. In this Chichi, the Little Spot Fabric – Tutorial, we also recommend a small stitch length (1.5mm to 2.0mm) to keep the fabric threads locked in place.
5. What should I do if my Chichi character looks lumpy?
Lumpiness usually comes from using too much stuffing at once. To fix this in your Chichi, the Little Spot Fabric – Tutorial, try pulling the stuffing out and re-inserting it in much smaller, fluffed-up pieces. Using a stuffing tool or a wooden dowel to push the fill into the corners will help create a smooth “Little Spot” surface.
Conclusion
This Chichi, the Little Spot Fabric – Tutorial has provided a complete roadmap for creating your very own Chichi character, from the initial selection of “Little Spot” fabrics to the intricate finishing touches. We’ve explored the importance of material quality, the technical precision required for cutting and sewing small-scale characters, and the creative joy of adding “humanized” details that bring your textile art to life.
By mastering these steps, you’ve not only created a beautiful handmade companion but also refined essential sewing and quilting skills that are applicable to a wide range of future projects.