
Children’s Turban Headband Pattern is a delightful sewing project that combines comfort, style, and practicality into a single handmade accessory. Whether you are creating a headband for your own child, as a thoughtful baby shower gift, or to sell at craft fairs, this project is both beginner-friendly and rewarding. With just a few fabric pieces, basic sewing supplies, and a little creativity, you can produce beautiful headbands that fit comfortably while adding a charming finishing touch to any outfit. Throughout this guide, you will learn every step required to create a professional-looking Children’s Turban Headband Pattern from start to finish.
One of the greatest advantages of making a Children’s Turban Headband Pattern yourself is the freedom to personalize every detail. You can choose colorful cotton prints, floral fabrics, animal-themed patterns, seasonal designs, or elegant solids depending on the occasion. Soft woven cotton fabrics are especially suitable because they are breathable, lightweight, and gentle on sensitive skin. By selecting high-quality materials and following careful construction techniques, you can create accessories that are both beautiful and durable for everyday wear.
This tutorial explains the complete sewing process in an easy-to-follow manner while remaining suitable for beginners and experienced sewists alike. Every stage—from choosing materials and cutting the pattern pieces to assembling the elastic casing, creating the decorative bow, and finishing the project—is described carefully. By the end of this article, you will understand not only how to sew a Children’s Turban Headband Pattern, but also how to customize sizes, improve durability, and achieve professional results every time.
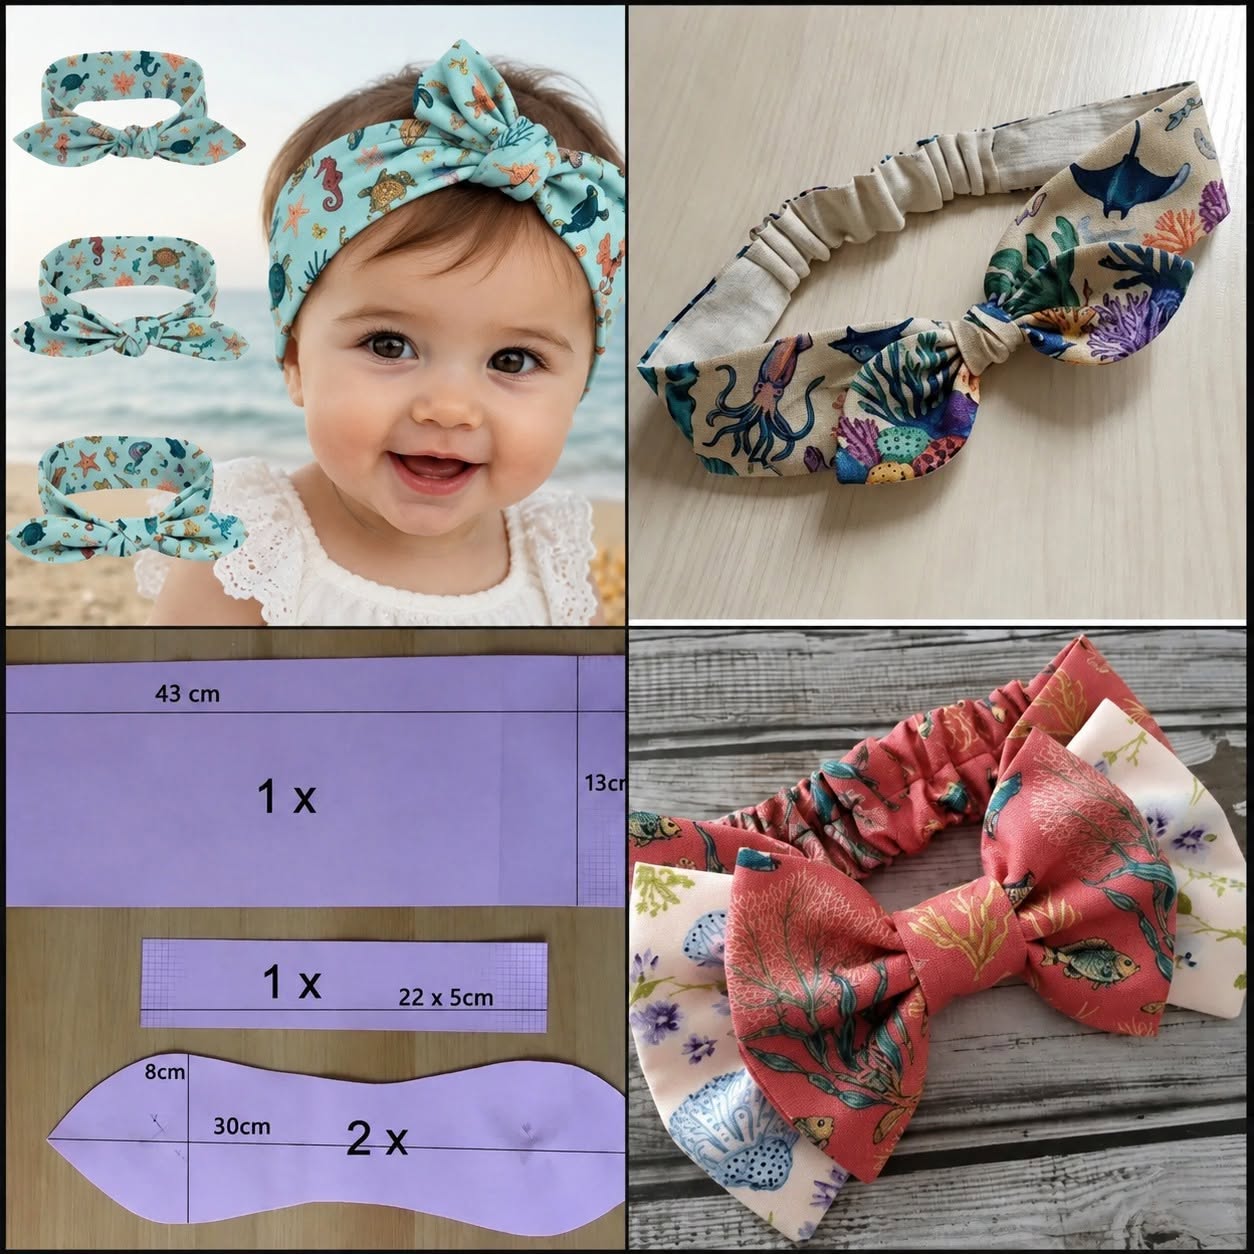
Choosing Materials for a Beautiful Children’s Turban Headband Pattern
Selecting the right materials is one of the most important steps when creating a Children’s Turban Headband Pattern. Lightweight quilting cotton is one of the most popular choices because it offers excellent structure while remaining comfortable for children. Linen blends also work beautifully if you prefer a slightly textured appearance.
For baby headbands, always prioritize soft, breathable fabrics that do not irritate delicate skin. Avoid stiff materials or heavily textured fabrics that may become uncomfortable after extended wear. Pre-washing your fabric before cutting also helps prevent future shrinking.
An elastic band is essential because it allows the headband to stretch comfortably while maintaining a secure fit. Soft braided elastic between 1 and 2 cm wide usually provides excellent flexibility without creating excessive pressure.
Choose matching thread with good tensile strength. High-quality polyester thread generally performs better than inexpensive alternatives because it resists breakage during sewing and everyday use.
Basic sewing tools include sharp fabric scissors, pins or clips, a rotary cutter if available, a cutting mat, measuring tape, fabric marker, ironing board, and a household sewing machine capable of straight stitching.
Finally, press every fabric piece before cutting. Wrinkle-free fabric produces more accurate measurements, cleaner seams, and a polished final appearance that makes your Children’s Turban Headband Pattern look professionally made.
Cutting and Preparing the Children’s Turban Headband Pattern
Before sewing, carefully transfer the pattern pieces onto your prepared fabric. According to the design shown, you will typically cut one long main headband piece, one narrow center band, and two bow pieces. Accurate cutting is essential because even small variations can affect the finished shape.
Mark all dimensions carefully using removable fabric chalk or an erasable marker. Straight grain placement helps maintain stability and prevents twisting after sewing.
After cutting, inspect every piece for clean edges. Small irregularities may become noticeable once the headband is assembled, so trimming carefully now saves time later.
Place the two bow pieces with right sides together. Pin around the edges, leaving a small opening for turning the fabric right side out after stitching.
Sew using approximately a 0.6 cm (¼ inch) seam allowance. Curved edges should be stitched slowly to maintain smooth curves without puckering.
Trim seam allowances slightly around curved sections before turning the fabric. This simple step reduces bulk and helps the bow maintain crisp, attractive curves once pressed.
Sewing the Children’s Turban Headband Pattern Step by Step
Begin by folding the long headband strip lengthwise with right sides facing together. Stitch along the long edge using a straight stitch, creating a fabric tube.
Turn the tube right side out using a safety pin, turning tool, or loop turner. Press the seam flat with an iron so the fabric lies smoothly and evenly.
Prepare the elastic by cutting it to the desired length according to the child’s head measurement. The elastic should fit comfortably without feeling too tight.
Thread the elastic through the fabric tube using a safety pin. Keep one end secured while feeding the elastic through to prevent it from slipping inside completely.
Once both elastic ends are visible, overlap them by approximately 1 cm and stitch several times using a reinforced zigzag stitch for maximum durability. This connection experiences frequent stretching, so secure stitching is essential.
Finally, close the remaining opening by folding the raw edges inward and topstitching neatly. Your elastic section should now gather naturally, creating the characteristic ruched appearance seen in a Children’s Turban Headband Pattern.
Creating the Decorative Bow and Finishing the Children’s Turban Headband Pattern
Take the previously sewn bow piece and gently shape it after pressing. A well-pressed bow immediately gives the finished accessory a more refined appearance.
Wrap the narrow center strip around the middle of the bow. Pull firmly enough to create definition without flattening the bow excessively.
Hand stitch or machine stitch the center strip securely at the back where it will remain hidden. Neat finishing improves both durability and appearance.
Position the completed bow over the gathered elastic section of the headband. Centering the bow creates balanced proportions that complement children’s hairstyles beautifully.
Secure the bow by stitching through several fabric layers. Reinforce the attachment because this decorative element will experience frequent handling during use.
Give the entire Children’s Turban Headband Pattern one final pressing with moderate heat. Check every seam, trim loose threads, and inspect the elastic for even gathering before considering the project complete.
Tips for Customizing Your Children’s Turban Headband Pattern
Personalization is one of the biggest advantages of sewing your own Children’s Turban Headband Pattern. Experiment with floral prints, ocean themes, woodland animals, geometric designs, seasonal fabrics, or classic solids to match different wardrobes.
Mix coordinating fabrics between the headband and bow for a unique boutique-inspired look. Contrasting prints often create playful, eye-catching accessories.
Adjust the elastic length to accommodate babies, toddlers, older children, or even adults. Always measure the wearer’s head circumference before cutting the elastic.
Decorative topstitching can add both style and durability. A straight topstitch close to the edge creates a polished professional finish.
If sewing multiple headbands as gifts or inventory, prepare all fabric pieces at once before assembly. Batch sewing improves efficiency and consistency.
Store finished headbands flat or gently rolled to preserve the bow’s shape and prevent wrinkles until they are ready to wear or package.
FAQ
1. Is the Children’s Turban Headband Pattern suitable for beginners?
Yes. The project uses basic sewing techniques including straight stitching, turning fabric tubes, inserting elastic, and simple finishing methods, making it an excellent beginner project.
2. What fabric works best?
Soft quilting cotton, lightweight linen blends, cotton poplin, and other breathable woven fabrics are excellent choices for children’s accessories.
3. How do I determine the correct elastic length?
Measure the child’s head circumference and subtract approximately 2–5 cm depending on the elasticity of your chosen elastic. Test the fit before permanently sewing the elastic together.
4. Can I wash the finished headband?
Yes. Machine washing on a gentle cycle with mild detergent is generally recommended for cotton fabrics. Air drying helps preserve shape and elasticity.
5. Can I make matching accessories?
Absolutely. Many sewists create coordinating dresses, bibs, bows, scrunchies, baby blankets, or bags using the same fabric collection for a cohesive handmade gift set.
6. What sewing machine needle should I use?
A universal size 80/12 needle works well for most lightweight woven cotton fabrics commonly used in this project.
7. Can I sell headbands made from this pattern?
In most cases, handmade finished products may be sold if you are using your own workmanship and complying with any applicable pattern licensing terms. Always verify the licensing conditions of any commercial pattern you use.
8. How can I make the bow fuller?
Increase the width of the bow pattern piece slightly or use a fabric with more body. Pressing carefully after stuffing and shaping also helps create a fuller appearance.
Conclusion
Creating a Children’s Turban Headband Pattern is an enjoyable sewing project that combines creativity, practicality, and timeless style. Throughout this guide, you learned how to select appropriate fabrics, prepare accurate pattern pieces, sew the elastic headband, construct the decorative bow, assemble every component, and apply finishing techniques that result in a professional-quality accessory. You also discovered useful customization ideas, fitting tips, fabric recommendations, and answers to the most frequently asked questions, making it easier to confidently create beautiful handmade headbands for babies and children.
With patience, careful measuring, accurate stitching, and attention to detail, you can produce charming accessories that are comfortable to wear, durable for everyday use, and suitable for gifts, craft markets, or personal collections. Every new fabric combination offers an opportunity to create a completely unique Children’s Turban Headband Pattern, allowing your creativity to shine with every project.