
Fabric Cup Cover Pattern is a practical and stylish sewing project that combines creativity, sustainability, and everyday convenience. Whether you enjoy sewing for yourself, making thoughtful handmade gifts, or creating products to sell at craft fairs, this simple project offers endless possibilities. A reusable fabric cup sleeve helps protect your hands from hot beverages while adding a personalized touch to your favorite coffee or tea cup. Throughout this guide, you will learn every step needed to create your own Fabric Cup Cover Pattern, from choosing materials to adding beautiful finishing details.
One of the biggest advantages of a Fabric Cup Cover is that it is beginner-friendly while still offering enough room for experienced sewists to customize every detail. The pattern requires only small pieces of fabric, making it a fantastic scrap-busting project. Cotton prints, linen, canvas, and quilting fabrics all work beautifully, allowing you to create unique combinations that match every season, holiday, or personal style. The finished sleeve is lightweight, washable, reusable, and environmentally friendly.
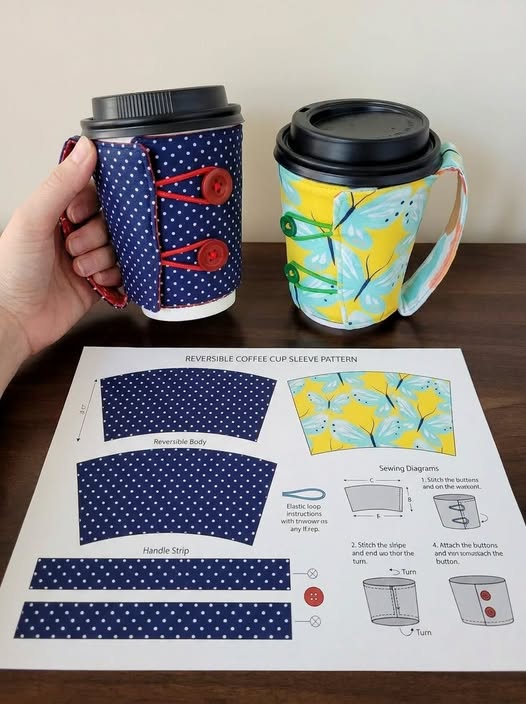
Besides being attractive, this project is incredibly functional. Disposable cardboard coffee sleeves are often thrown away after one use, while a reusable fabric sleeve can last for years with proper care. By sewing your own Fabric Cup Cover Pattern, you reduce waste while enjoying a comfortable grip on hot drinks. The reversible design shown in the project allows you to enjoy two different fabric styles in one accessory, making it both practical and fun to use every day.
Choosing Materials and Preparing the Fabric Cup Cover Pattern
The first step is selecting quality materials. Quilting cotton is one of the most popular choices because it is easy to sew, durable, and available in countless beautiful prints. You will also need lightweight interfacing to give the sleeve enough structure without making it bulky. A small elastic loop and decorative button will create a secure closure around the cup.
Before cutting the fabric, wash, dry, and press all cotton materials. Prewashing removes any shrinkage that could occur after the project is completed. Ironing the fabric also ensures more accurate cutting and cleaner seams.
Prepare two body pieces using the curved sleeve pattern. One piece will become the exterior, while the second becomes the lining. Since this project is reversible, both fabrics should coordinate nicely. Floral prints, polka dots, geometric designs, or solid colors all create attractive combinations.
Cut one long strip for the handle section according to your pattern measurements. This strip forms the comfortable grip that allows you to hold the cup more securely. Make sure the strip is cut straight with smooth edges.
Fuse lightweight interfacing to the wrong side of the exterior body piece. This additional layer helps the sleeve maintain its shape even after repeated washing and daily use. Avoid heavy interfacing because it can make the sleeve stiff.
Finally, gather matching thread, sewing clips or pins, fabric scissors, measuring tools, and your sewing machine. Organizing everything before beginning makes the sewing process much smoother and more enjoyable.
Step-by-Step Sewing Instructions for the Fabric Cup Cover Pattern
Start by placing the two body pieces right sides together. Align every curved edge carefully and pin or clip them securely to prevent shifting while sewing.
Stitch around the curved perimeter using approximately a 1/4-inch seam allowance. Leave a small opening along one side so the project can be turned right side out later. Sewing slowly around the curves helps maintain a neat shape.
Trim the seam allowances slightly around the curved sections without cutting through the stitches. Small notches along the curves help the fabric lie flat once it is turned. This simple step creates a much more professional finish.
Turn the sleeve right side out through the opening. Use a blunt turning tool or chopstick to gently push out the curved edges without damaging the fabric. Press everything thoroughly with a warm iron to achieve crisp edges.
Topstitch around the entire body piece close to the edge. This closes the turning opening while adding strength and a polished appearance. Even topstitching also helps the sleeve keep its shape during regular use.
Fold the long handle strip according to the pattern instructions. Stitch along the edges, turn it right side out, press carefully, and sew it securely onto the body of the sleeve. Attach the elastic loop on one side before securing the decorative button on the opposite side. Test the closure around a coffee cup to ensure a comfortable but secure fit.
Customizing Your Fabric Cup Cover Padrao for Different Styles
One of the best features of the Fabric Cup Cover Pattern is its endless customization possibilities. Changing fabrics instantly creates a completely different appearance without altering the basic construction.
Seasonal fabrics are especially popular. Christmas prints, autumn leaves, spring florals, patriotic designs, Halloween themes, or winter snowflakes allow you to create sleeves for every holiday throughout the year.
Decorative stitching can add another layer of personality. Try contrasting thread, decorative machine stitches, or simple quilting lines across the exterior fabric before assembling the sleeve. These details increase durability while adding visual interest.
Embroidery also works beautifully on this project. Personalize the sleeve with initials, names, small flowers, coffee-themed designs, or inspirational words before sewing the pieces together. Handmade personalization makes wonderful gifts.
Different closure options provide even more flexibility. While buttons and elastic loops are traditional, snaps, hook-and-loop fasteners, or wooden toggles can also create attractive and functional closures depending on your preferred style.
If you plan to sell finished sleeves, creating coordinated fabric collections can make your display more appealing. Offering matching mug rugs, tote bags, zipper pouches, or placemats alongside your Fabric Cup Cover Pattern creates attractive handmade gift sets.
Tips for Professional Results and Long-Term Care
Accurate cutting is one of the most important factors in achieving professional-looking results. Even small differences in curved pieces can affect the final fit around the cup.
Always press after every major sewing step. Pressing creates crisp seams, improves accuracy, and gives handmade projects a polished appearance that distinguishes them from rushed sewing.
Choose quality thread that matches both durability and color. Strong polyester thread performs well for everyday use and withstands repeated washing without weakening.
When attaching the elastic loop, test the closure before permanently sewing the button into place. Different buttons vary slightly in thickness, so adjusting the elastic length beforehand ensures the perfect fit.
Machine wash the finished sleeve using cold or warm water with mild detergent. Air drying or tumble drying on low heat helps preserve both the fabric colors and the interfacing structure for many years.
Finally, enjoy experimenting with different fabric combinations. The more sleeves you create, the more confident you will become in choosing coordinating prints, improving stitching accuracy, and adding your own creative touches to every Fabric Cup Cover Pattern.
Frequently Asked Questions
Is the Fabric Cup Cover Pattern suitable for beginners?
Yes. This project uses simple sewing techniques, making it an excellent choice for beginners who want to practice curved seams and basic construction.
Which fabric works best?
100% quilting cotton is the most popular option because it is durable, easy to sew, washable, and available in many beautiful designs.
Should I use interfacing?
Yes. Lightweight fusible interfacing gives the sleeve stability while keeping it soft and flexible enough for everyday use.
Can I make the sleeve reversible?
Absolutely. Using two coordinating fabrics creates a fully reversible design, giving you two different looks in one project.
How do I adjust the size for different cups?
Simply widen or narrow the curved body pattern while maintaining the overall shape. Test the fit using paper before cutting fabric.
Can I wash the finished sleeve?
Yes. Machine wash using mild detergent and allow it to air dry or tumble dry on low heat for the best results.
Can I sell finished Fabric Cup Cover Pattern sleeves?
If you create the sleeves yourself and have permission to use the pattern commercially when required, handmade finished products are often suitable for craft fairs, markets, and small businesses.
What other embellishments can I add?
Embroidery, quilting, decorative stitching, lace trim, labels, faux leather tags, or fabric appliqués all work beautifully.
Conclusion
Creating your own Fabric Cup Cover Pattern is a rewarding sewing project that combines functionality, sustainability, and creativity. Throughout this guide, you learned how to select the right materials, prepare your fabric, cut accurate pattern pieces, assemble the reversible sleeve, attach the handle and closure, customize the design, and care for the finished project. With only a small amount of fabric and a little sewing time, you can create a reusable coffee cup sleeve that is both beautiful and practical.
As you gain confidence, don’t hesitate to experiment with new fabrics, seasonal prints, quilting techniques, embroidery, and decorative finishes. Every version of your Fabric Cup Cover Pattern can become a unique handmade accessory or a thoughtful gift for family and friends.