
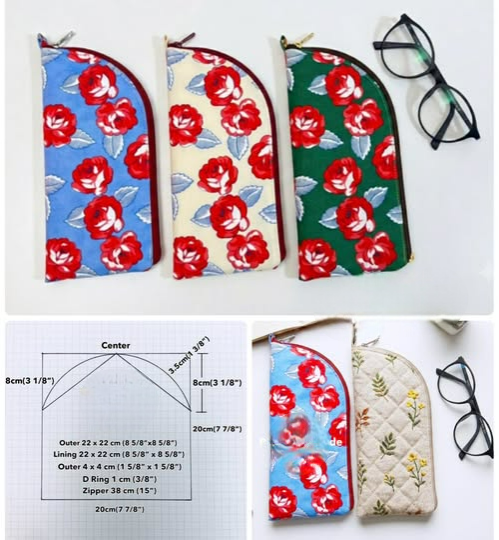
Fabric Eyeglass Case with Curved Zipper Pattern is a practical and attractive sewing project designed to protect eyeglasses while turning small pieces of fabric into a useful handmade accessory. The distinctive feature of this design is the zipper: instead of running only across a straight top edge, it follows the rounded upper section and continues down the side of the case. This creates a wide opening that makes it much easier to insert or remove glasses. The floral examples shown in the reference image also demonstrate how beautifully the shape works with colorful printed cotton. With careful cutting, light padding, and accurate zipper installation, this fabric eyeglass case can have a polished appearance while remaining approachable for home sewing. It is also an excellent project for using coordinated fabric scraps left from larger quilting or sewing projects.
The Fabric Eyeglass Case with Curved Zipper Pattern shown in the photo begins with an approximately square construction piece that is shaped at the upper portion to create the characteristic curved profile. The reference diagram indicates pieces around 22 x 22 cm (8 5/8 x 8 5/8 inches) for both the outer fabric and lining, along with a zipper approximately 38 cm (15 inches) long. The finished case is roughly 20 cm (7 7/8 inches) tall, although the exact finished dimensions can vary slightly depending on seam allowances, padding thickness, and how closely the zipper is stitched to its teeth. The curve begins near the upper sides, approximately 8 cm (3 1/8 inches) below the center-top area in the reference, creating enough room for the zipper to travel smoothly around the rounded edge. These proportions provide a useful starting point rather than an absolute rule, especially because glasses vary considerably in size.
One of the advantages of this eyeglass case sewing pattern is that it combines several useful sewing skills in one relatively compact project. You can practice working with a lining, adding lightweight batting or interfacing, sewing around curves, installing a zipper, clipping curved seam allowances, and finishing a small accessory neatly. The case can be made in floral cotton like the examples, but solids, geometric prints, small patchwork panels, linen blends, or coordinated quilting fabrics can work equally well. For everyday glasses, choose fabric that is durable but not excessively bulky. The interior should preferably be smooth and clean so that frames can slide inside easily. Remember that handmade fabric cases provide useful protection against everyday scratches and light contact, but they are not intended to replace a rigid protective case when strong impact or crushing is a concern.
Materials, Measurements, and Preparing the Curved Pattern
For one Fabric Eyeglass Case with Curved Zipper Pattern, prepare an outer fabric piece approximately 22 x 22 cm (8 5/8 x 8 5/8 inches) and a lining piece of the same approximate size. You will also need lightweight batting, fusible fleece, or another suitable stabilizer. A zipper approximately 38 cm (15 inches) is a useful length for the proportions illustrated in the reference project. Have coordinating thread, fabric scissors or a rotary cutter, pins or sewing clips, a marking tool, ruler, iron, and sewing machine ready before beginning.
The term outer fabric refers to the visible material on the outside of the finished eyeglass case. Quilting cotton is especially convenient because it is easy to cut, press, and sew. If you choose a directional floral print, inspect the orientation before cutting. The red floral motifs in the reference examples are arranged attractively across the front, demonstrating why thoughtful fabric placement can make even a simple accessory look professionally planned.
The lining fabric forms the interior surface that comes into contact with the eyeglasses. Cut it using the same basic pattern as the exterior. A smooth cotton is usually a practical choice. Avoid unnecessarily rough embellishments inside the case because the goal is to create a comfortable storage area for the glasses. Press the lining before cutting so wrinkles do not alter the dimensions of your pattern pieces.
Next, prepare the basic curved zipper pattern. Start with the approximately 22 cm square template and mark the center of the upper edge. According to the proportions visible in the reference diagram, mark points approximately 8 cm (3 1/8 inches) down each side. Draw smooth curves from these side marks toward the upper center. Rather than creating an abrupt corner, use a French curve, plate, flexible ruler, or carefully drawn freehand line to produce a gentle transition that a zipper can follow.
The reference drawing also appears to indicate approximately 3.5 cm (1 3/8 inches) near the upper curved area. Treat this measurement as a shaping reference when reproducing the photographed design rather than as a universal requirement. What matters most is creating two smooth, symmetrical curves. Fold a paper template vertically at the center before cutting the curve if you want both sides to match precisely. This simple technique can greatly improve the symmetry of your finished handmade eyeglass case.
Finally, cut the outer fabric, lining, and stabilizer according to your prepared template. If using fusible fleece, follow the product instructions when attaching it to the wrong side of the outer fabric. If you are using ordinary batting, temporarily secure it with light basting or a few strategically placed pins. Trim away obvious excess bulk where necessary while keeping enough material to maintain the shape. Press carefully after each preparation stage because accurate pressing is one of the easiest ways to improve the final appearance.
Quilting and Building the Padded Fabric Layers
The next stage of the Fabric Eyeglass Case with Curved Zipper Pattern is creating a stable body. Lightweight padding gives the case structure and helps cushion the contents. Place the outer fabric right side up over the batting or fusible fleece. Smooth everything from the center toward the edges so that no folds remain. If the fabric shifts easily, baste around the perimeter within the future seam allowance before beginning any decorative quilting.
You can leave the exterior relatively simple, or you can add machine quilting for texture and stability. The beige example in the photograph demonstrates how quilting can create a more structured appearance. Straight diagonal lines, diamonds, gentle crosshatching, or parallel lines are all suitable options. Keep the quilting moderate because excessive stitching can make a small accessory stiff and difficult to turn.
If you choose a floral print similar to the reference, simple quilting is often enough. A highly decorative fabric already provides visual interest, so complicated stitching is unnecessary. Quilting approximately every 1 to 1 1/2 inches (2.5 to 3.8 cm) can provide stability without overwhelming the design. These intervals are optional and can be adjusted according to the batting, fabric, and appearance you prefer.
After quilting, place the paper template over the padded exterior again and check the shape. Quilting can sometimes cause slight shrinkage or distortion. Trim the piece back to the intended dimensions if necessary, paying particular attention to the curved upper edges. A clean curve is important because any bumps or sharp changes in direction become more noticeable after the zipper is attached.
Prepare the lining separately and compare it with the quilted outer section. Both should follow essentially the same outline. If your batting is thick, you may find that the lining benefits from being trimmed a tiny amount after construction, but avoid removing too much at this stage. It is easier to make a small adjustment later than to correct a lining that has accidentally become too small.
Before proceeding, place your eyeglasses over the fabric temporarily to check scale. Large sunglasses, oversized frames, or thick prescription frames may require additional width or length. For unusually large glasses, increase the original pattern proportionally and test it with inexpensive scrap fabric first. A custom fabric glasses case should hold the frames comfortably without forcing the zipper against them.
How to Sew the Curved Zipper and Assemble the Case
The zipper is the defining feature of this Fabric Eyeglass Case with Curved Zipper Pattern. Begin by identifying the center of the zipper tape and the center of the curved upper edge. Mark these positions lightly. Matching centers first helps distribute the zipper evenly around both sides of the curve. Sewing clips can be particularly convenient here because they hold the zipper without distorting the padded layers.
Position the zipper so its teeth remain clear of the seam line. Work gradually around the first curve instead of trying to force the entire zipper into position at once. The zipper tape needs to follow the rounded shape naturally. Make small adjustments as you clip or pin it. If necessary, carefully manipulate only the zipper tape so it relaxes around the curve, taking care not to damage the zipper teeth or compromise the tape.
Using a zipper foot, stitch slowly along the zipper tape. A stitch length around 2.5 to 3 mm is a reasonable starting point for many woven cotton projects, although your machine and fabric may require adjustment. Stop periodically with the needle down, lift the presser foot, and reposition the fabric when navigating the curve. This technique helps maintain an even distance from the zipper teeth and reduces puckering.
Add the lining so the zipper edge is enclosed neatly between the exterior and interior layers. Depending on your preferred construction sequence, you can sew the outer fabric to the zipper first and then attach the lining, or sandwich the zipper between the two layers and sew them together. After stitching, gently pull the layers away from the zipper teeth and press carefully. Topstitching near the zipper can help prevent the lining from becoming caught during use.
Repeat the process along the remaining curved section. Keep checking that the zipper opens and closes freely. This is especially important before sewing the final body seams because correcting zipper problems is much easier while the project is still open. Do not sew so close to the teeth that the slider becomes difficult to move. A smooth zipper is more important than an extremely narrow line of topstitching.
Once the zipper is installed, arrange the case into its final shape and sew the remaining seams according to your construction method. Leave an opening in the lining if your assembly requires turning the case right side out. Trim bulky seam allowances and clip the curved seam allowance carefully, making small snips without cutting through the stitching. Turn the case through the opening, gently shape the curves, and close the lining opening with a neat machine stitch or discreet hand stitching.
Finishing, Customizing, and Getting Professional Results
After turning your Fabric Eyeglass Case with Curved Zipper Pattern, use your fingers or a blunt turning tool to shape the upper curves. Avoid using sharp objects that might pierce the fabric. Press the finished case lightly, protecting synthetic batting and the zipper from excessive heat. The goal is to flatten unwanted wrinkles while maintaining the soft padded structure that helps protect the glasses.
Check the zipper several times. It should travel smoothly around the curved section without catching the lining. If the lining approaches the teeth too closely, secure it farther away with additional topstitching. This small finishing detail can significantly improve everyday usability. Also inspect the zipper ends and reinforce them if necessary, since these areas receive repeated stress whenever the case is opened.
A small fabric zipper tab can be added near the end of the zipper if desired. The reference diagram appears to include a small approximately 4 x 4 cm (1 5/8 x 1 5/8 inch) fabric component, which can be adapted as a neat finishing tab depending on your chosen construction. Fold the raw edges inward, press the small piece, and stitch it securely around the appropriate zipper end. Keep the finished tab compact so it does not interfere with opening the case.
Color choice is another enjoyable part of this project. The photograph shows blue, cream, and green backgrounds combined with striking red floral motifs. You could create a coordinated set using the same print in several background colors, or make each quilted eyeglass case completely different. Contrasting zipper tape can create a decorative outline around the curved edge, while a matching zipper produces a quieter and more integrated appearance.
For better results, avoid rushing the curved zipper installation. One of the most common mistakes is stretching either the fabric or zipper tape while sewing. This can create ripples around the finished edge. Instead, clip frequently, sew slowly, and allow the materials to follow the curve naturally. A test version made from scrap fabric can be worthwhile if you have never installed a zipper around a rounded edge.
Your completed case can be used for reading glasses, prescription glasses, or similarly sized accessories, provided you adjust the dimensions when needed. It can also make a thoughtful handmade gift. Because the project requires relatively small pieces of fabric, it is an appealing way to use favorite remnants. Once you understand the basic Fabric Eyeglass Case with Curved Zipper Pattern, you can experiment with patchwork exteriors, decorative quilting, contrasting linings, personalized fabric combinations, and different levels of padding.
Frequently Asked Questions About the Fabric Eyeglass Case with Curved Zipper Pattern
What size fabric do I need for this eyeglass case?
For the proportions shown in the reference image, begin with outer and lining pieces approximately 22 x 22 cm (8 5/8 x 8 5/8 inches). You will also need a similarly sized piece of lightweight stabilizer or batting. Always compare the pattern with the glasses you intend to store before cutting your final fabric.
How large is the finished case?
The reference pattern indicates a finished height of approximately 20 cm (7 7/8 inches). The exact finished width and internal capacity will depend on your curve, seam allowance, batting thickness, and zipper installation.
What zipper length should I use?
A zipper approximately 38 cm (15 inches) is indicated in the reference diagram. A slightly longer zipper can sometimes be easier to handle during construction because the slider can be moved away from the area being stitched. Excess zipper length can be managed according to the type of zipper and your chosen finishing method.
What is the best fabric for a Fabric Eyeglass Case with Curved Zipper Pattern?
Quilting cotton is an excellent choice for beginners because it is stable, widely available, and easy to press. Cotton-linen blends and other medium-light woven fabrics may also work. Very stretchy fabric can make accurate zipper installation more difficult unless it is appropriately stabilized.
Should I add batting or interfacing?
Yes, some form of stabilization is recommended if you want a softly padded case similar to the photographed examples. Lightweight fusible fleece is convenient, while thin batting can produce a quilted effect. Avoid extremely thick padding around the zipper because excessive bulk can make the curved edge difficult to sew.
Can beginners sew a curved zipper?
Yes, although the zipper is likely to be the most challenging stage. Beginners should use plenty of clips, sew at a controlled speed, and reposition the fabric frequently. Making a practice sample can help you understand how zipper tape behaves around a curve before working with your favorite fabric.
How do I stop the lining from getting caught in the zipper?
After installing the zipper, press the lining away from the zipper teeth and add a narrow line of topstitching where appropriate. Before completing the case, open and close the zipper several times to make sure the lining stays clear.
Can I make the pattern larger for sunglasses?
Absolutely. Measure the sunglasses at their widest and tallest points and provide additional room for thickness, seams, and ease. Oversized frames should never be forced into the case. Making a quick test case from inexpensive fabric is a useful way to confirm your enlarged dimensions.
Do I need to quilt the fabric?
No. Quilting is optional, particularly if you use fusible fleece or another stable interfacing. However, quilted fabric can provide extra texture and help hold non-fusible batting in place. Simple diagonal or straight lines are sufficient for this small project.
How can I make the curved edges look smoother?
Start with a symmetrical paper template, cut accurately, and sew the zipper without stretching the fabric. When curved seams are enclosed, carefully clipping the seam allowance helps the fabric spread after turning. Gentle pressing and patient shaping will also improve the final curve.
Can this case protect glasses from being crushed?
A padded fabric case offers useful everyday protection against scratches and light bumps, but it does not provide the same structural protection as a rigid hard-shell case. If the glasses will be stored under heavy objects or transported where crushing is possible, a hard case is the safer option.
What seam allowance should I use?
A seam allowance of approximately 1/4 inch (6 mm) is convenient for many small sewing projects, but the best choice depends on how your template was drafted. If your pattern dimensions already include seam allowance, follow those dimensions consistently throughout the project rather than adding additional allowance.
Conclusion
The Fabric Eyeglass Case with Curved Zipper Pattern combines practical construction with an elegant shape that can showcase beautiful fabrics. Starting with approximately 22 x 22 cm outer and lining pieces, lightweight padding, and a 38 cm zipper provides proportions similar to those shown in the reference image. The most important stages are creating symmetrical upper curves, stabilizing the exterior, carefully guiding the zipper around the curved edge, adding a smooth lining, and finishing the seams without unnecessary bulk.Throughout this tutorial, you learned how to prepare the eyeglass case sewing pattern, choose appropriate materials, create the padded exterior, install the curved zipper, assemble the lining, shape the curved seams, and customize the finished accessory. Once you become comfortable with the basic construction, the same idea can be adapted with different prints, quilting designs, zipper colors, and dimensions to create personalized cases for different styles of glasses.
This is also a satisfying project for using smaller pieces from your fabric collection instead of allowing beautiful scraps to go unused. Floral prints can produce a cheerful vintage-inspired result like the examples in the photo, while modern geometric fabrics can completely transform the appearance without changing the construction method. Careful measuring, slow stitching around the curves, and good pressing are the details that make the biggest difference.If you make your own Fabric Eyeglass Case with Curved Zipper Pattern, leave your sincere opinion about the project and share any suggestions you may have. It is always interesting to hear which fabrics, quilting styles, zipper colors, or construction techniques worked best for other sewing enthusiasts, and your ideas may inspire new variations of this useful handmade accessory.